# FAQ

### What is warp.green?

warp.green is a protocol that allows messages to be passed between supported chains (Chia and Ethereum & Base) via a trusted set of validators. Any app can integrate with the protocol to communicate across blockchains. At launch, two basic apps were also provided: an ERC-20 bridge and a CAT bridge.

### What does 'Beta' mean?

Almost 300 tests check if our Solidity contracts behave as expected, and simulated messaging/bridging operations ensure our puzzles work correctly. We've been on testnet for a while, and have gone through a round of security audits. That being said, the bridge is a very important piece of infrastructure, so we'd like to be very cautious.

Beta means that we're monitoring everything very closely to catch any bugs that might've not been fixed during the testnet phase. Validators might still change their infrastructure, so some downtime might occur during beta.

### I've encountered an error while bridging - what should I do?

Refresh the page. If you want to resume an ongoing transfer, please go to [warp.green/explorer](https://www.warp.green/explorer), find it, and click 'Complete Relay'.

If you still have problems, please [contact us](/users/contact-us).

### Are you secure?

Security is a continuous effort. For this bridge, two aspects are important:

* **Validators**: Compromising a supermajority of validators (i.e., 7 out of 11) could allow a malicious actor to take control of the protocol and apps built on top of it (e.g., bridges). During the selection process, technical ability and experience with highly-secure systems were a major consideration in the decision of whether to invite a party to become a validator or not.
* **Code**: Alternatively, an exploit could lead to invalid messages being passed (in which case warped assets could lose their peg, and other apps using the bridge would also suffer). Before mainnet launch, Chia Network, Inc. has reviewed our chialisp puzzles, and our Solidity contracts have gone through [an audit](https://hacken.io/audits/warp.green) from Hacken, a firm specializing in blockchain security. We're also maintaining a [bug bounty ](https://github.com/warpdotgreen/cli/blob/master/SECURITY.md)pot with funds to be given for responsible disclosures. Shortly after launch, Zellic, another security-focused company, has performed [another audit](https://github.com/Zellic/publications/blob/master/warpdotgreen-cli%20-%20Zellic%20Audit%20Report.pdf) on our Solidity contracts.

### What are the fees associated with bridging?

There are three main 'fees' that users have to keep in mind:

* **Network transaction fees**: Each bridging operation involves transactions on the source and destination chains (one on each, plus a possible token spend approval transaction on EVM chains). Users initiate both transactions and have to pay the associated network fees.
* **Message tolls**: In order to prevent spam, the user is expected to pay low amounts of ether/chia when sending a message. These tolls are intended to prevent spam and get redirected to the block builder (e.g., miner/farmer). Please note that tolls may be updated at any time.
  * For messages originating from Chia, the toll is `0.001 XCH`
  * For messages originating on Base/Ethereum chains, the toll is `0.00001 ETH`
* **Bridge tips**: Bridge contracts redirect a small portion of the funds (0.3%) to the protocol. A minimum tip of 1 mojo is enforced by the contracts, which means that the minimum total transfer amount is 2 mojos worth of any token.

### Who are the validators?

The validators that secure the warp.green protocol are:

* yakuhito from TibetSwap & FireAcademy.io
* Bufflehead (The dexie Team)
* The SpaceTime Team
* The SpaceScan.io Team
* The Chain HQ Team
* The Ozone Wallet Team
* tjump from XCHscan.com
* M.G. from Primer Security
* The MIDL.DEV Team
* GIRITEC.COM

Please note that validators operate through several legal entities; the list above is only intended to give a sense of the people and teams maintaining them. For any message to be successfully relayed, 6 of the 10 validators need to sign it.

### What are the risks associated with bridging?

When bridging, you're exposed to multiple risks. Among them, we'd like to outline:

* **Underlying blockchain risks**: One of the involved chains might experience consensus failure. This would likely lead to assets that cannot be unwrapped, and messages that have been delivered might become invalid.
* **Smart contract / puzzle risks**: A vulnerability in the puzzles, smart contracts or overall design might allow malicious actors to steal user funds. To minimize this risk, we have undergone audits for both sides of the bridge - see questions above for more information.
* **Validator risk**: When relying the warp.green protocol, you're trusting that a majority of validators are honest and have not been compromised. For a list of the validators, please see the questions above.


# Bridge Guide

How to bridge ETH from Base to Chia using the warp.green bridge, Metamask, and the reference Chia wallet

{% hint style="info" %}
This section has been moved here from the official Chia documentation and depicts one setup that can be used with the bridge. The bridge interface supports other Chia wallets, including [Sage](https://sagewallet.net/) and [Goby](https://www.goby.app/).
{% endhint %}

## Intro

A *cryptocurrency bridge* is a powerful tool that enables seamless transfers of digital assets between different blockchain networks, breaking down the barriers of blockchain interoperability. The first Chia blockchain bridge by warp.green is now available, paving the way for anyone to access XCH.

As the first of many bridges to come, warp.green marks an exciting milestone in our journey toward greater access to chia (XCH). To help you get started, here's a introductory guide on how to use the Warp.Green bridge.

## The warp.green Bridge

The [warp.green bridge](https://www.warp.green/) is a messaging protocol that enables bridging assets between Chia and other blockchains. It is an open-source project located on [GitHub](https://github.com/warpdotgreen). It was developed by warp.green, which is not affiliated with Chia Network Inc.

This guide will show you how to send ETH from the [Base](https://www.base.org/) blockchain (an Ethereum L2) to the Chia blockchain. The transfer will take a total of 15-20 minutes, though the initial setup could take considerably longer if you are not familiar with the technologies involved.

{% hint style="info" %}
It is also possible to bridge assets from Ethereum to Chia, but we chose the Base chain for this guide because it tends to have lower fees.

In addition, it is possible to bridge assets in the other direction: from Chia to Ethereum/Base. This guide doesn't demonstrate this functionality, but the basic technique is quite similar.

Finally, note that the bridge is set up to allow for bridging *any* Chia or Ethereum asset. However, only a limited number of assets are currently supported. A list of supported assets is maintained at [warp.green/bridge/assets](https://www.warp.green/bridge/assets).
{% endhint %}

## Set up MetaMask

[MetaMask](https://metamask.io/) is one of the most popular wallets for storing digital assets such as ETH, and it supports the Base blockchain. We will use MetaMask for this guide, so if you want to follow along, you will need to install it as a web browser extension. But don't worry – if you want to use a different Base wallet, the instructions will likely be similar.

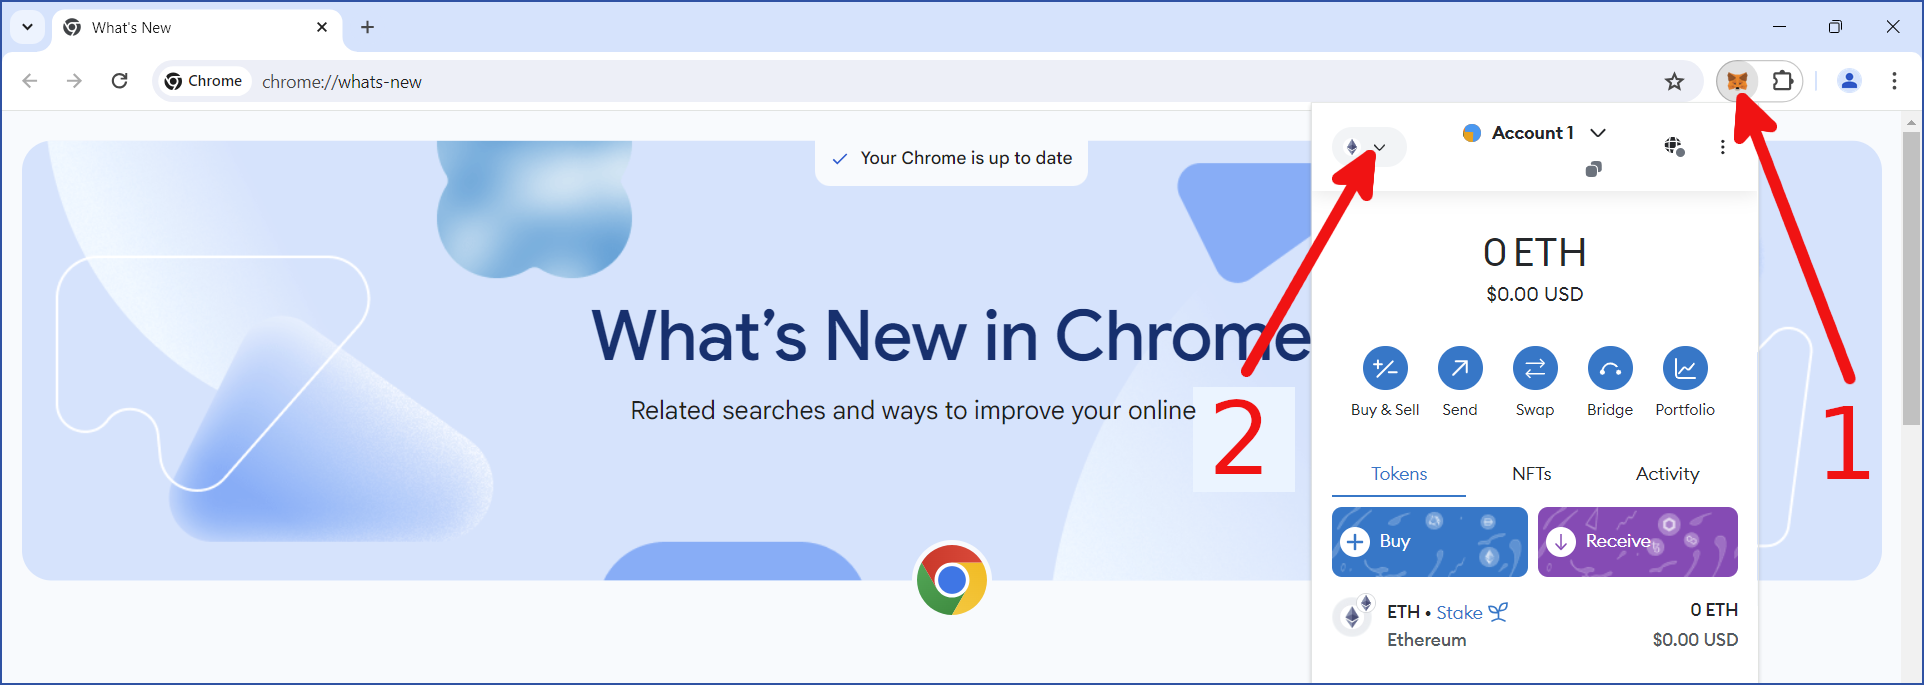
After you have installed MetaMask, click the browser extension button ("1" in the following image), then click the dropdown to change blockchains ("2"):

<div align="center"><img src="/files/MCoR0cmNPZQahV2f5Moh" alt="" width="800"></div>

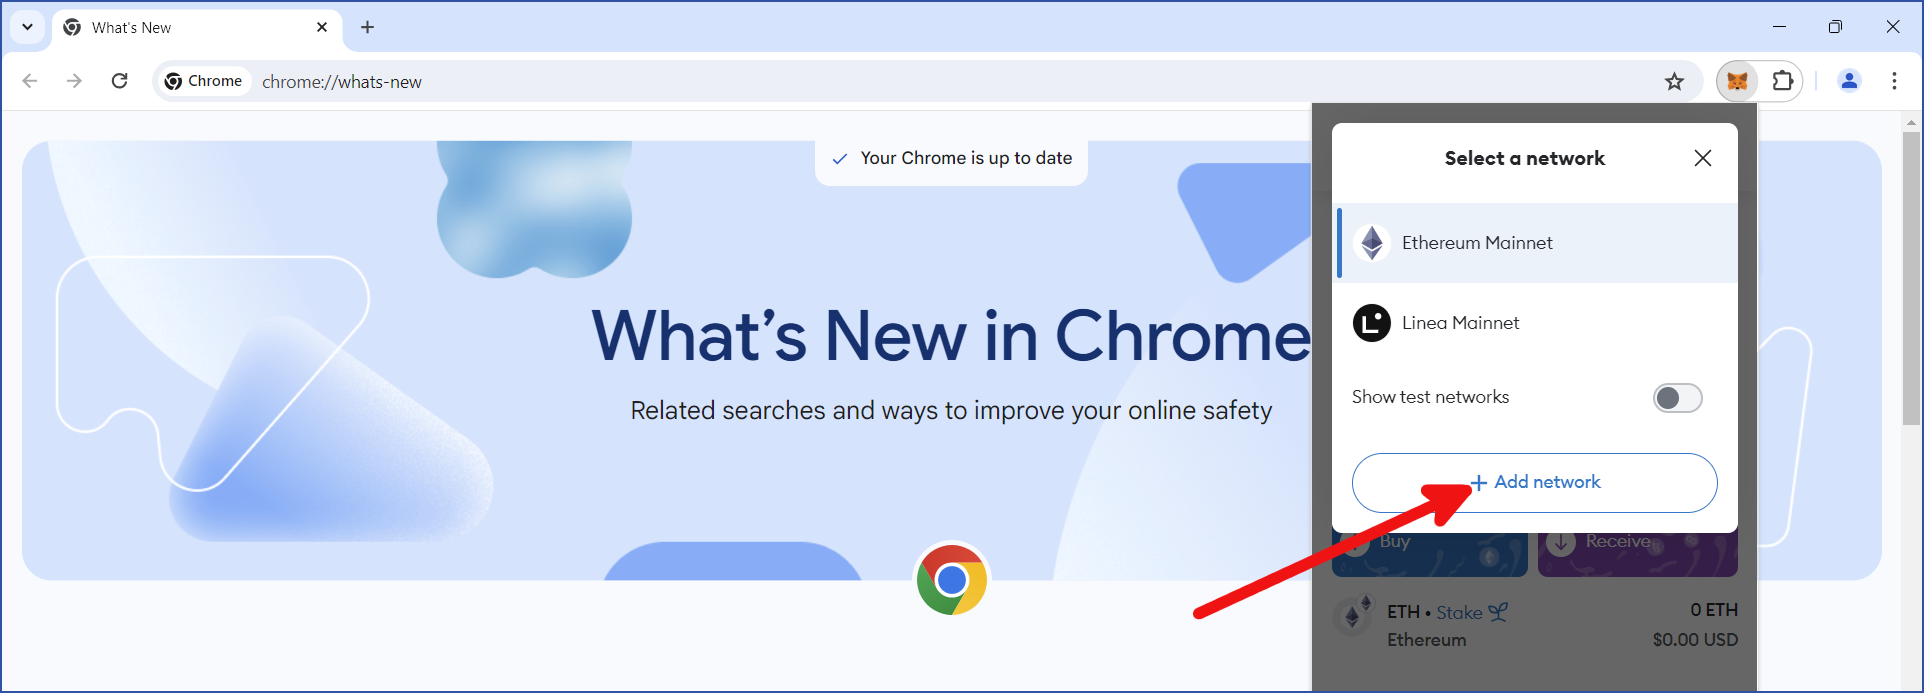
By default, Ethereum's mainnet will be selected. The warp.green bridge *will* work with this network, but for this guide, we will use Base instead. Click `+ Add network`:

<div align="center"><img src="/files/4hxtMyDJyehMLXpGt7tQ" alt="" width="800"></div>

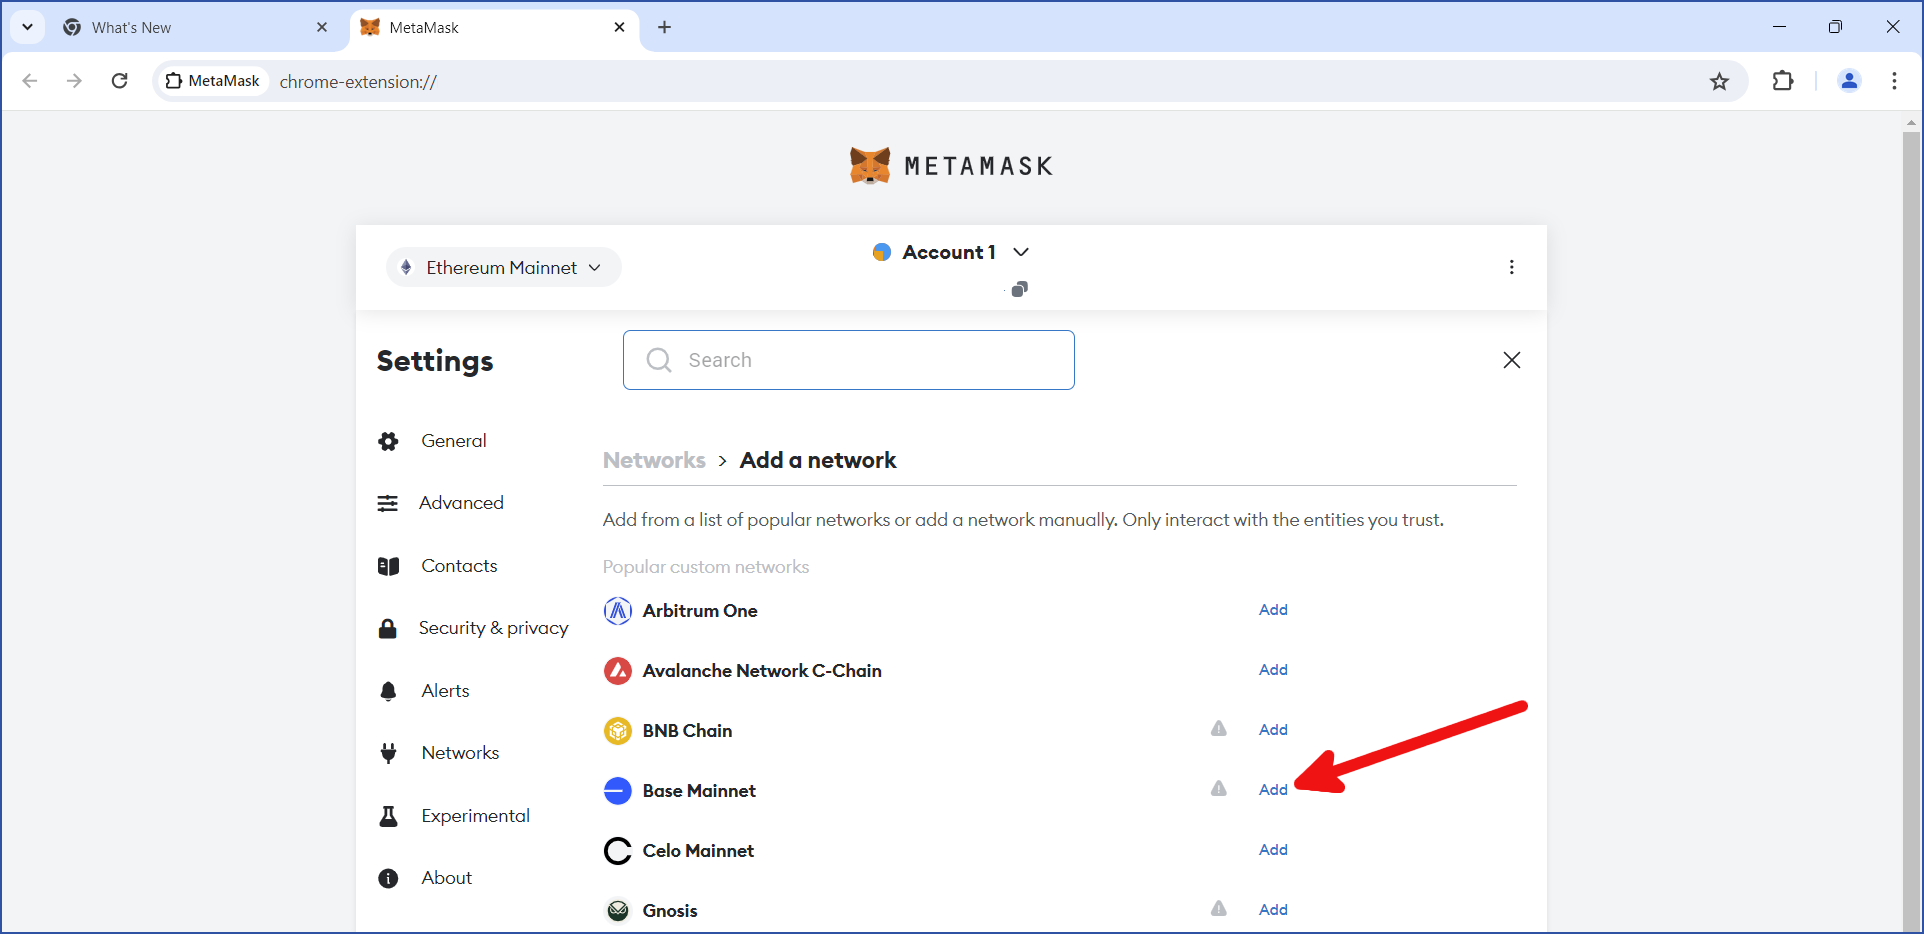
Several supported networks will be displayed. Locate `Base Mainnet` and click `Add`:

<div align="center"><img src="/files/dMdZowSLIc0rbasXgzFj" alt="" width="800"></div>

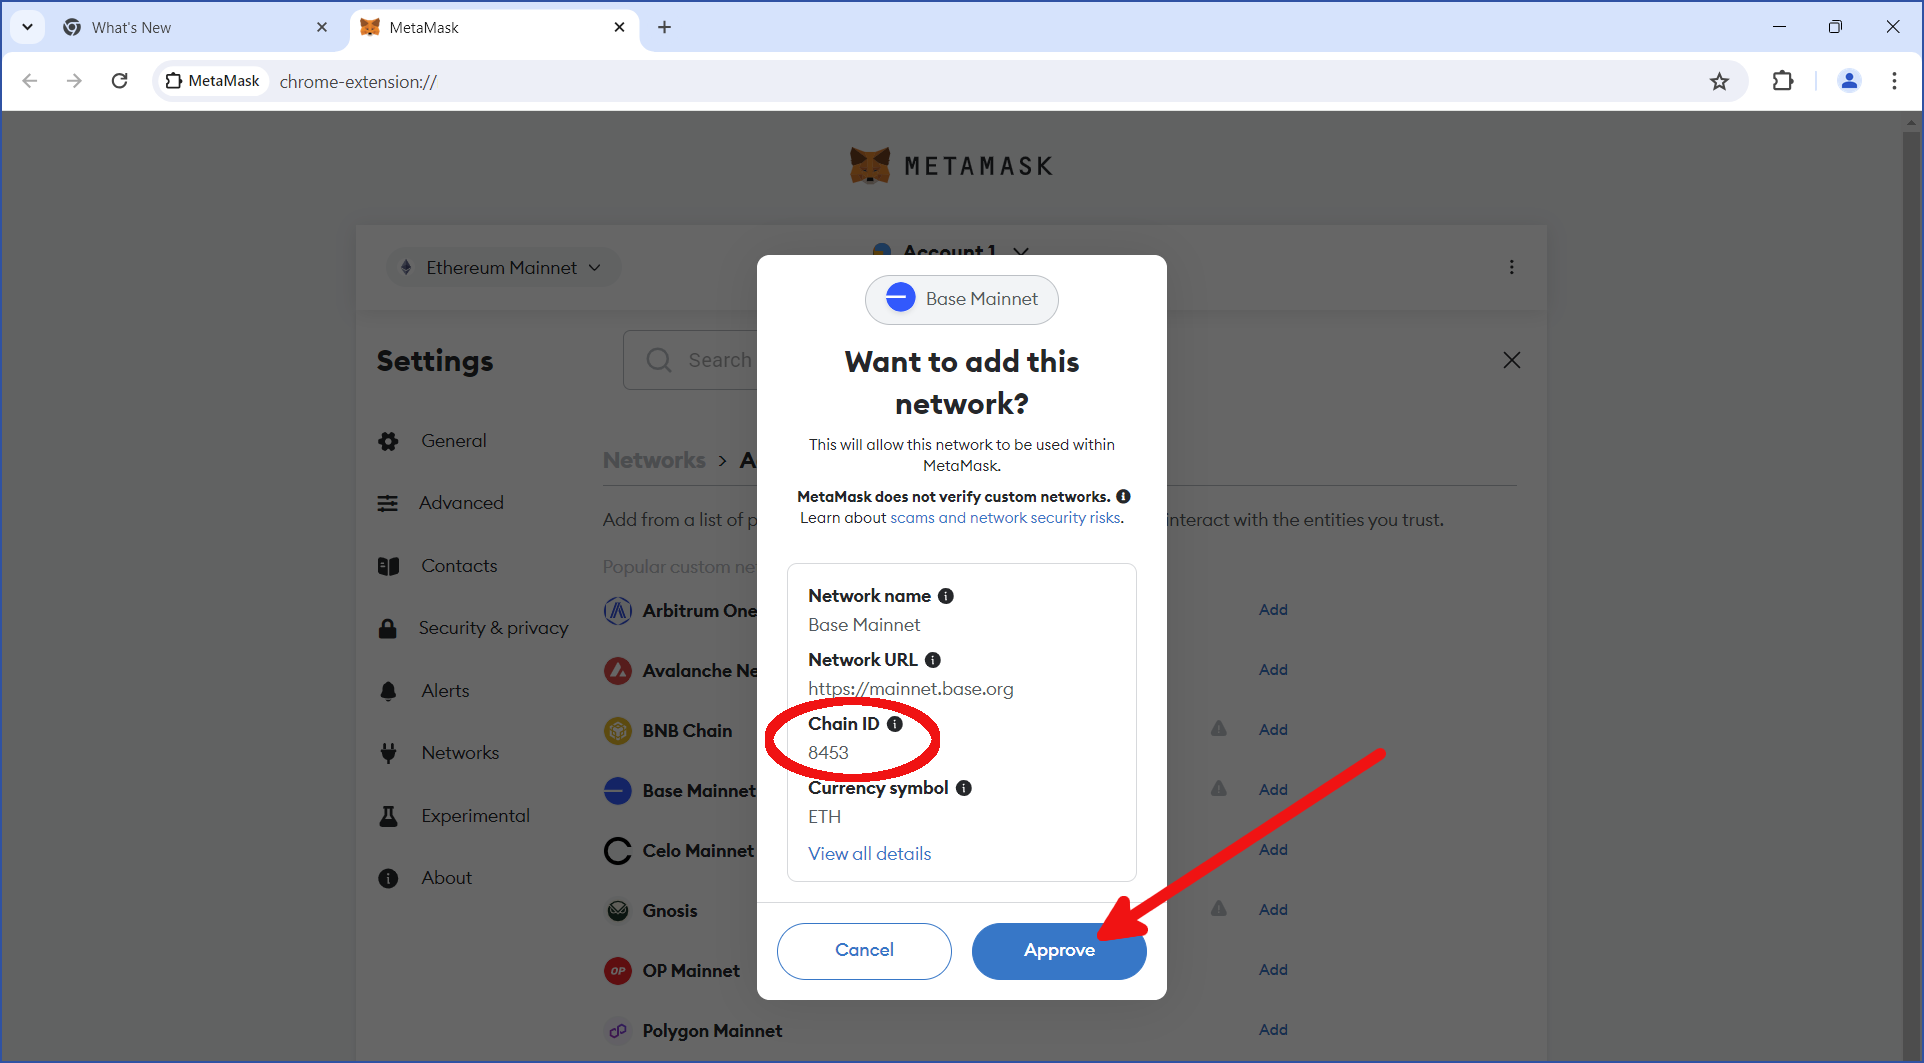
Verify that you are adding the correct network. The Chain ID for the Base mainnet is `8453`. Make sure this number is shown, and click `Approve`:

<div align="center"><img src="/files/Tg0OdtGgDU9lOsRiLzPu" alt="" width="800"></div>

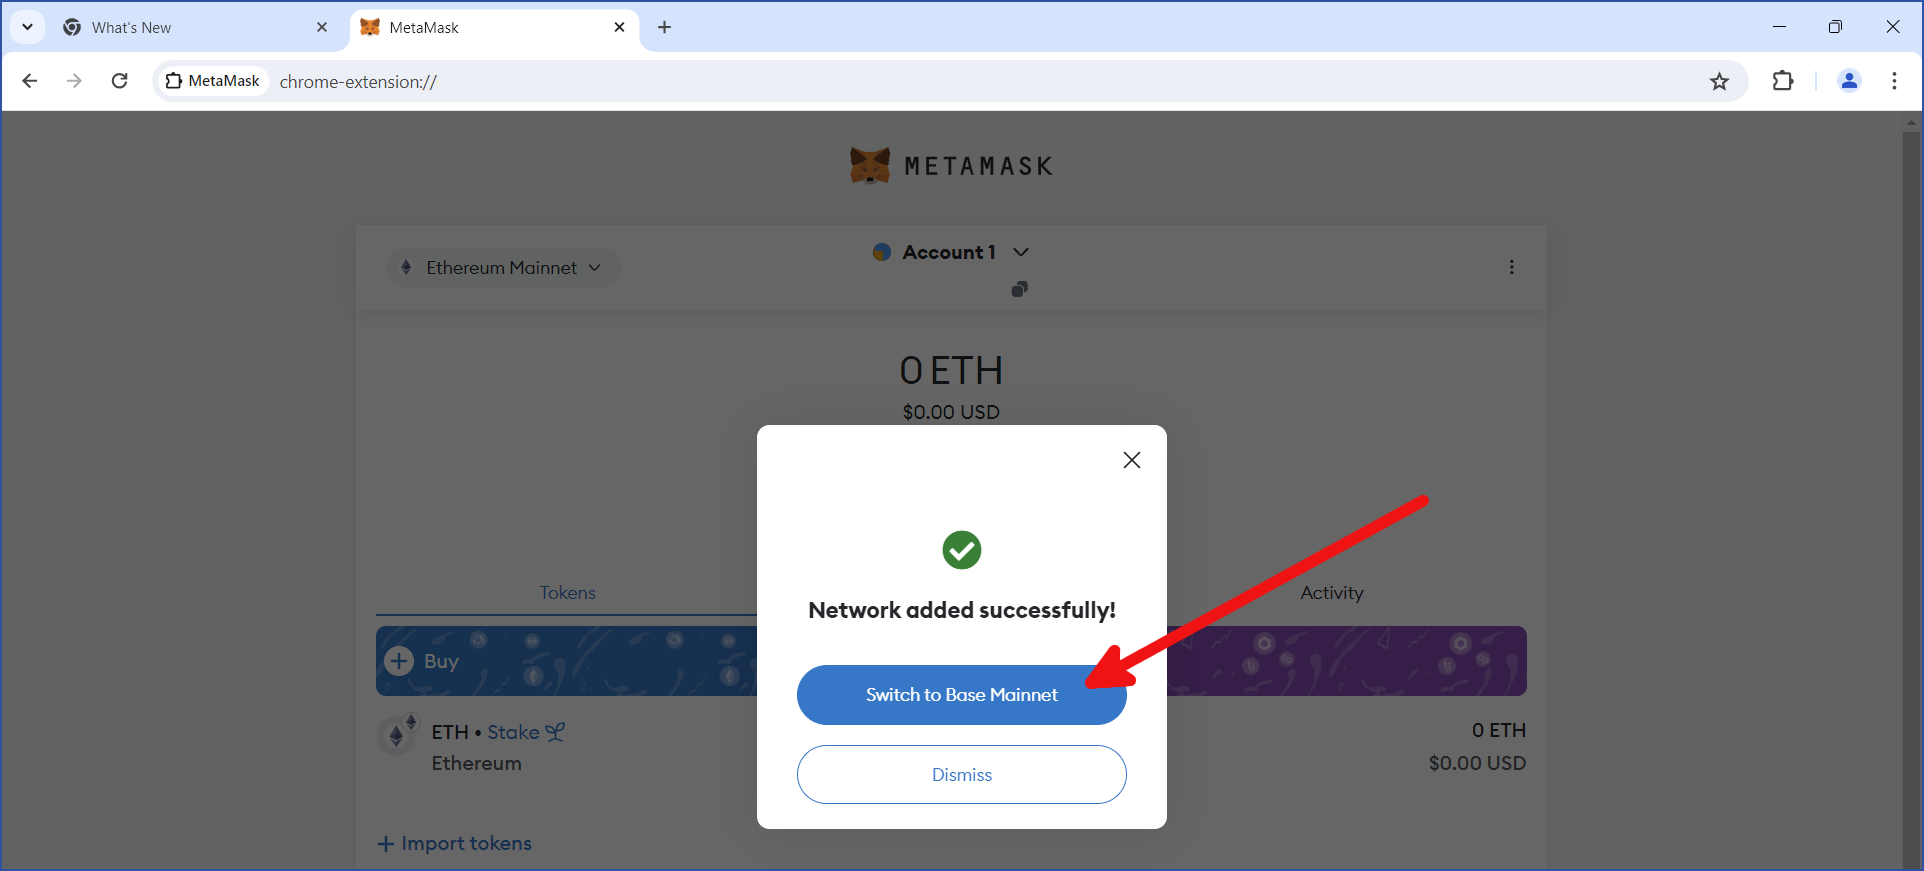
The network should be added successfully. Click `Switch to Base Mainnet`:

<div align="center"><img src="/files/gWgTTGrCxGkH84VZdSXX" alt="" width="800"></div>

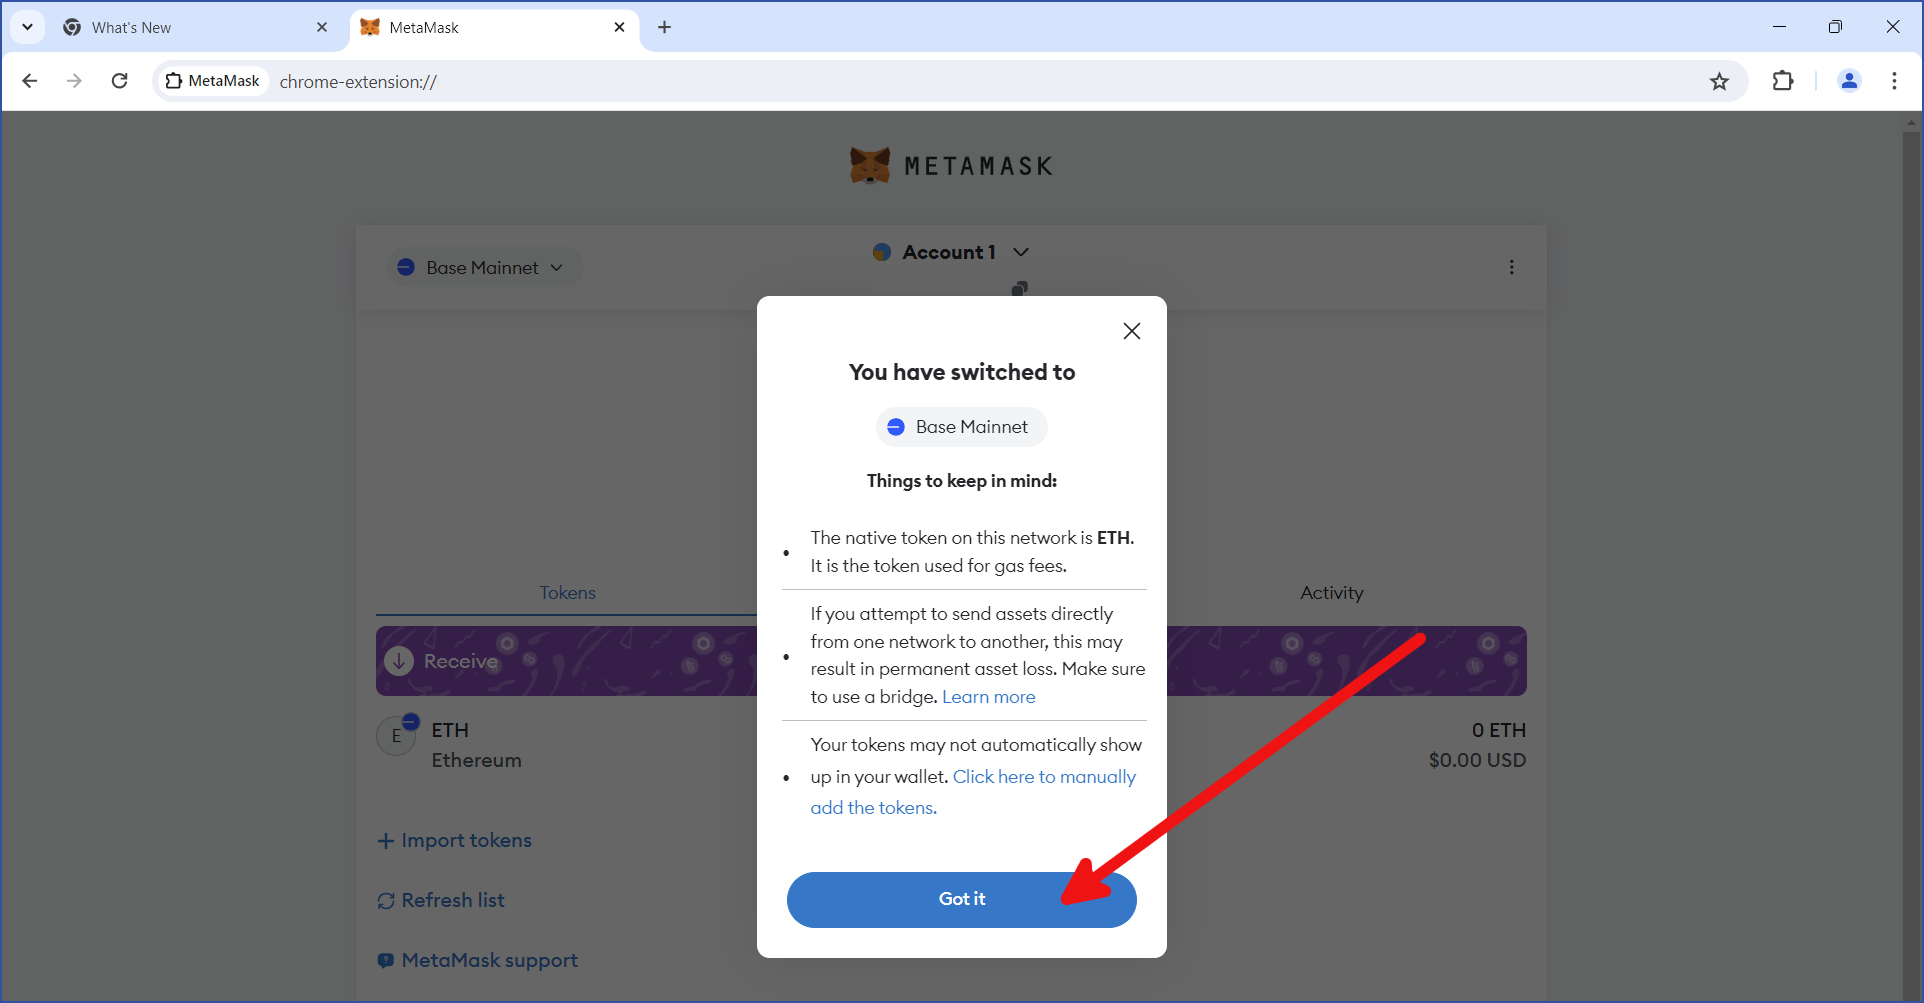
You will be given some important info about this network. Read this info carefully, then click `Got it`:

<div align="center"><img src="/files/iEfSnMpSo7BCFWcEWXLG" alt="" width="800"></div>

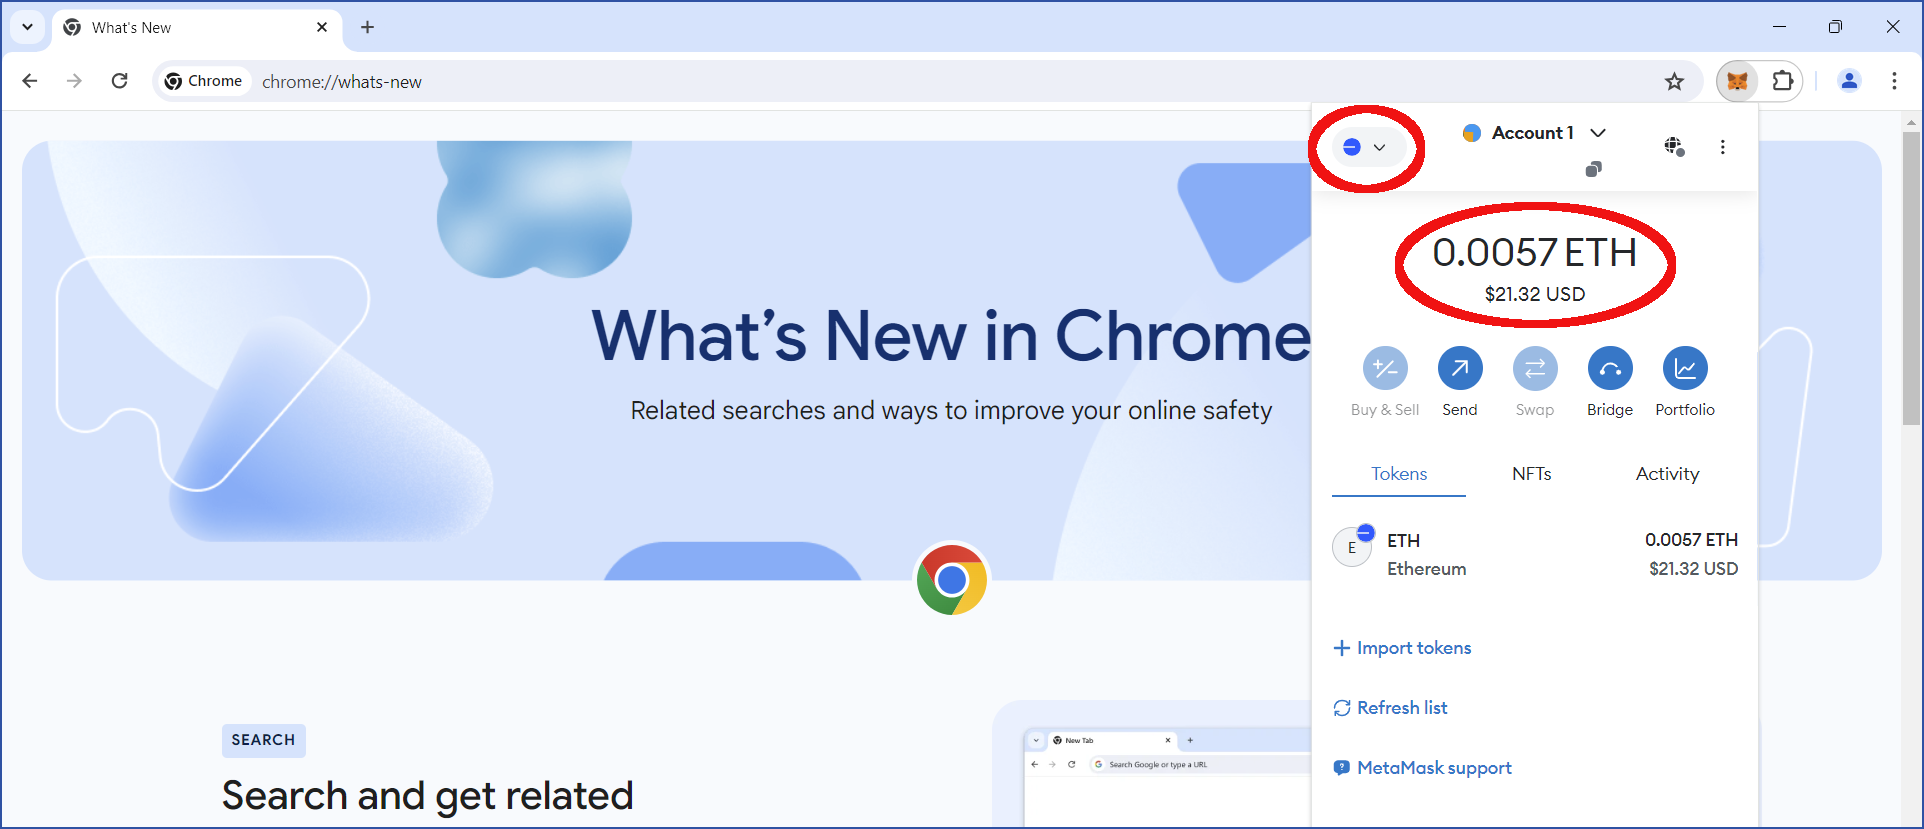
In order to use this wallet for the bridge, you will need to add funds. In this example, the MetaMask wallet was funded with 0.0057 ETH on the Base blockchain:

<div align="center"><img src="/files/vbwKTovR2kYMVgpZ6xf8" alt="" width="800"></div>

After your Ethereum wallet has been funded, you can set up a Chia wallet.

## Set up a Chia wallet

While several Chia wallets exist, currently the bridge only supports wallets that use WalletConnect (e.g., [Sage](https://sagewallet.net/)), as well as [Goby](https://www.goby.app/). For this example, we will use the official Chia reference wallet. See the official Chia [wallet guide](https://docs.chia.net/reference-client/getting-started/wallet-guide/#use-the-chia-wallet) for instructions on setting up this wallet.

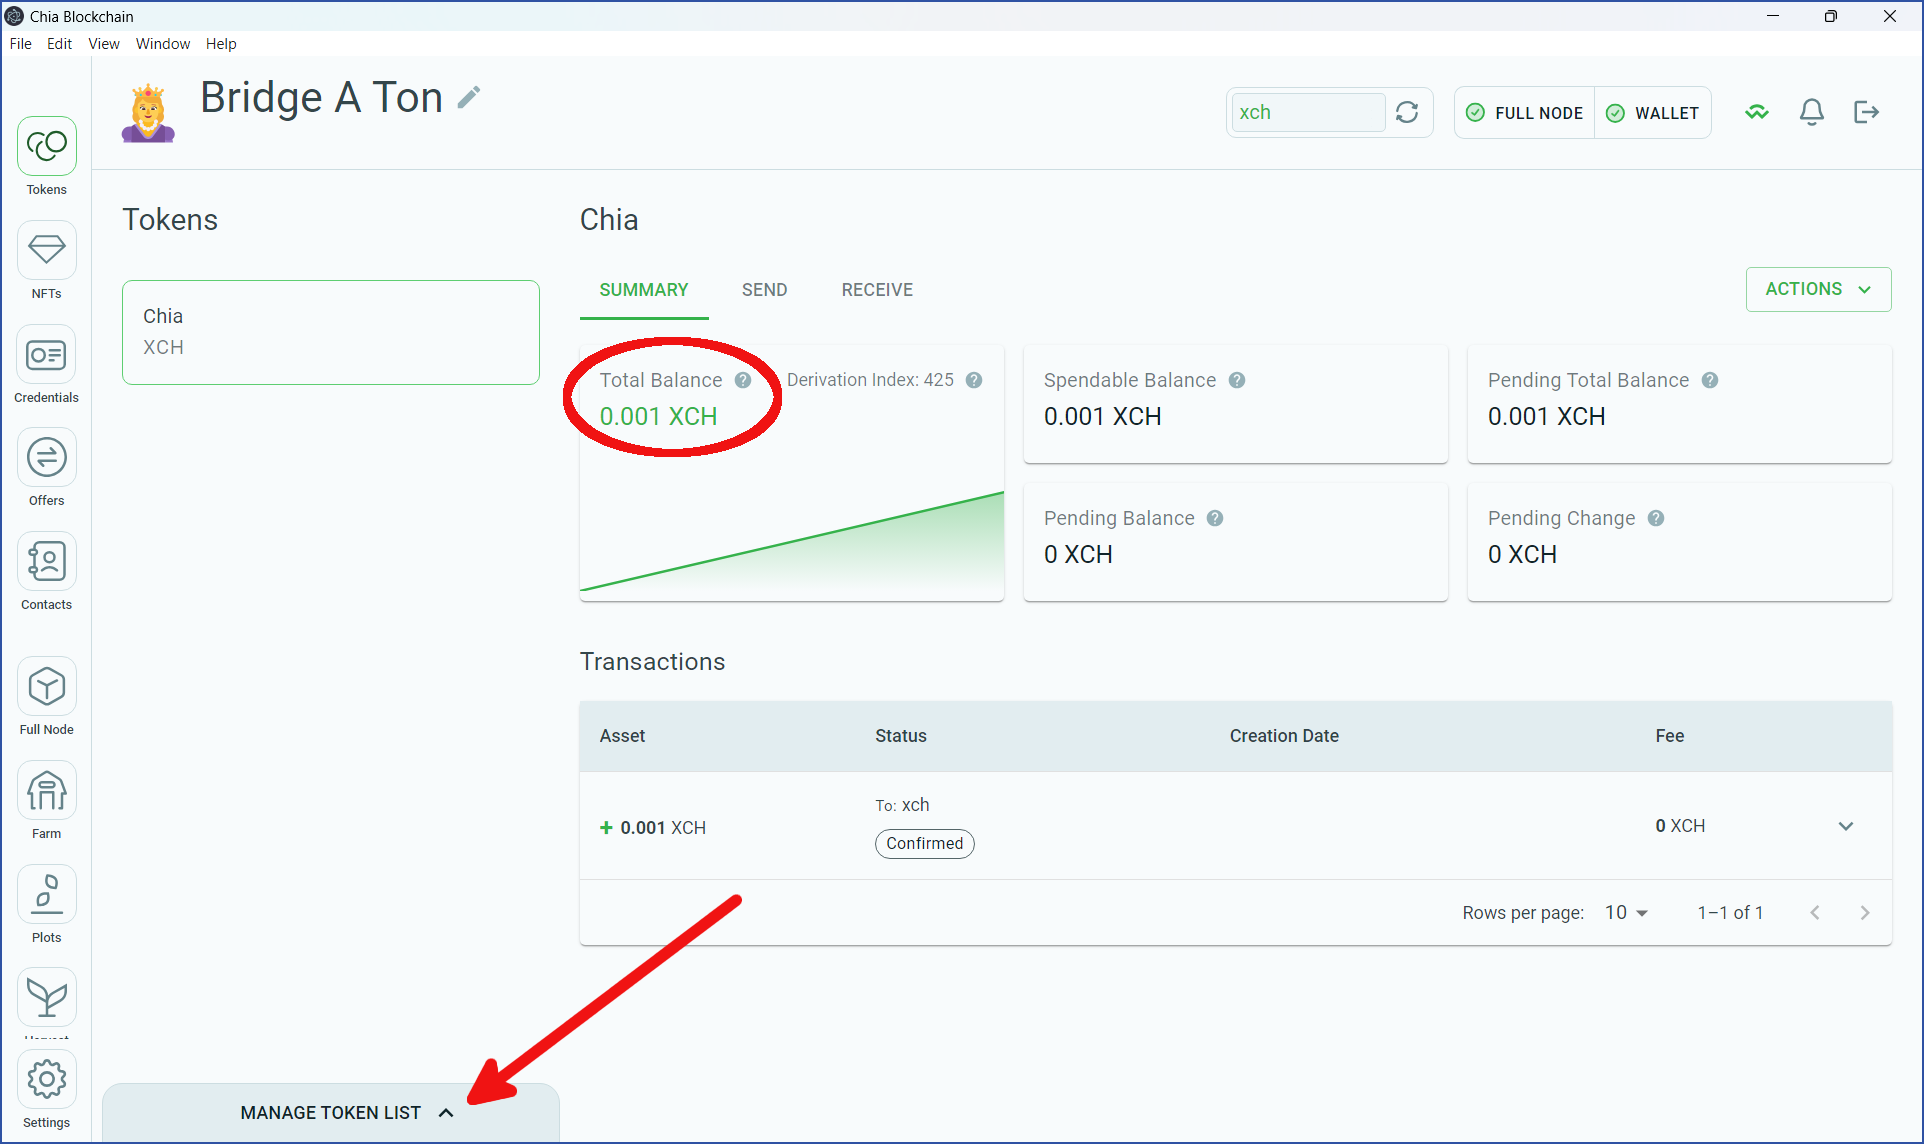
You will need to add some XCH to the reference wallet in order to pay fees. In the image below, the wallet contains 0.001 XCH. Typically, this amount will be sufficient.

We're going to send a wrapped form of ETH to the Chia reference wallet. If you are using Chia 2.3.1 or later, your wallet will automatically recognize the wrapped ETH, but it's still a good idea to add this asset manually.

{% hint style="info" %}
Regardless of which blockchain you are using, when you receive a bridged token, it will be a "wrapped" version of the native token. The warp.green bridge calls its tokens "warped" instead of "wrapped". There is no material difference between these two terms; they can be used interchangeably.
{% endhint %}

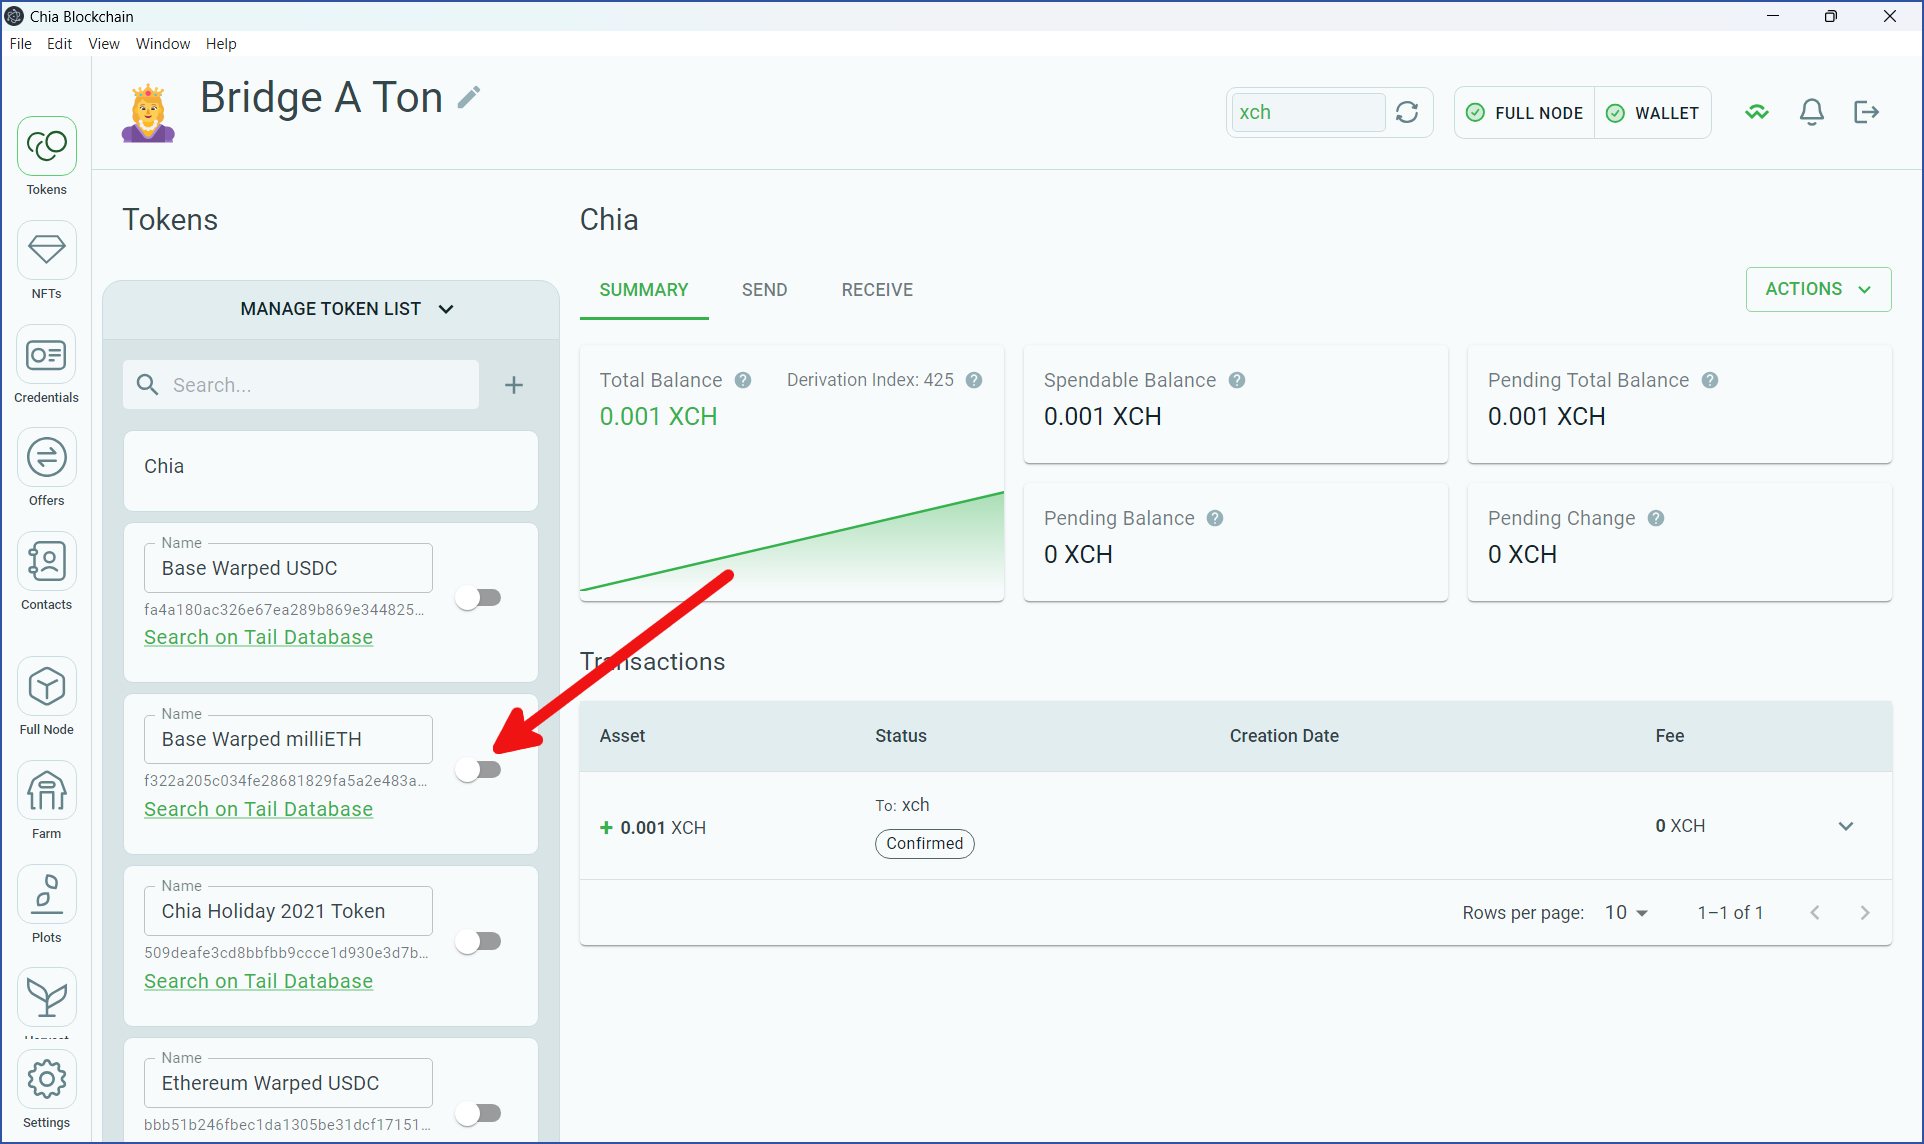
Click `MANAGE TOKEN LIST`:

<div align="center"><img src="/files/qeqvobapB0yUWjNjQCo8" alt="" width="800"></div>

Locate `Base Warped milliETH` and click the slider to enable this asset. Feel free to double-check that the asset's ID matches the one from the [asset list](https://www.warp.green/bridge/assets) on warp.green's website:

<div align="center"><img src="/files/ew1ktziVgazTkrNq1STI" alt="" width="800"></div>

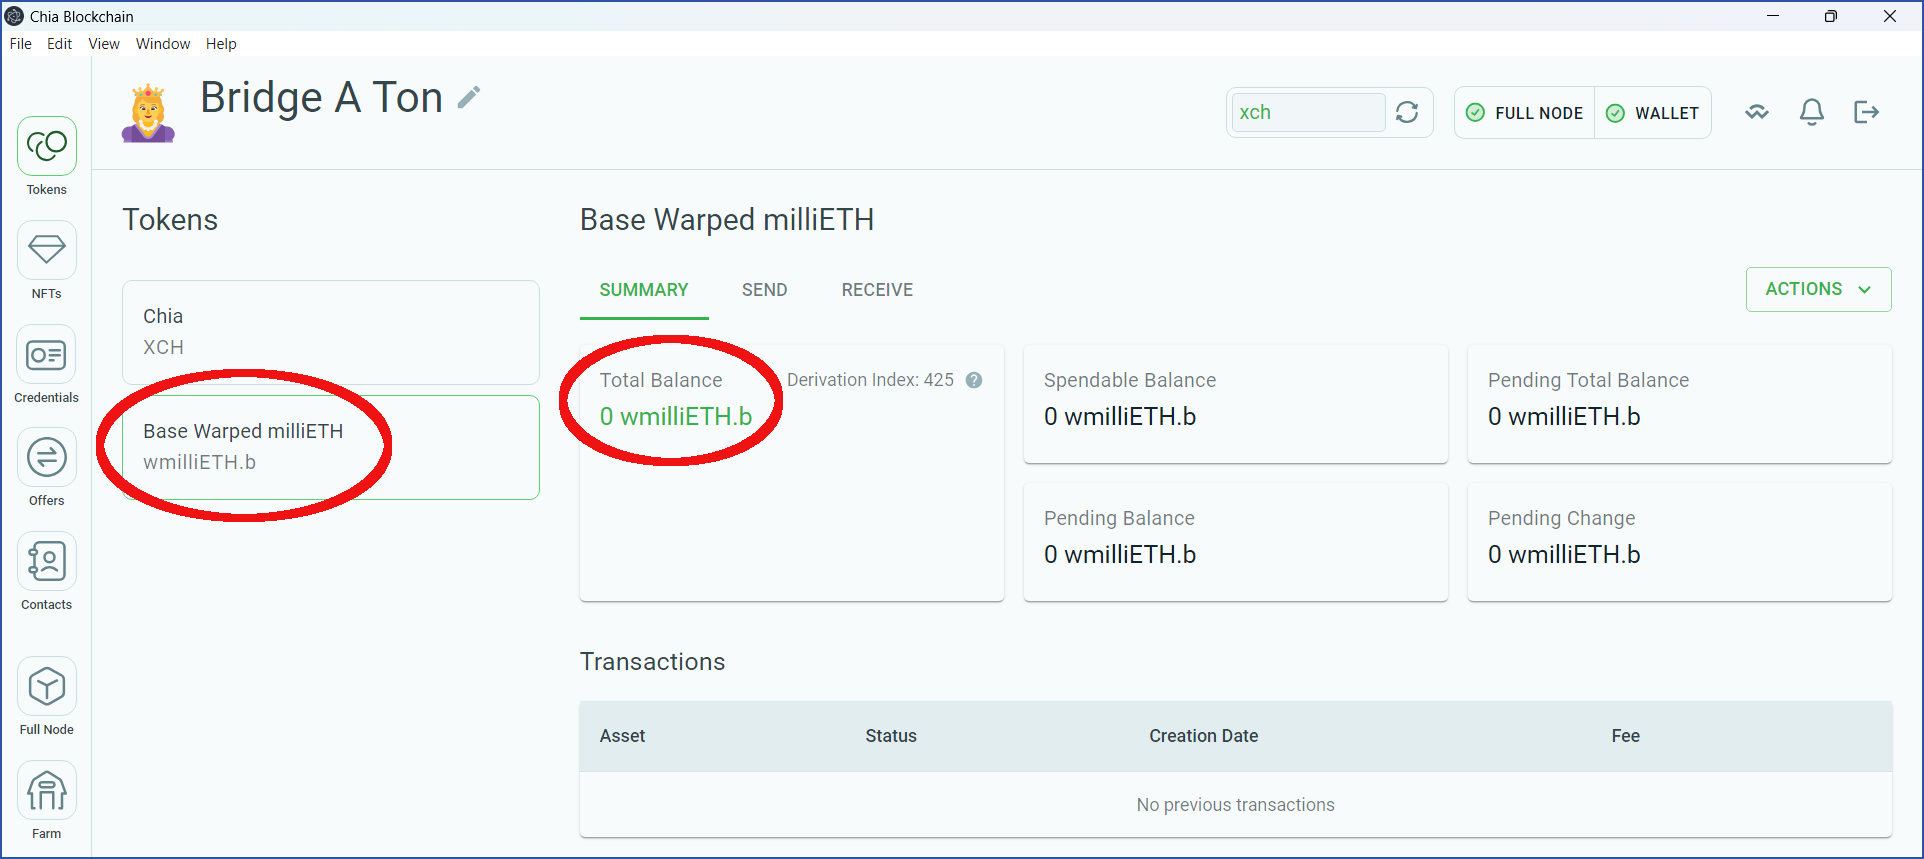
Your wallet will add `Base Warped milliETH`:

<div align="center"><img src="/files/RwgVoNJGZgzfY84ZztET" alt="" width="800"></div>

{% hint style="info" %}
One `Base Warped milliETH` is the equivalent to 1/1000 of one ETH. This denomination was chosen due to the differences in decimals on Chia and Ethereum.
{% endhint %}

## Connect your wallets to the bridge

Using the same browser where you installed MetaMask, browse to [warp.green/bridge](https://www.warp.green/bridge). In order to use the bridge, you will need to connect both of your wallets.

### Connect your ETH wallet

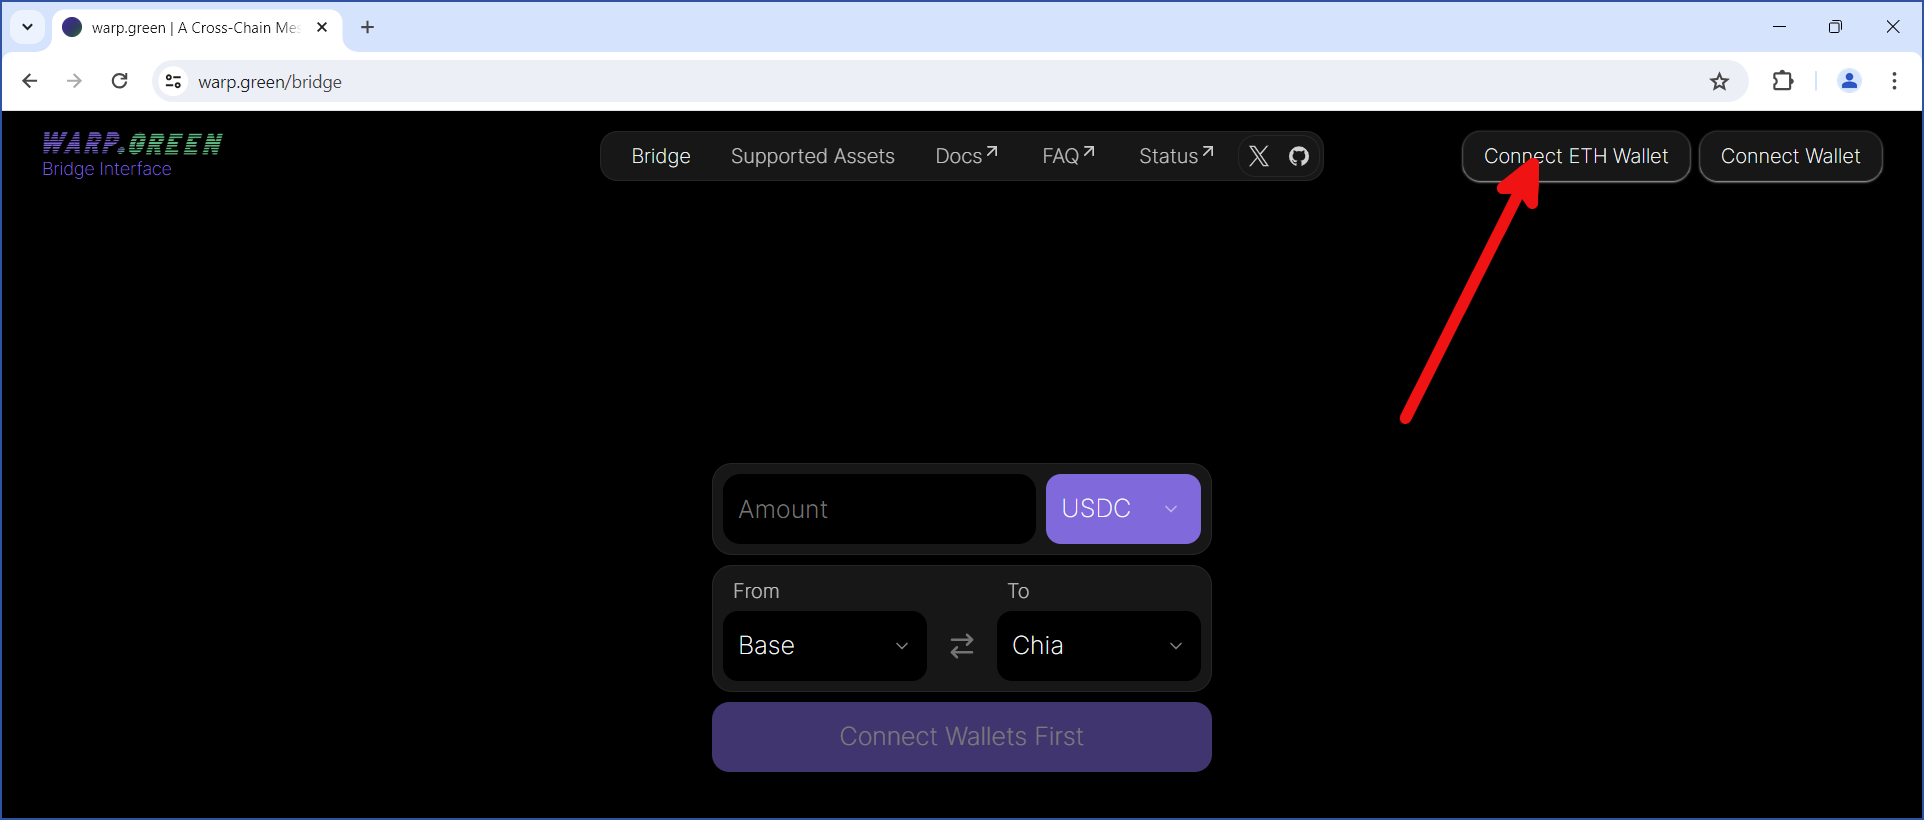
Click `Connect ETH Wallet`:

<div align="center"><img src="/files/OVKAhrEJgVp2YLuljIA3" alt="" width="800"></div>

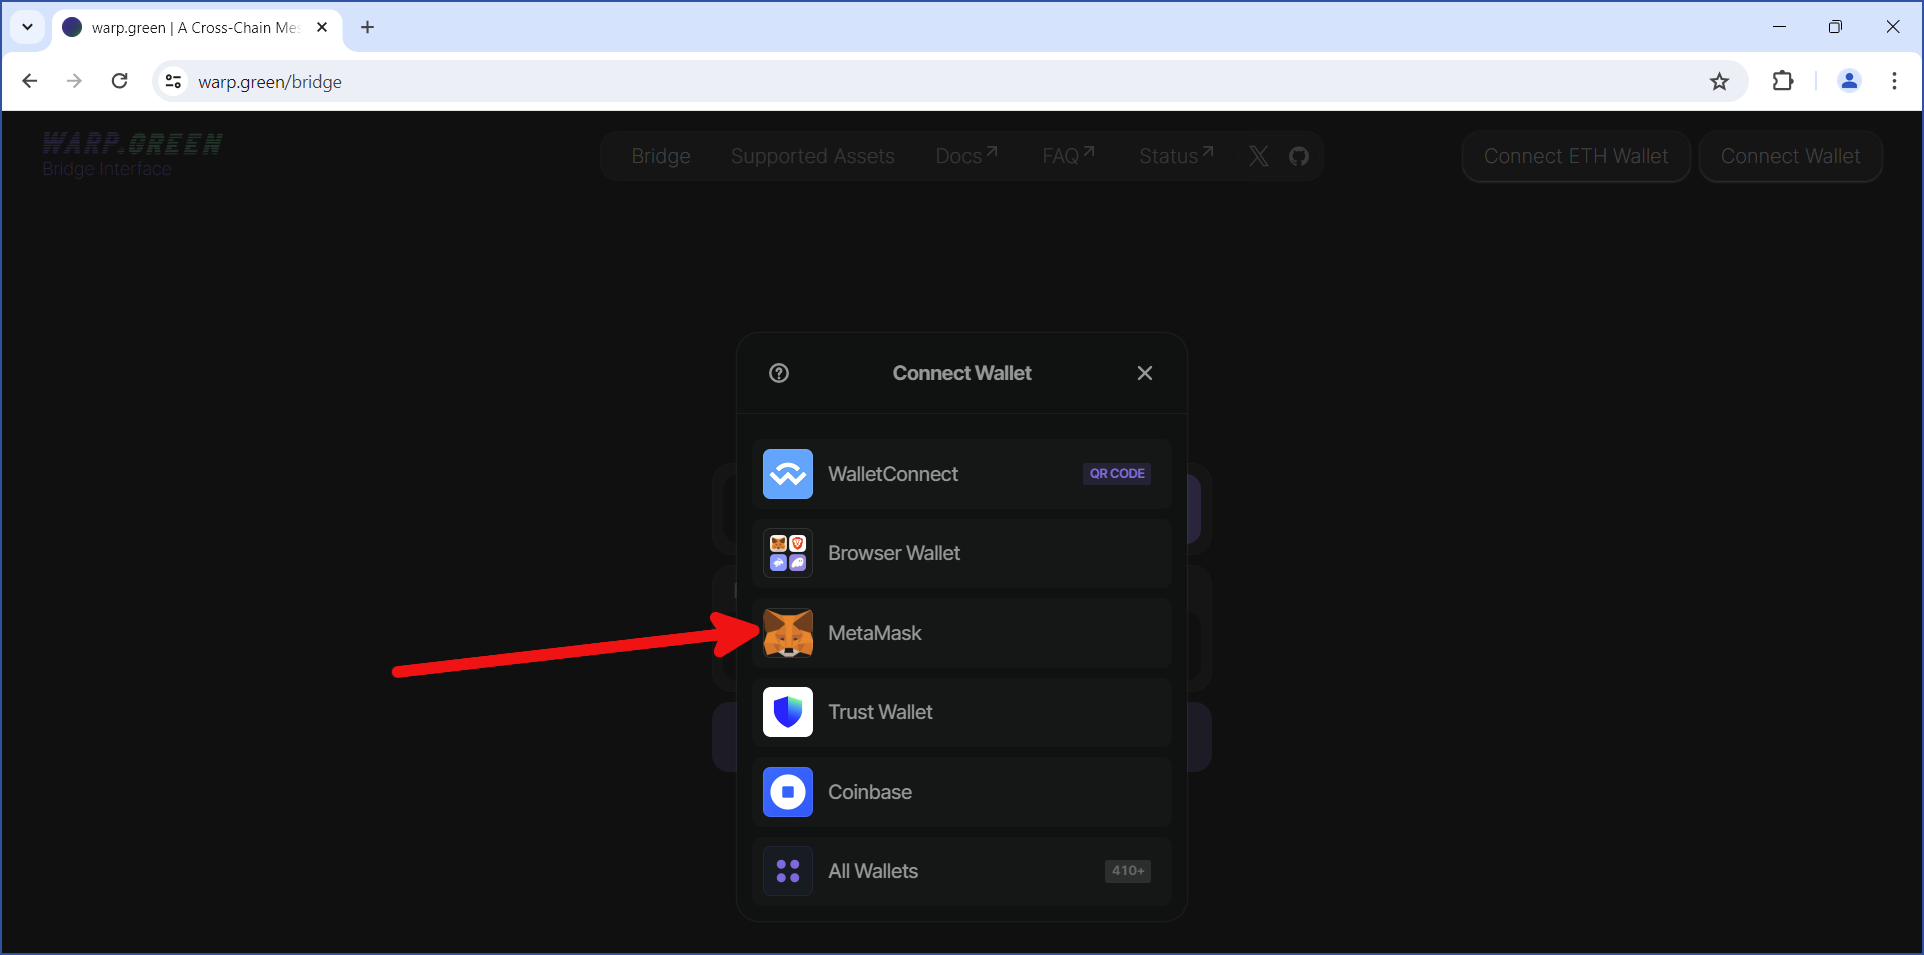
Click `MetaMask` (or whichever wallet you used on the Ethereum side):

<div align="center"><img src="/files/k2eW8Dk1h6N7G8Q8SF6L" alt="" width="800"></div>

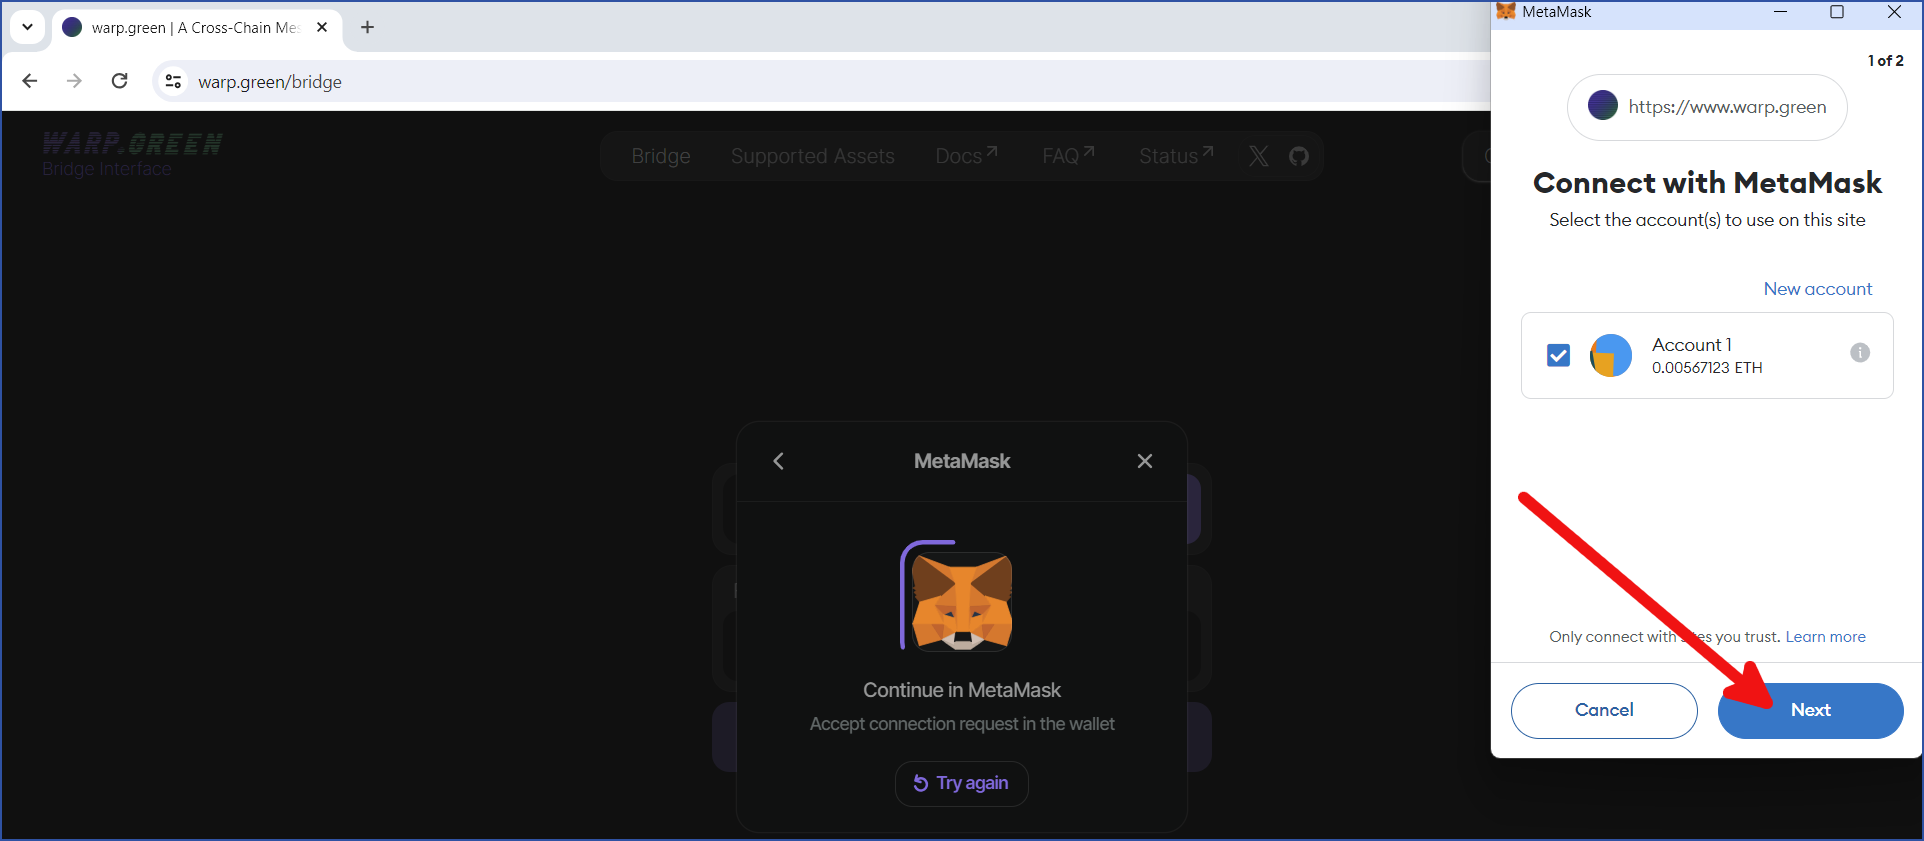
Select the account(s) you want to connect to the bridge. If you just installed MetaMask, there will only be one account. Click `Next`:

<div align="center"><img src="/files/uF33tZWOuUDzbbFpIsCk" alt="" width="800"></div>

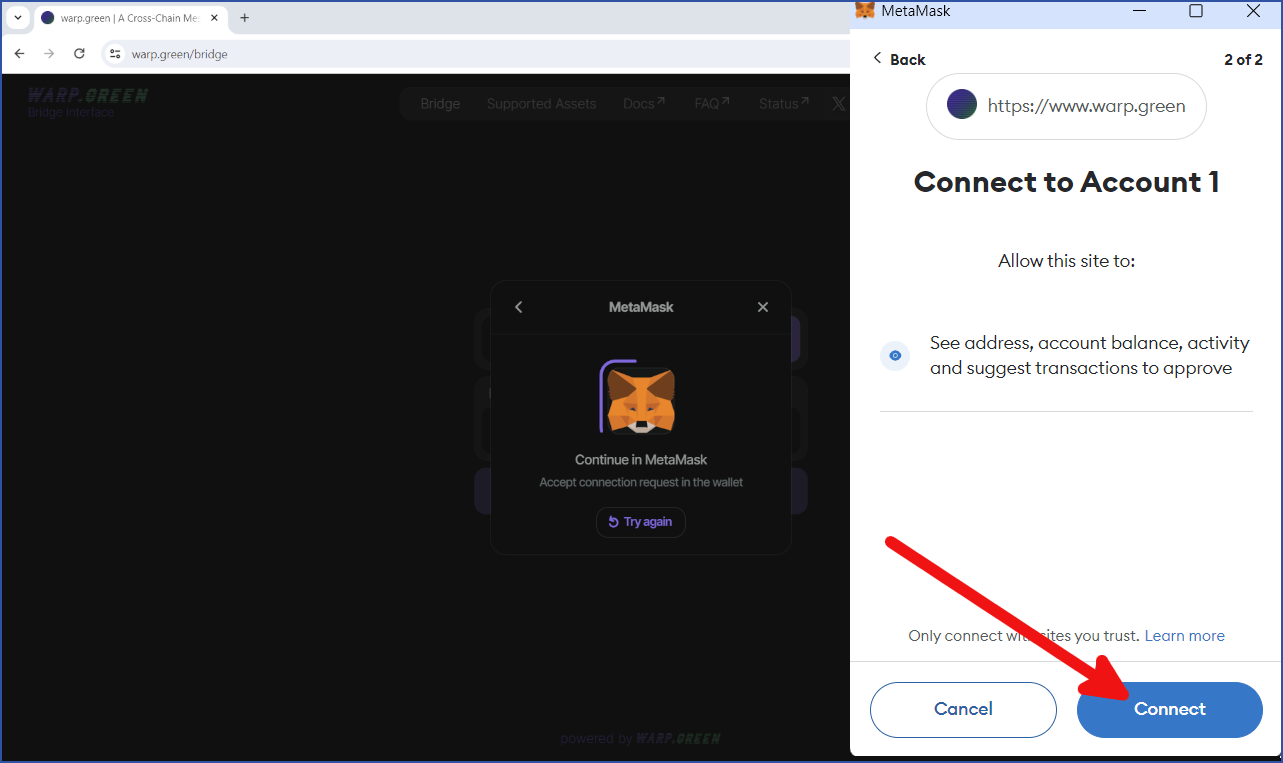
Click `Connect` to connect your MetaMask wallet to the bridge:

<div align="center"><img src="/files/borC4oJSc0ZErvsL7vrV" alt="" width="800"></div>

Your MetaMask wallet is now connected to the bridge.

### Connect your Chia wallet

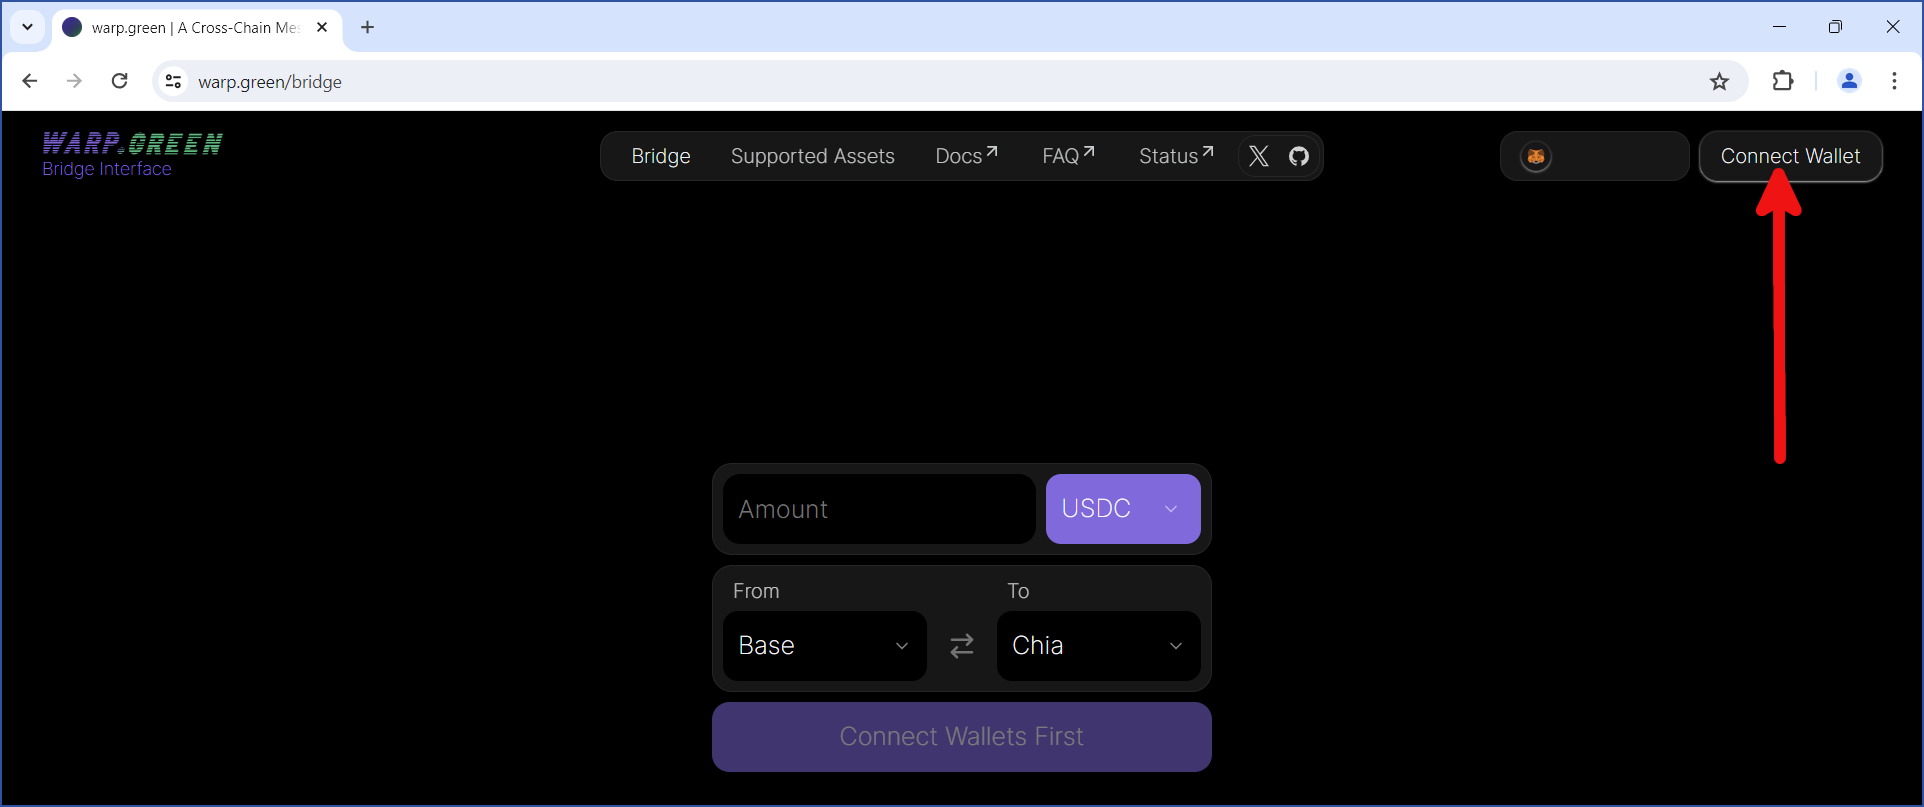
Click `Connect Wallet`:

<div align="center"><img src="/files/M3JyXde1y9dUHAGLXMWa" alt="" width="800"></div>

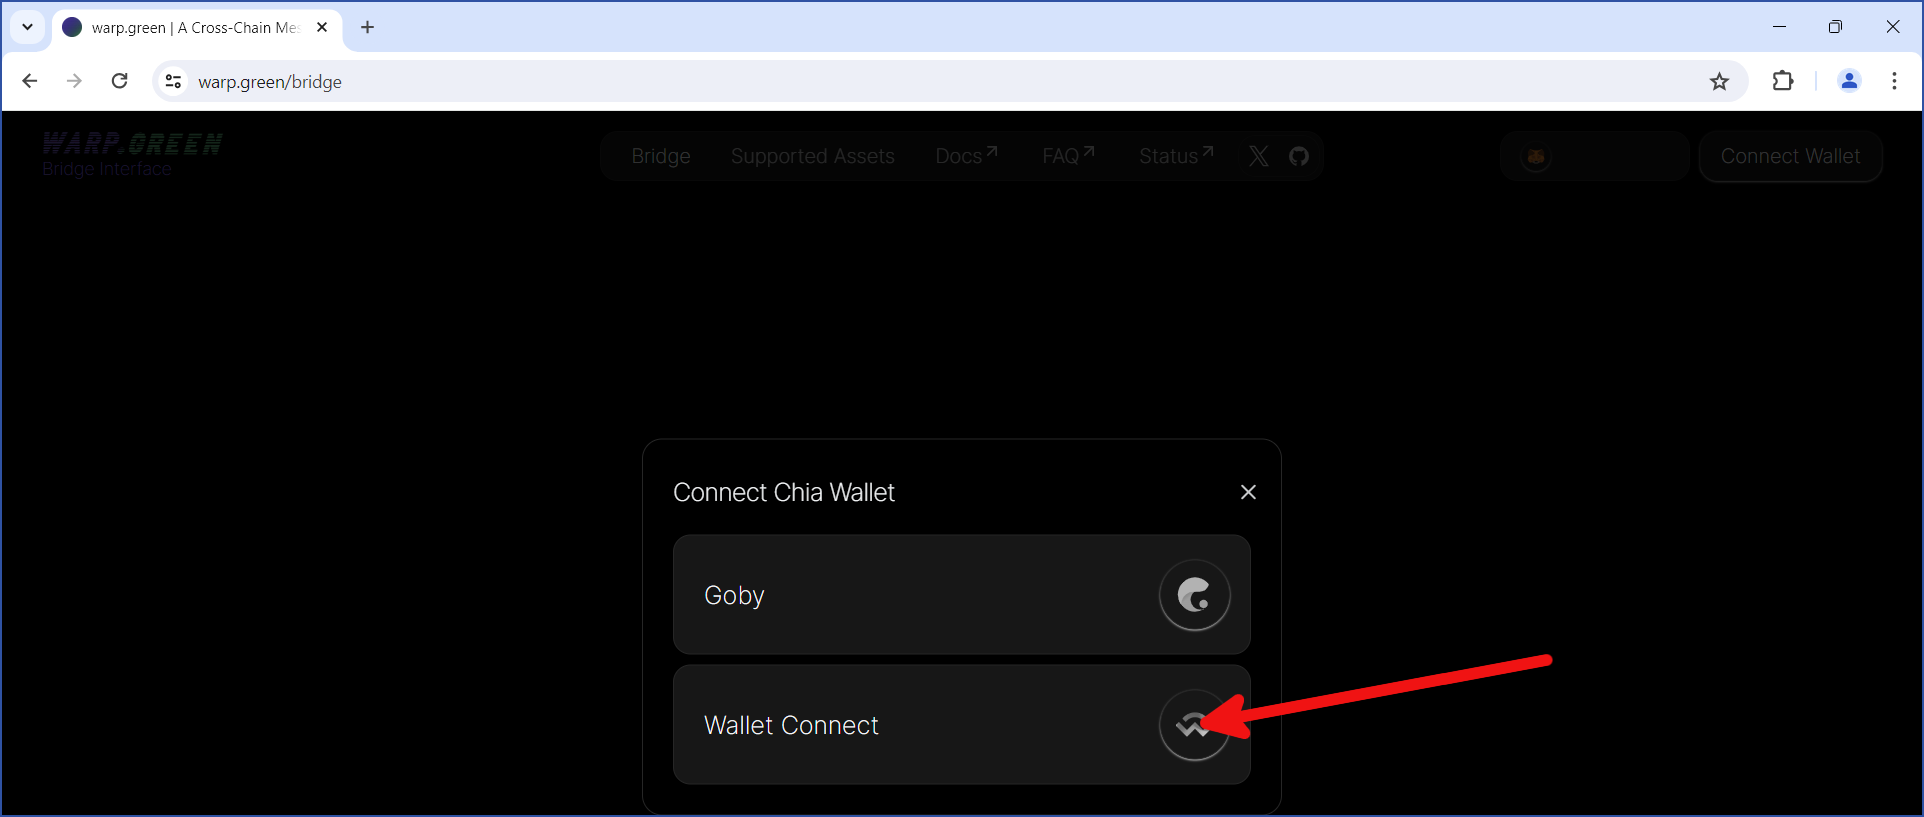
Click `Wallet Connect` if you are using the Chia reference wallet:

<div align="center"><img src="/files/6onSbtlEDH4PvKif6LoO" alt="" width="800"></div>

You will be shown a QR code (not shown here). In this example, we'll click the `Copy Link` button.

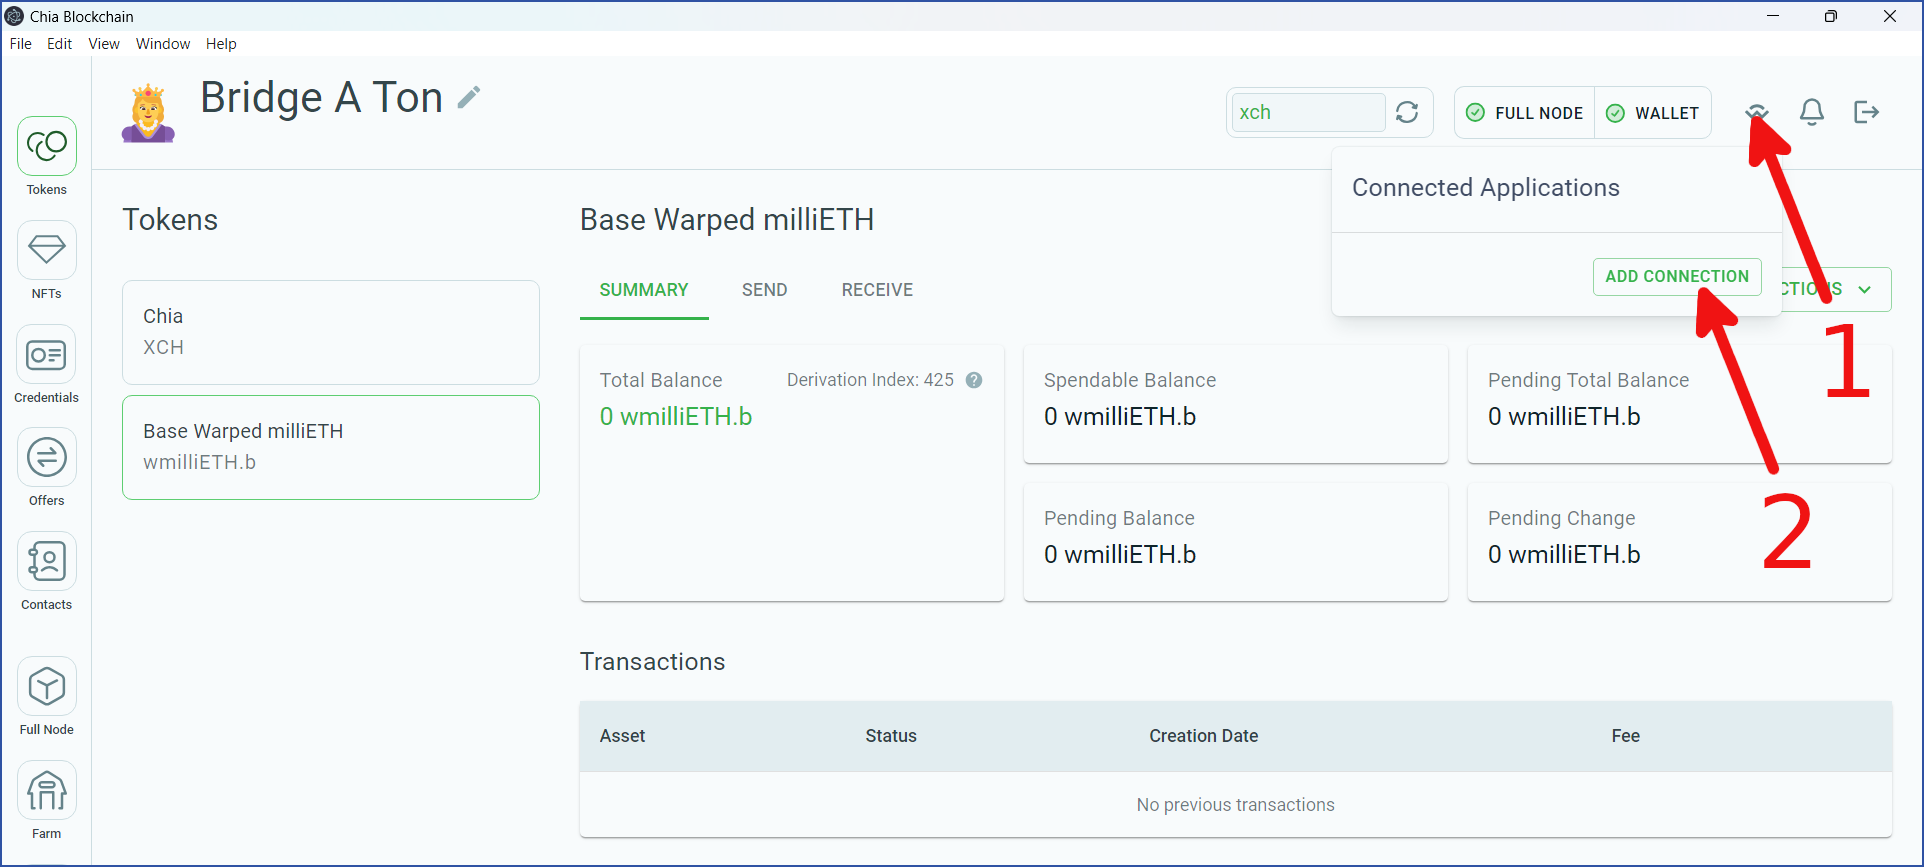
Next, open your reference wallet, click the WalletConnect icon ("1" in the image below), then click `ADD CONNECTION` ("2"):

<div align="center"><img src="/files/0ai05KYyXUR9aSaP082C" alt="" width="800"></div>

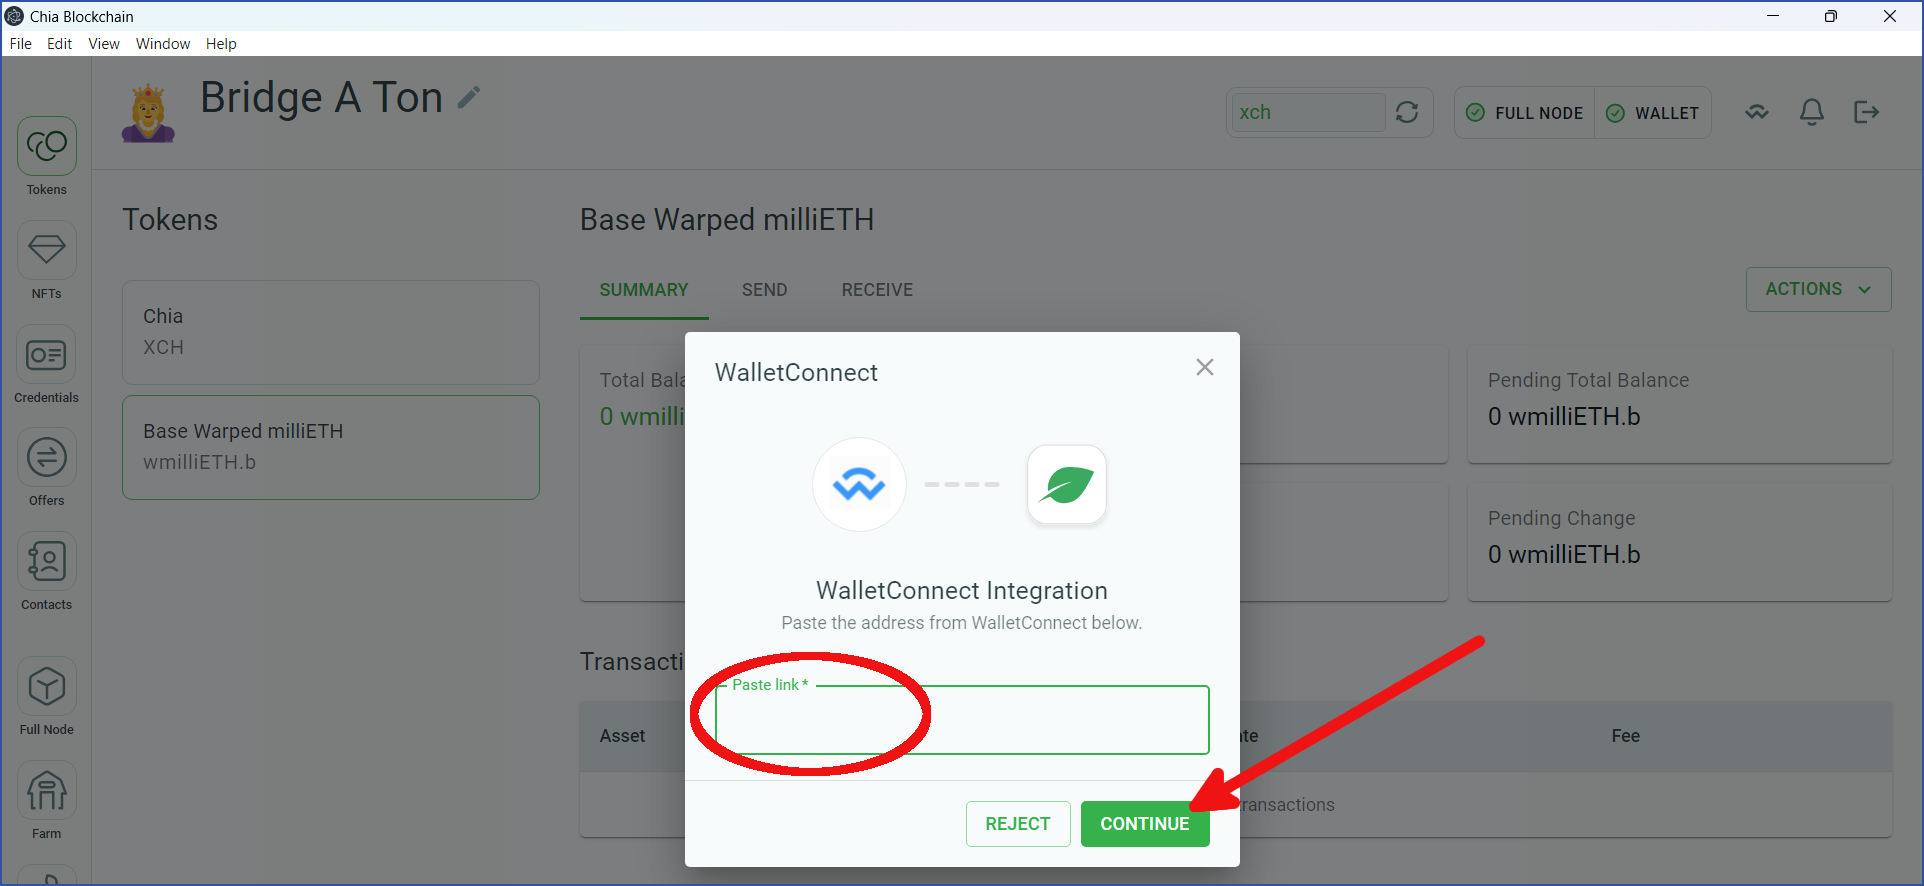
Paste the link you previously copied, and click `CONTINUE`:

<div align="center"><img src="/files/ZOmSEYz2gpSpGOczlVje" alt="" width="800"></div>

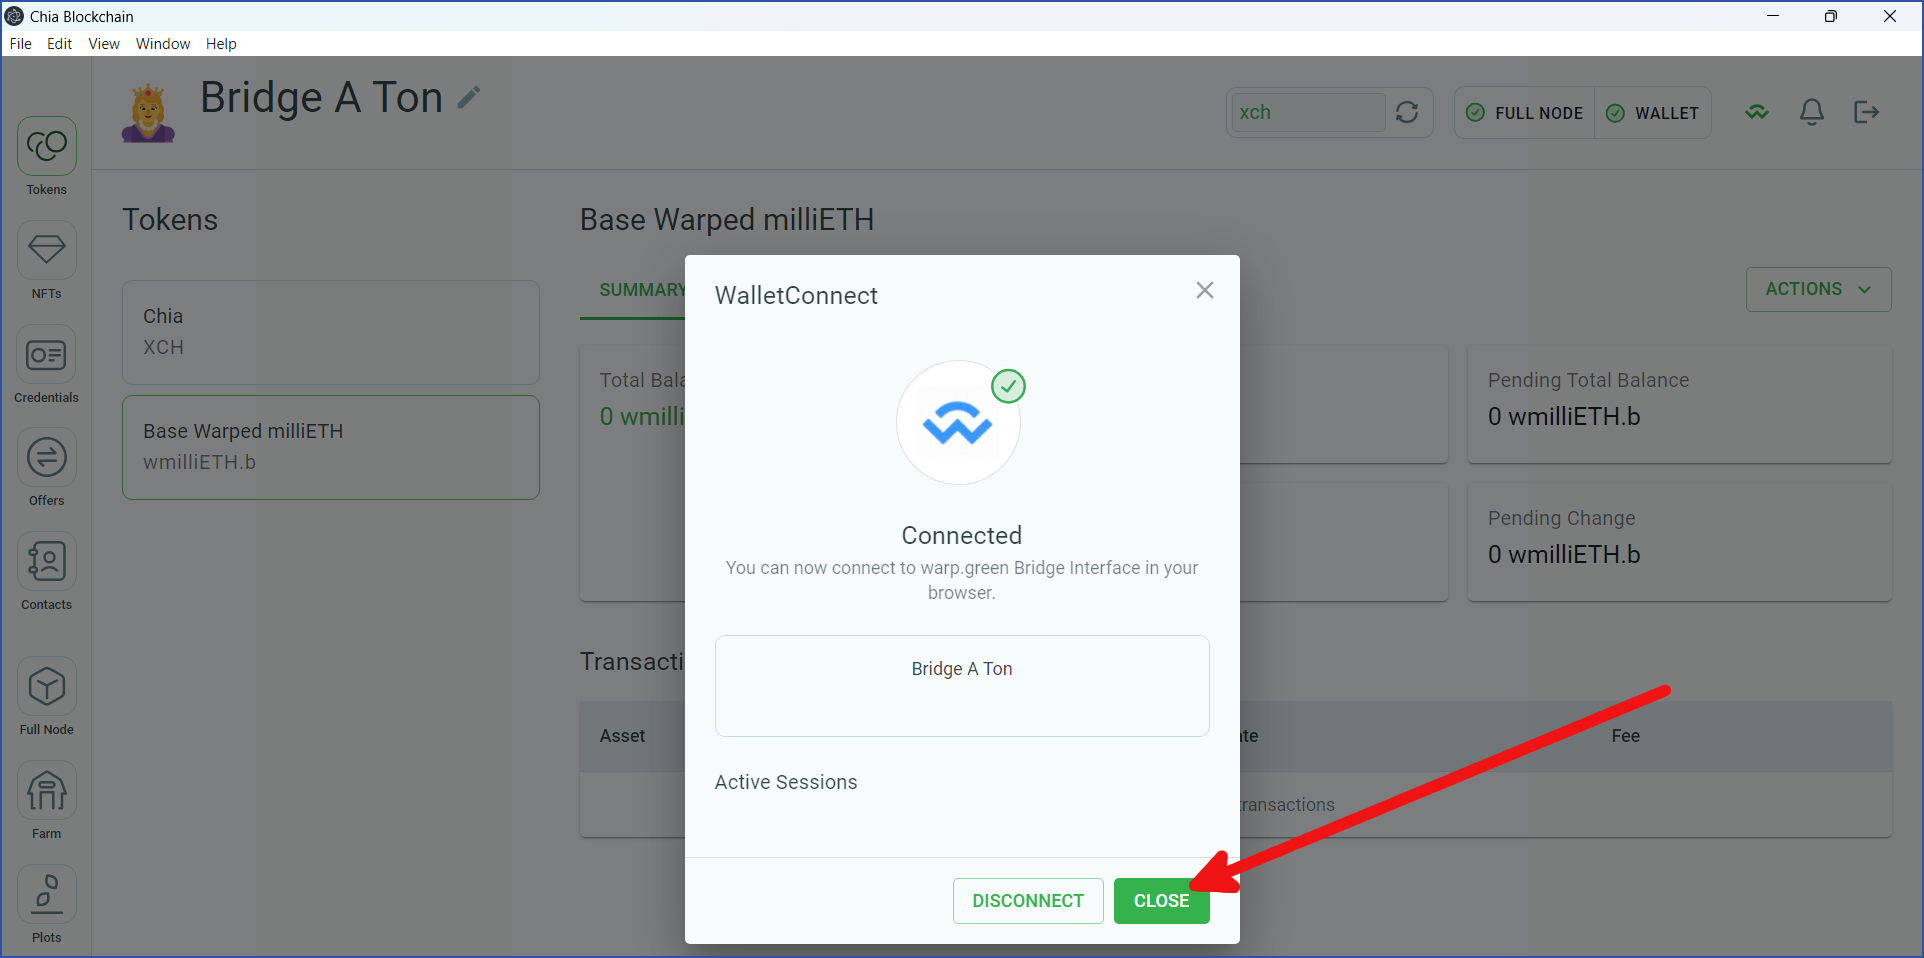
Your Chia reference wallet will now be connected to the bridge. Click `CLOSE`:

<div align="center"><img src="/files/9a1X28LPj6GO4IkMhrsg" alt="" width="800"></div>

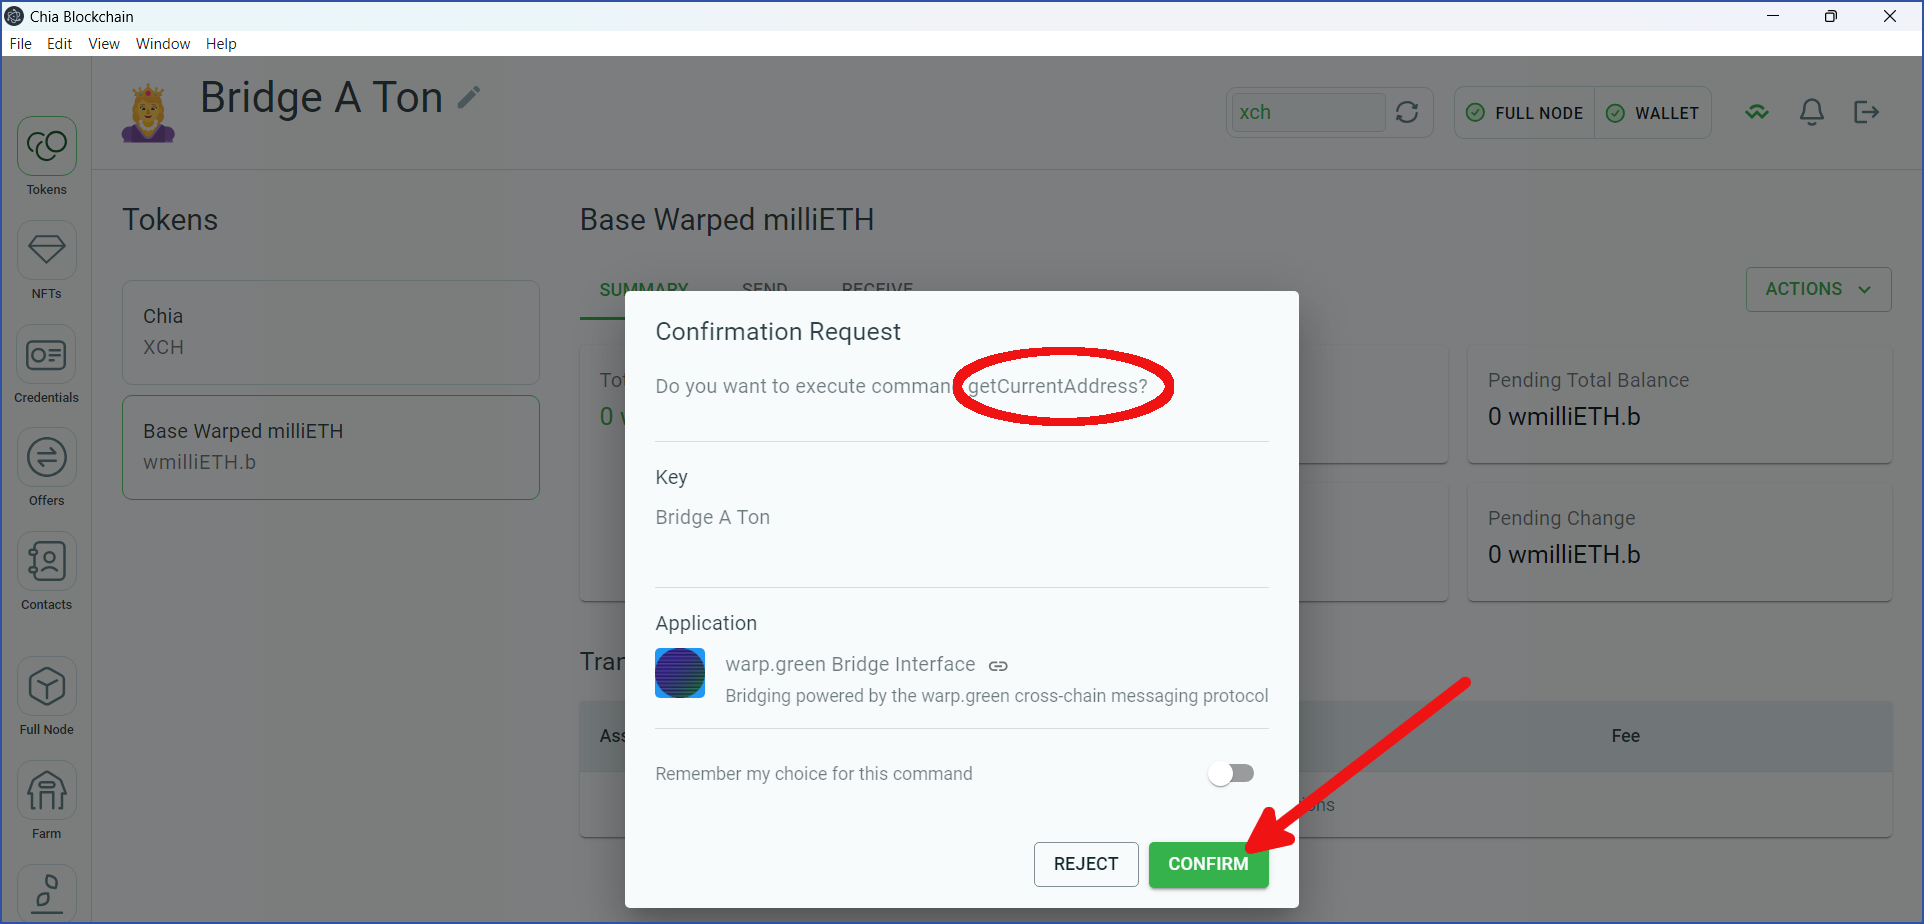
The bridge will request an address from your wallet. It may perform other requests as well. Click `CONFIRM` for each request:

<div align="center"><img src="/files/Cqd5BlM3qybe3IeRYJpw" alt="" width="800"></div>

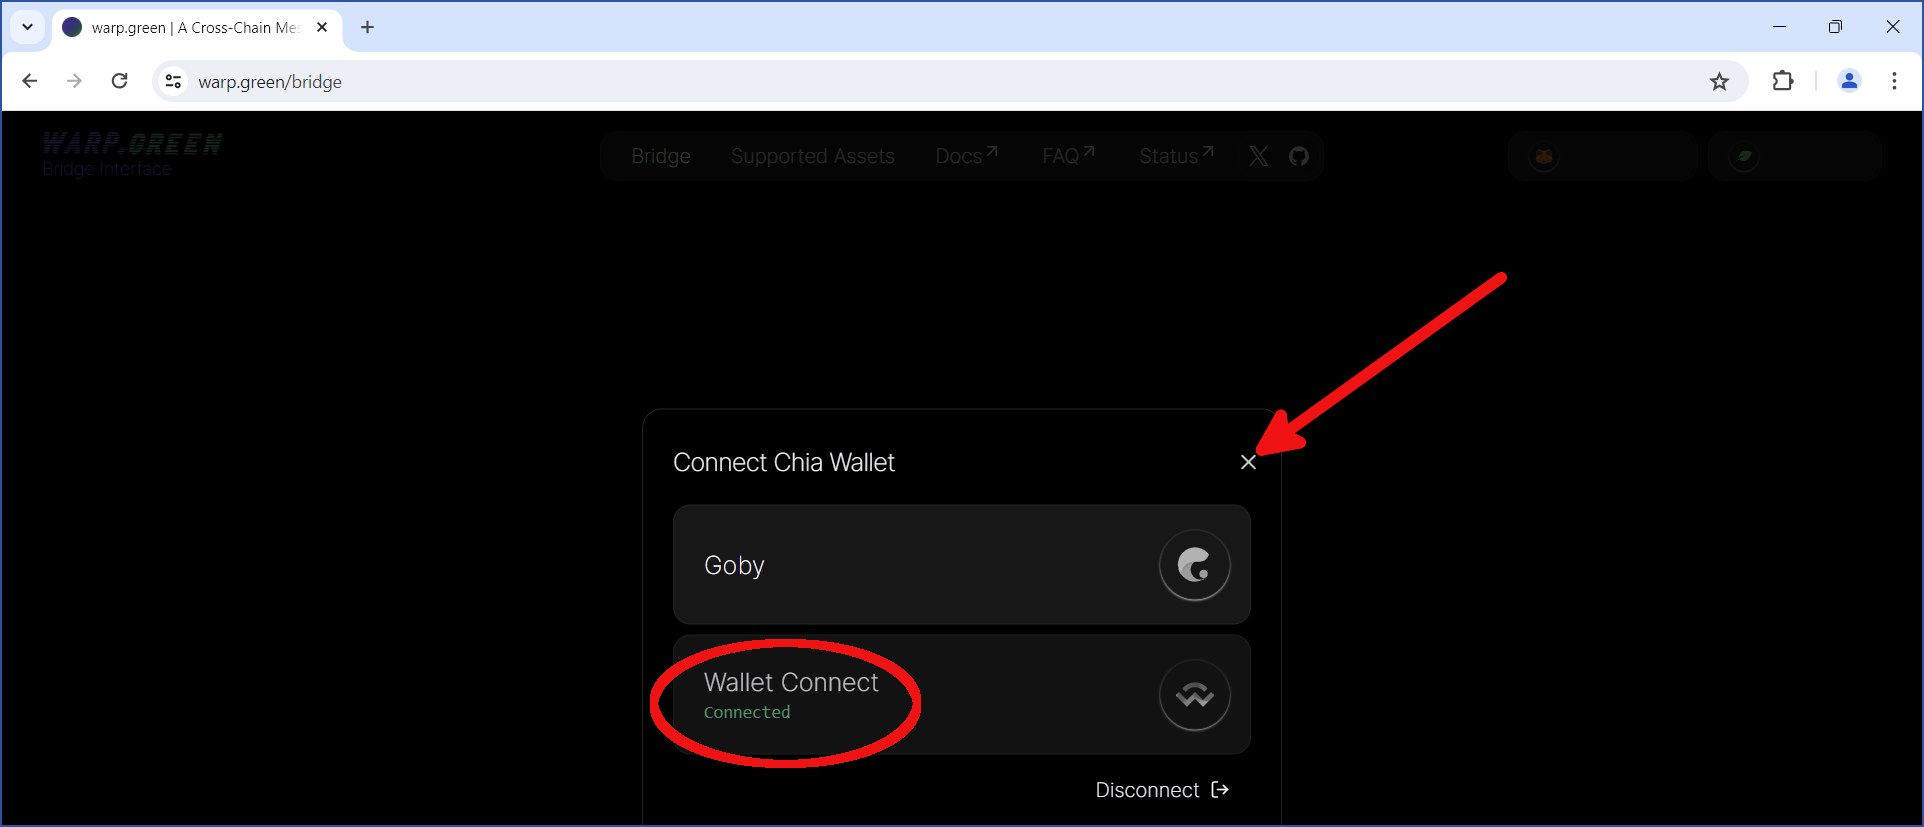
Return to your web browser. You should see `Connected` displayed under `Wallet Connect`. If so, you can close this dialog:

<div align="center"><img src="/files/plGedGzcpTJipC2LMn75" alt="" width="800"></div>

## Initiate the transfer

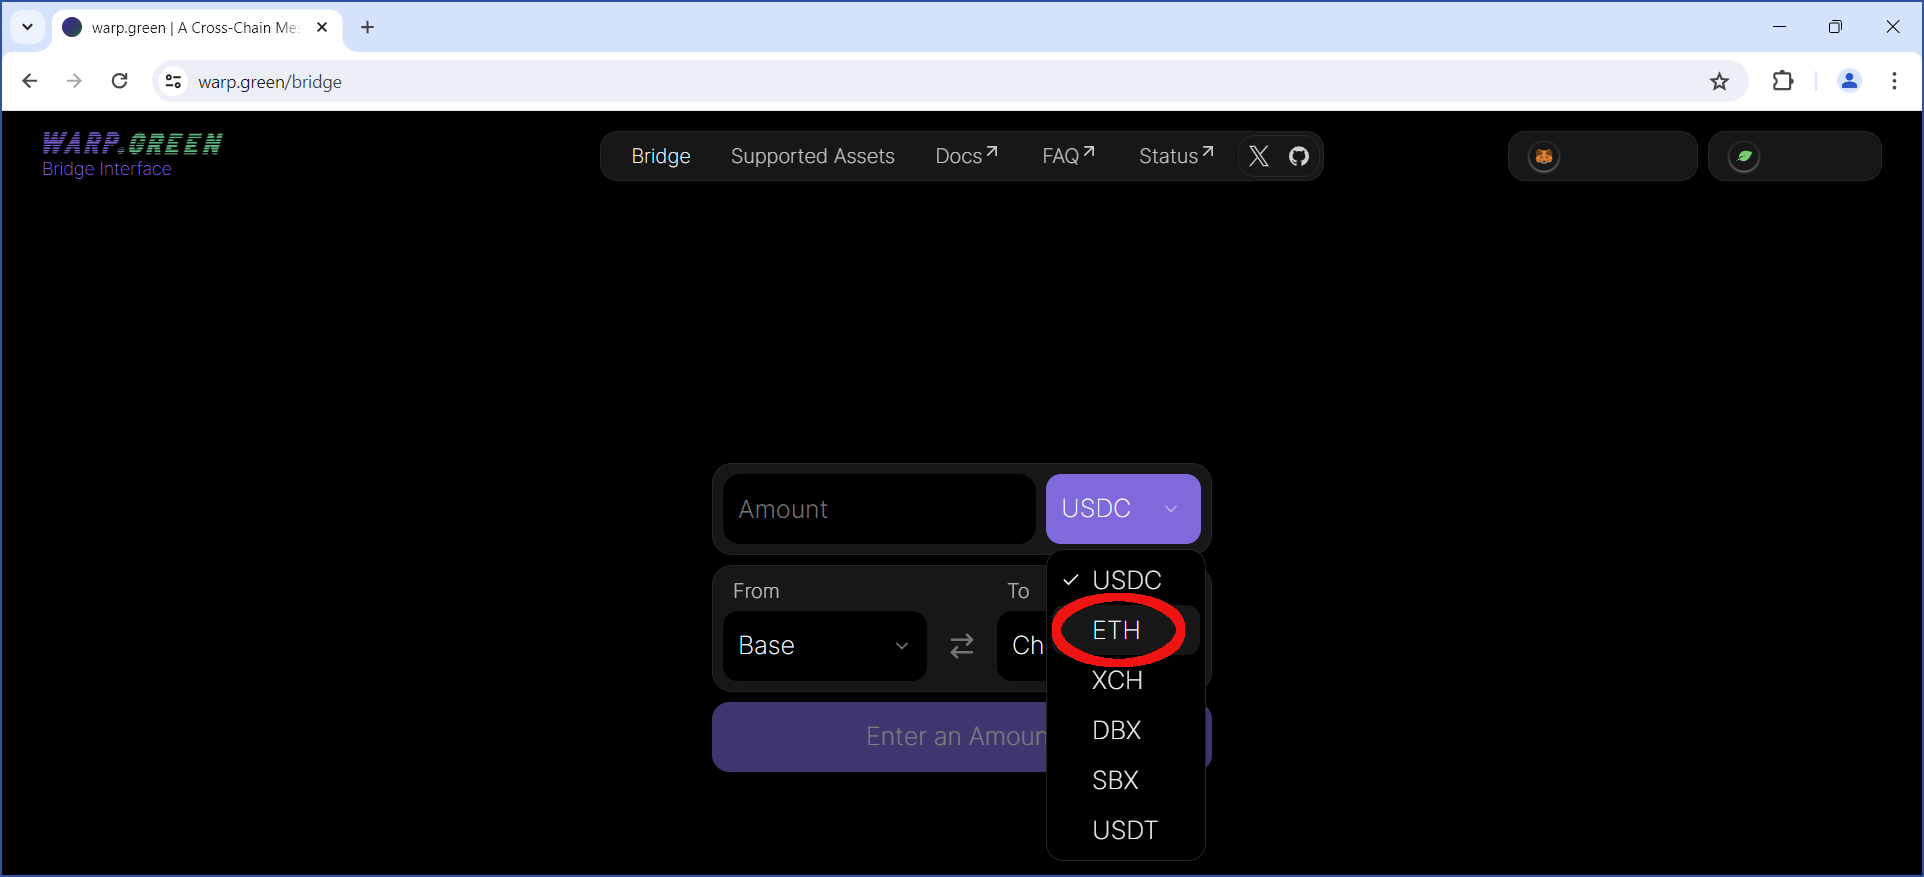
The bridge will ask you to enter an amount to transfer. By default, the asset to transfer will be USDC. However, in this example, we will transfer ETH:

<div align="center"><img src="/files/EyeMb3GI9ql9n28PMeal" alt="" width="800"></div>

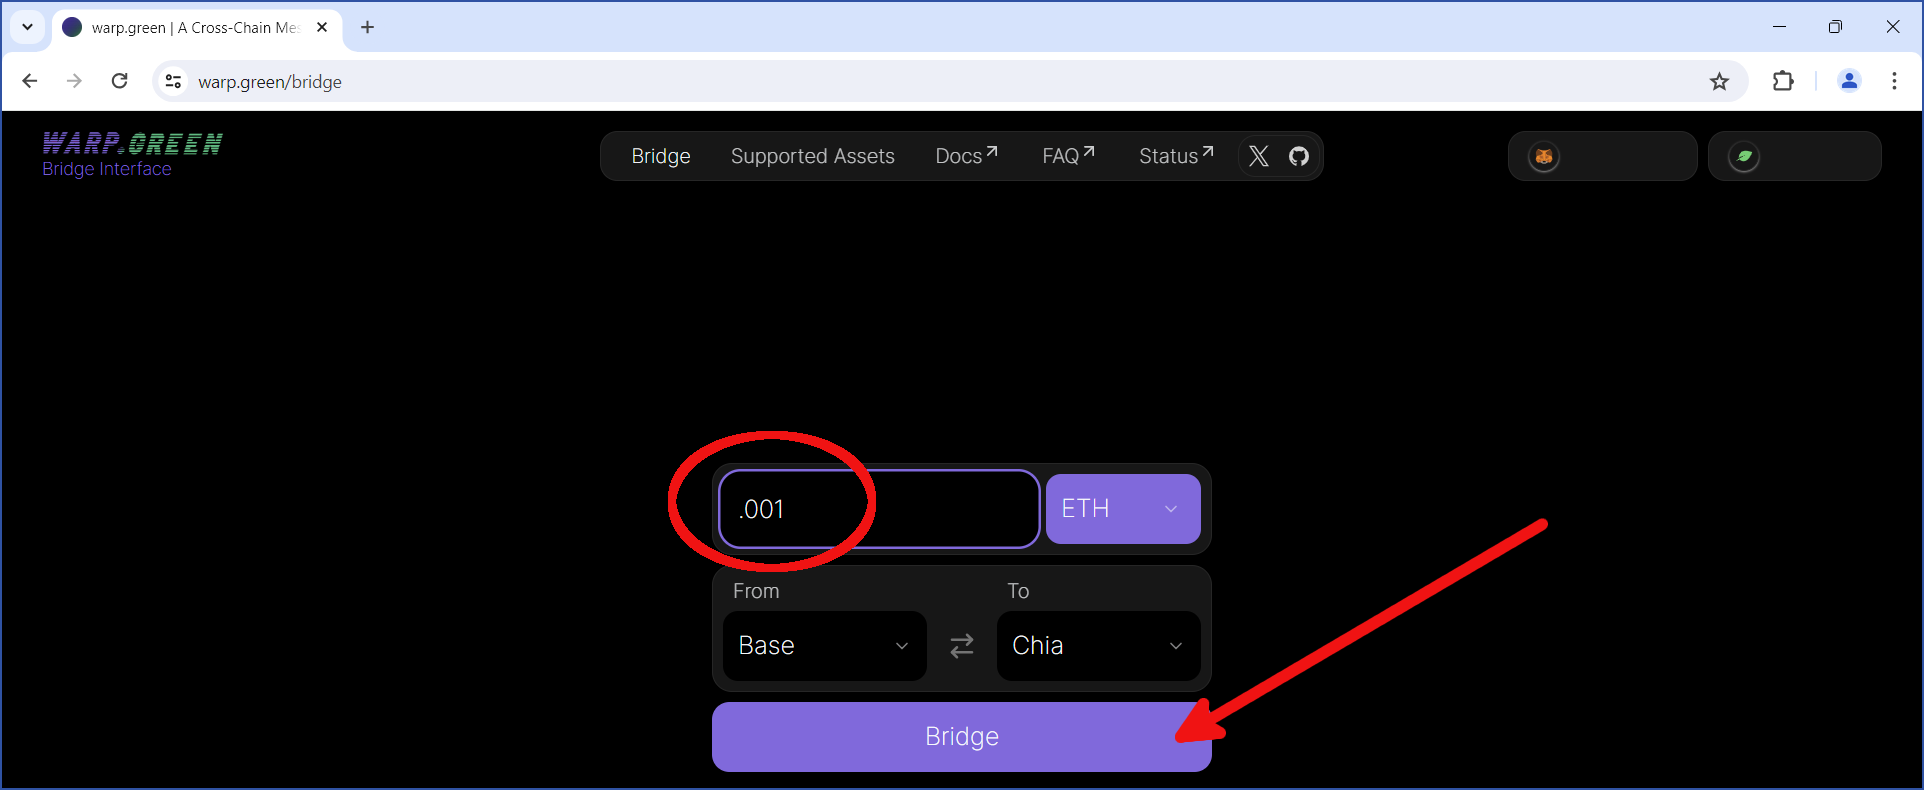
Enter the amount to transfer. Also, verify that the `From` and `To` chains are accurate. For this example, we will transfer 0.001 ETH from Base to Chia.

{% hint style="info" %}
The Base blockchain will charge a fee, so you will not be able to send the full amount in your MetaMask wallet. In this example, 0.00000465 ETH was the required fee. This fee will vary, depending on which blockchain you are using, and how busy the network is.
{% endhint %}

After you have verified this info, click `Bridge`:

<div align="center"><img src="/files/HOIG6oZq2cuHWmzp7FCw" alt="" width="800"></div>

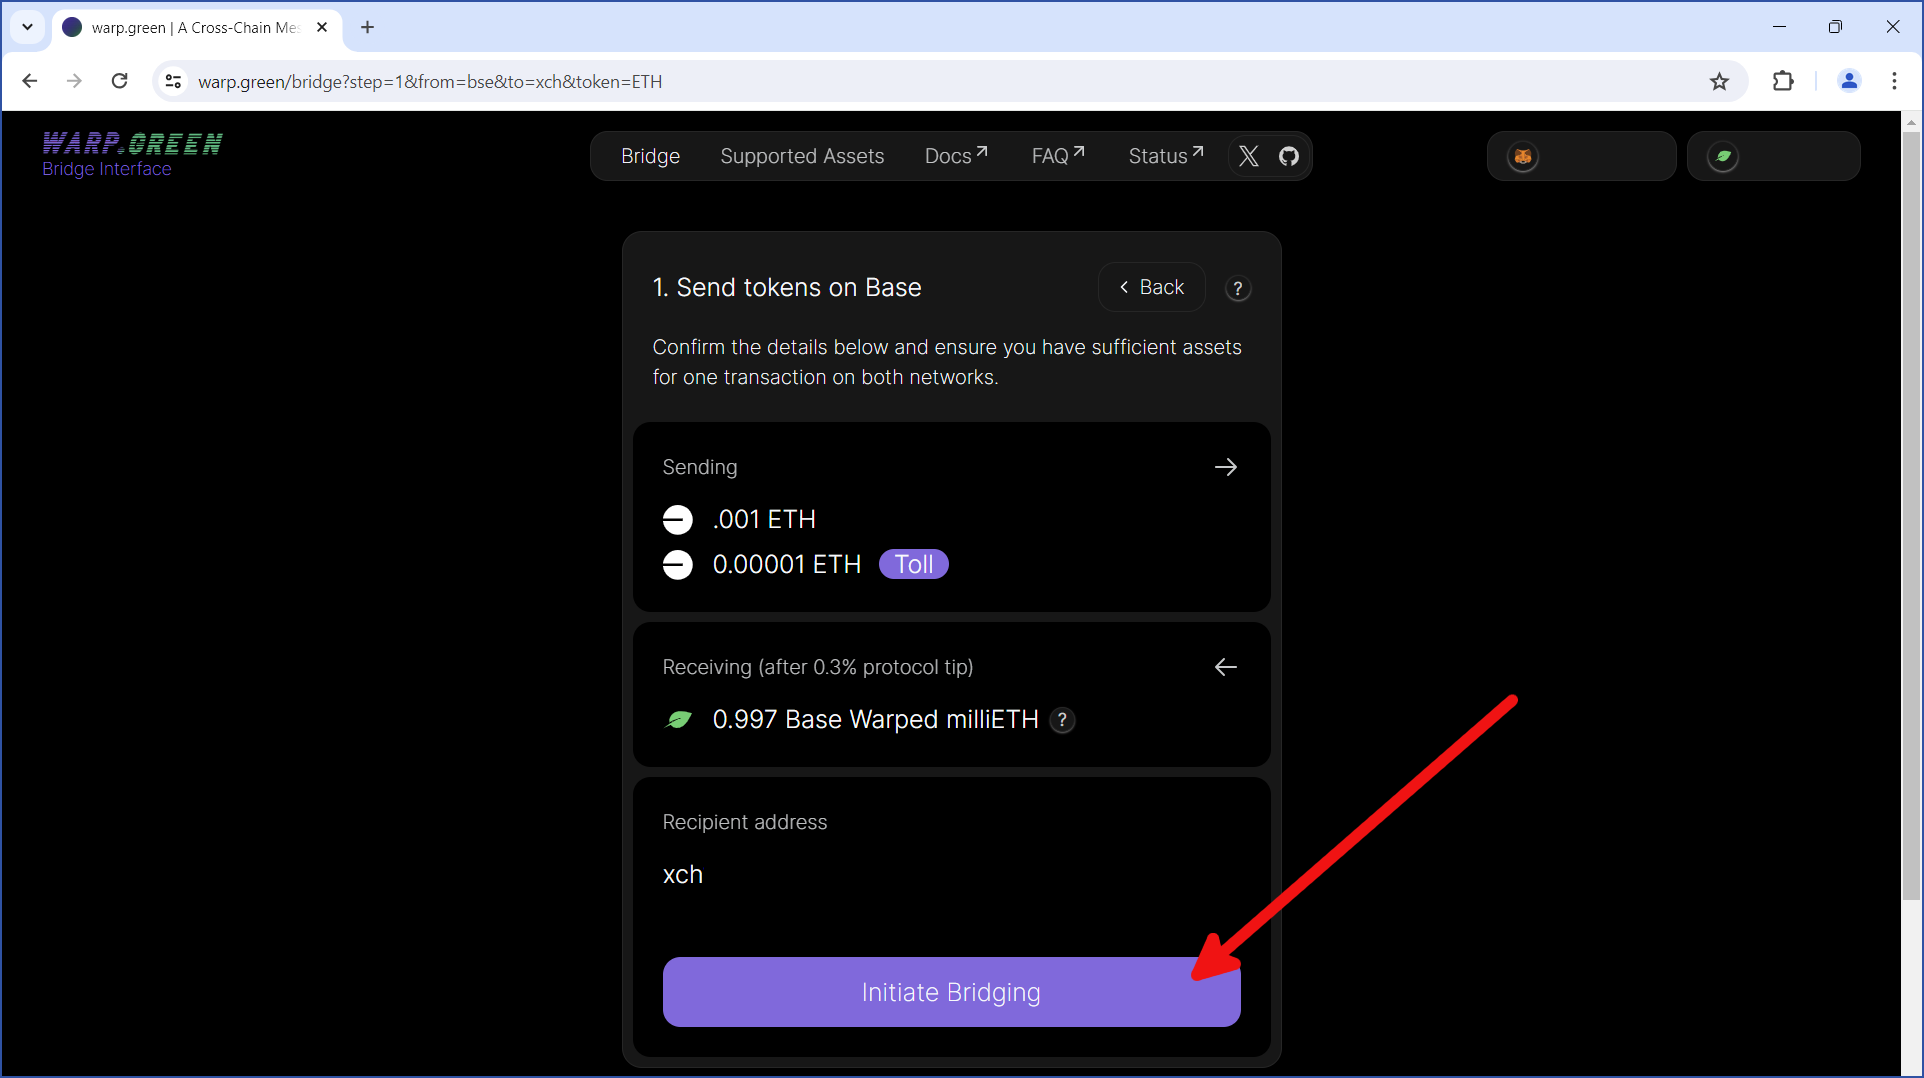
In Step 1 of the transfer, you will be given one more chance to verify the accuracy of everything you have entered.

{% hint style="danger" %}
Be sure to read this dialog carefully, and verify that all information contained within is accurate.
{% endhint %}

{% hint style="warning" %}
Several fees may apply when using the bridge:

Each blockchain charges a fee to use its network. The size of each fee depends on how busy the network is, as well as how long you are willing to wait for your transaction to be confirmed. Generally speaking, the fees on Base are significantly lower than those on Ethereum. On Chia, the network is often not busy enough to require any fees.

In addition, a "toll" is automatically deducted for using the bridge. The toll is a small charge (either 0.001 XCH or 0.00001 ETH, depending on the chain where the transaction originated), collected solely to prevent network spam. This money does not go to the bridge or to its operators. Instead, it is redirected to the farmer/miner of the block which includes your transaction.

Finally, the bridge itself charges a 0.3% tip for using the protocol. This tip is split among the bridge validators and helps to cover the costs associated with maintaining the bridge.

For more information, see [our documentation](https://docs.warp.green/).
{% endhint %}

If everything looks good, click `Initiate Bridging`:

<div align="center"><img src="/files/AqWXBOKGiSmy8g3aMmDV" alt="" width="800"></div>

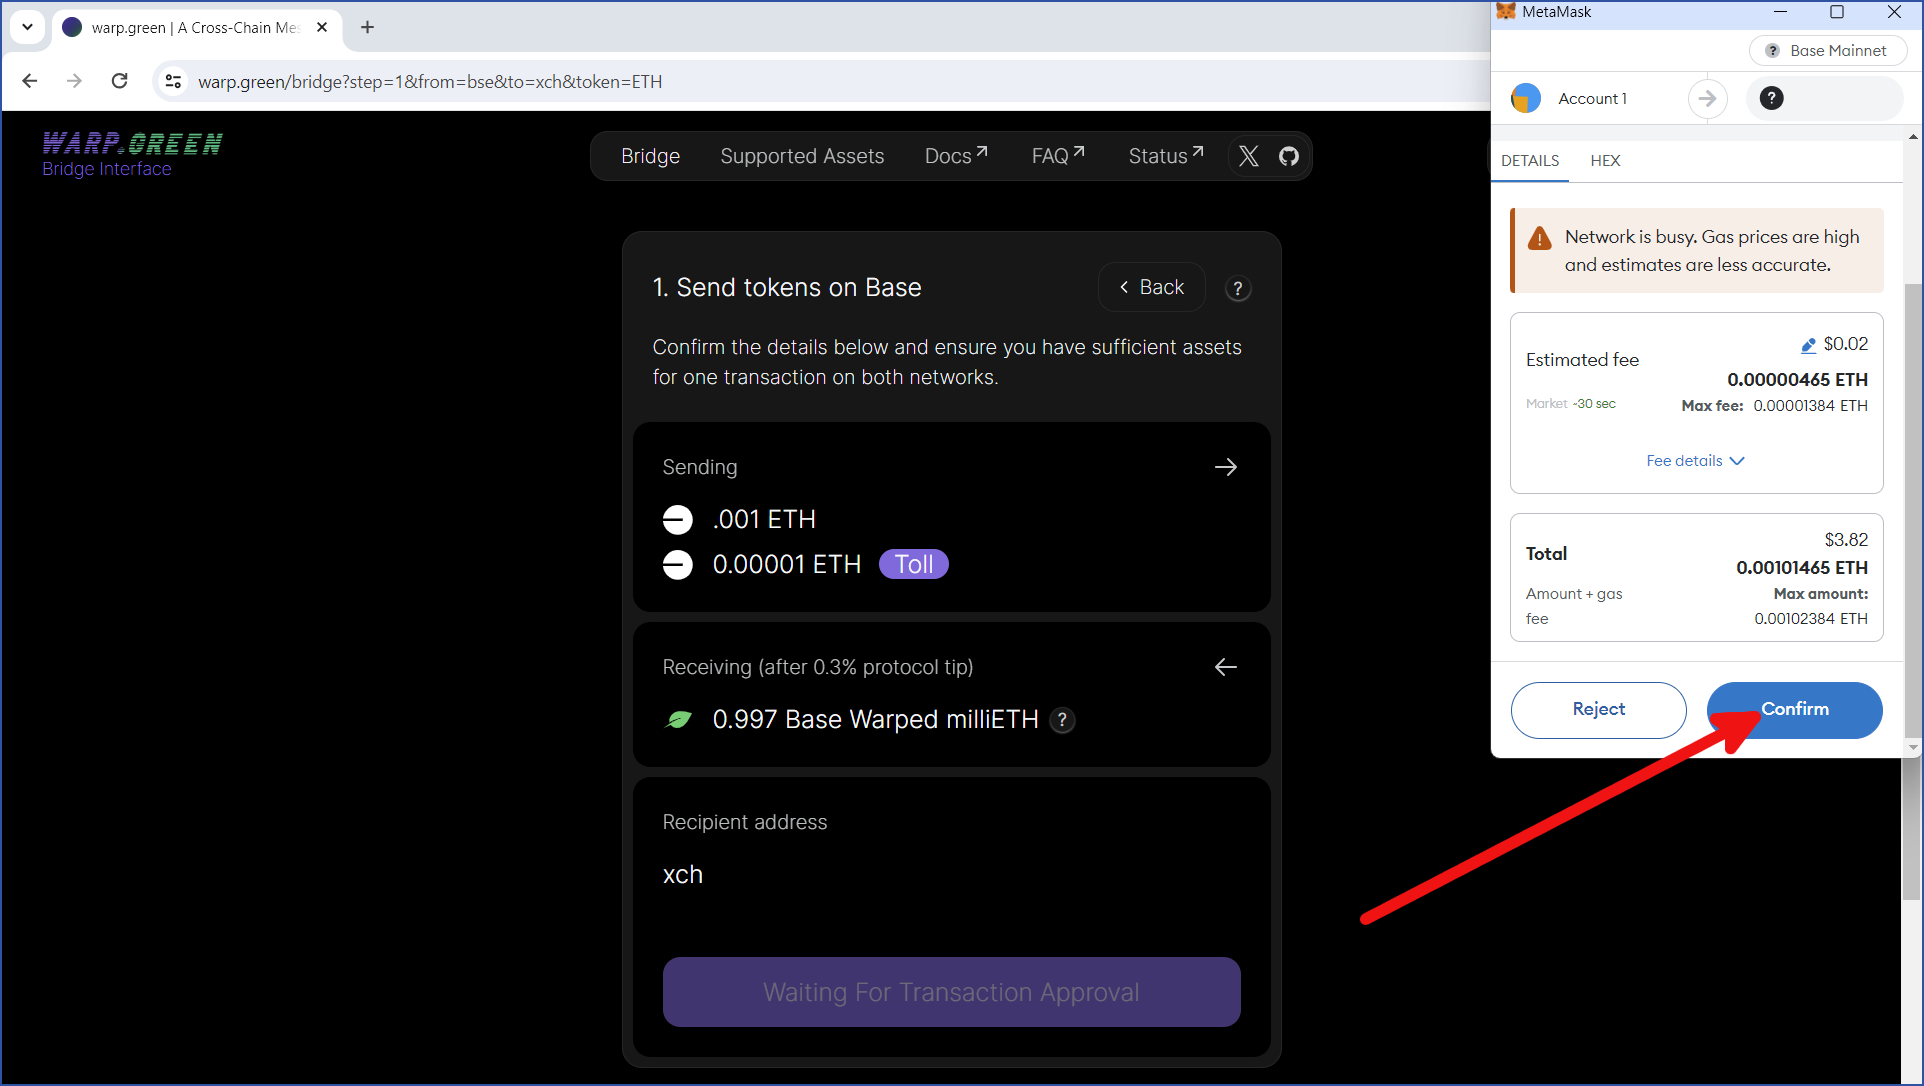
MetaMask will pop up, and you will be shown the details of your transfer. This includes the current blockchain fee amount. Click `Confirm` to accept the fee and initiate the transfer:

<div align="center"><img src="/files/G04XakYrJeZt7JVY8zNk" alt="" width="800"></div>

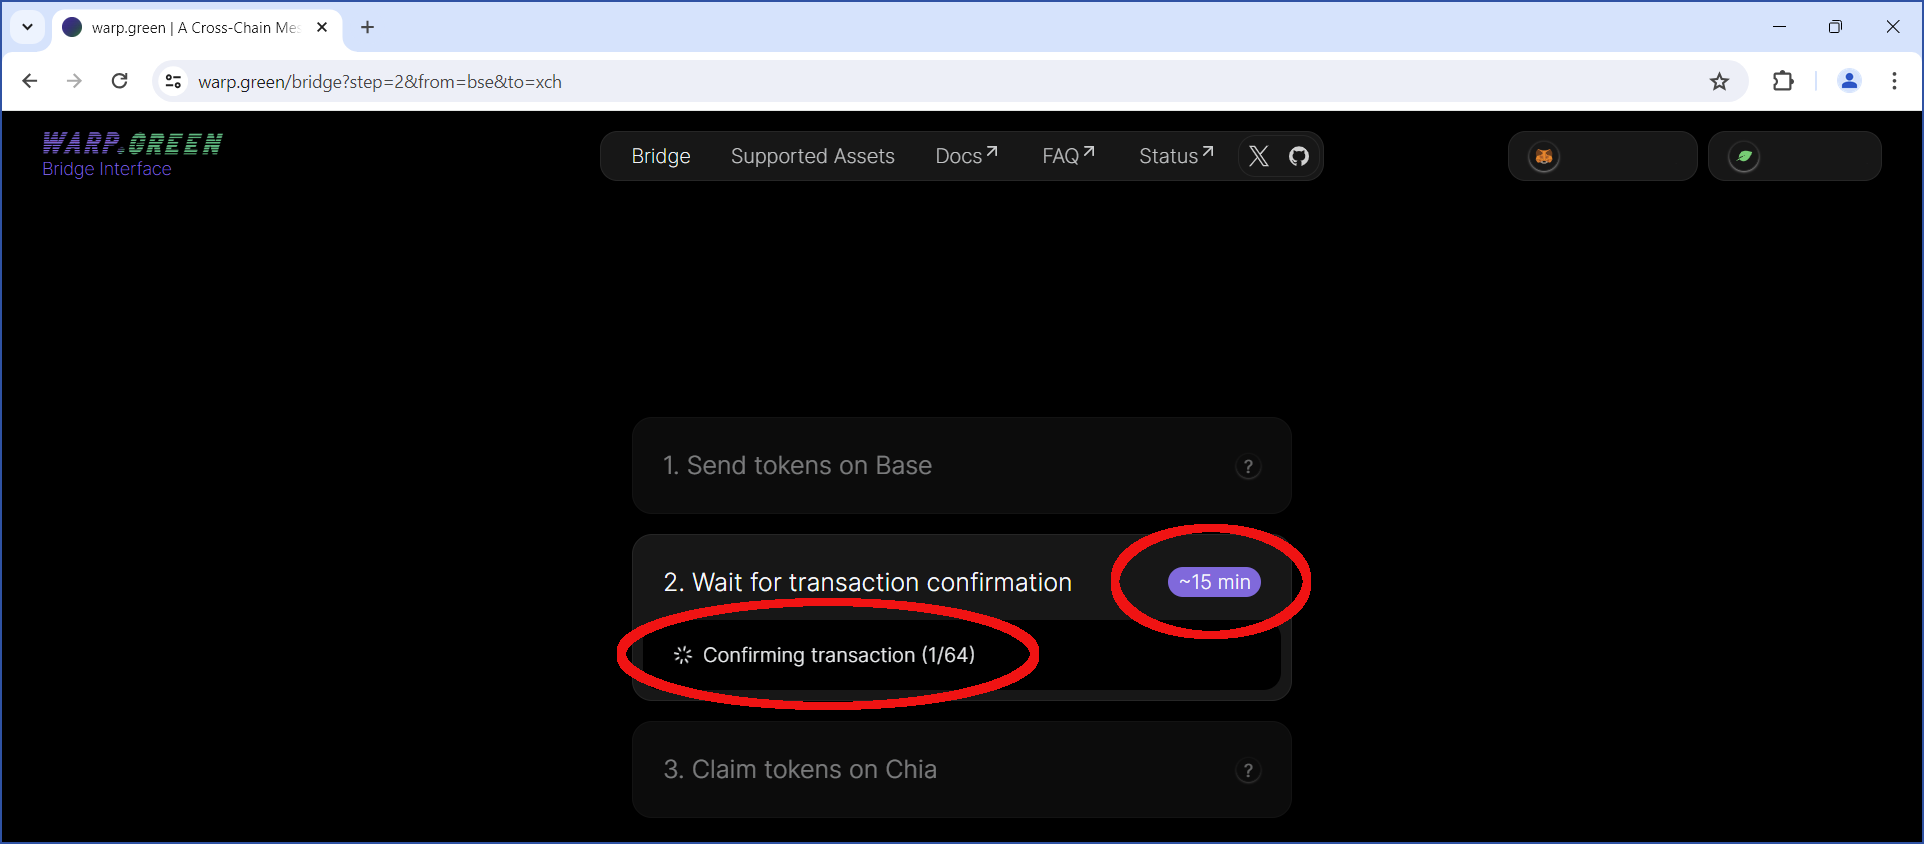
You will now be taken to Step 2 of the transfer. Before completing the transfer, you will need to wait around 10-15 minutes; the exact time can vary a bit. The reason for this delay is to avoid funds being lost in blockchain reorgs:

<div align="center"><img src="/files/KhcBPDGncPc7ll9YdhSJ" alt="" width="800"></div>

Leave this browser window open, and return to it after 15 minutes.

### Complete the transfer

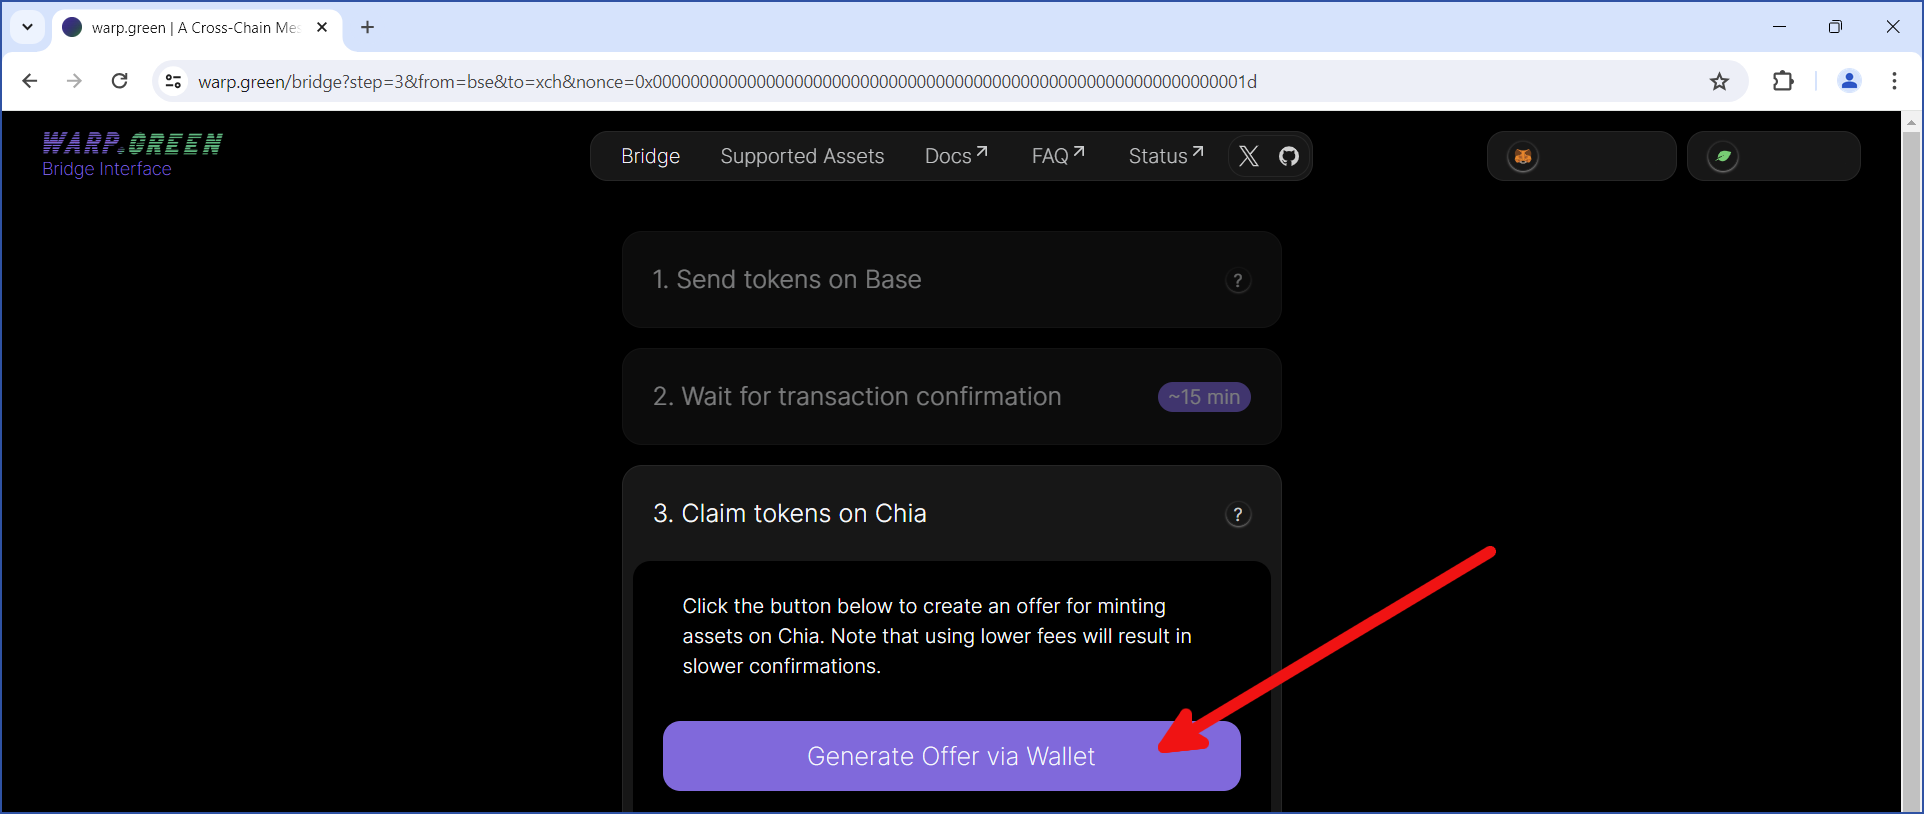
After waiting for around 15 minutes, the transfer will reach Step 3. Click `Generate Offer via Wallet`:

<div align="center"><img src="/files/UNi4n4J1UepS16LTJARs" alt="" width="800"></div>

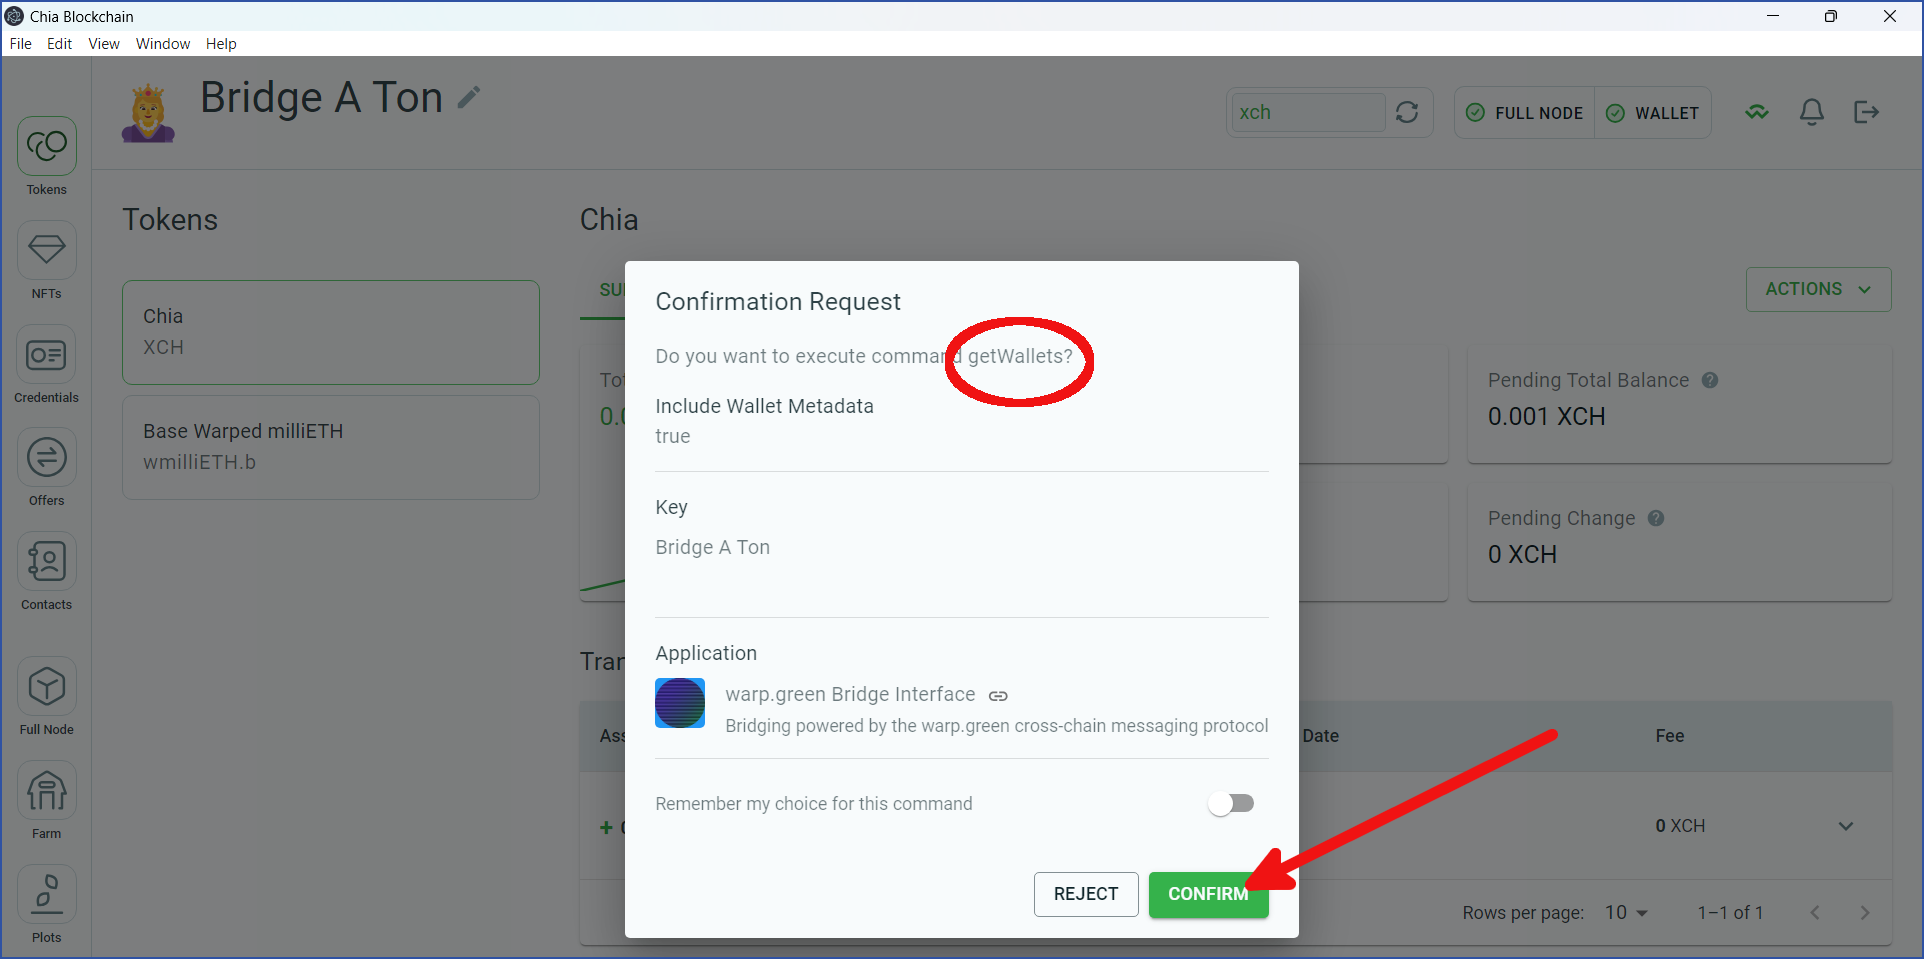
Change to your Chia reference wallet. You may see a dialog asking for permission to execute `getWallets`. If so, Click `CONFIRM`:

<div align="center"><img src="/files/YbpblyqCjOXWlgyGWLsb" alt="" width="800"></div>

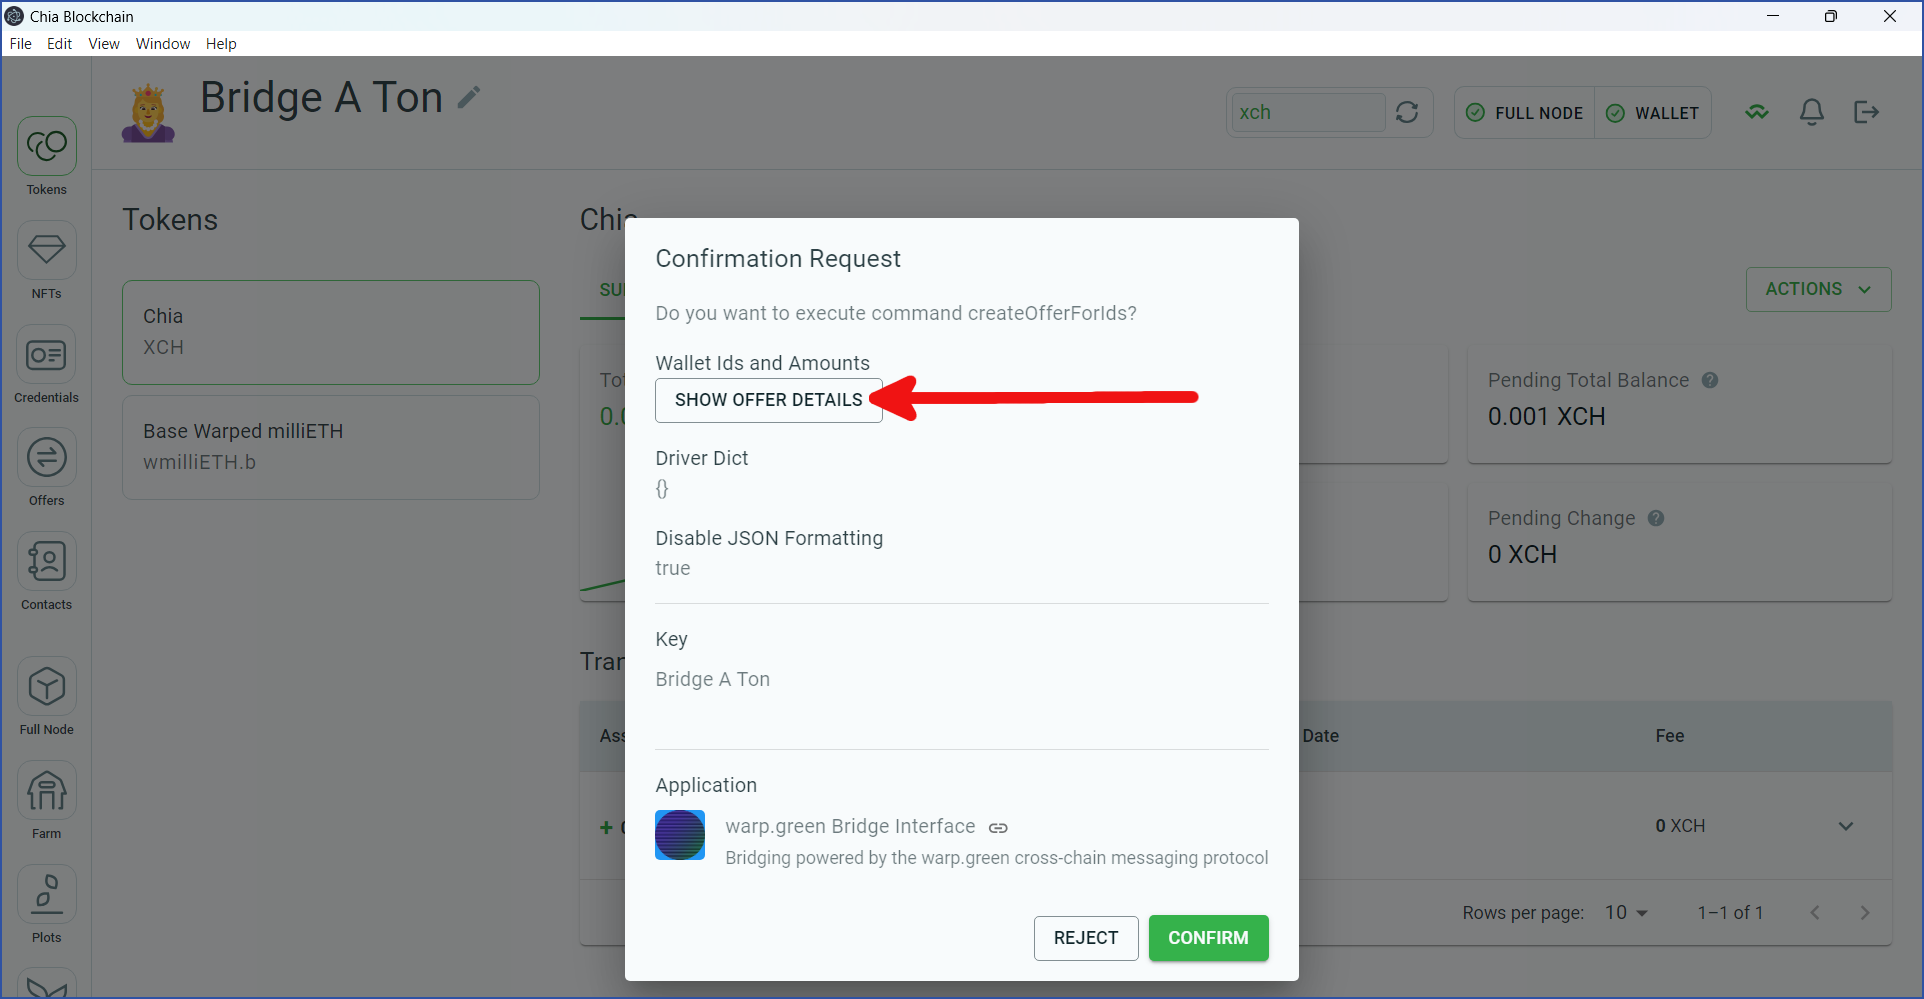
You may need to grant permission to execute one or more additional methods. Click `CONFIRM` on these dialogs. Eventually, you will see a dialog with a `SHOW OFFER DETAILS` button. Click this button:

<div align="center"><img src="/files/D1doyNdQcrEZV2ItWH22" alt="" width="800"></div>

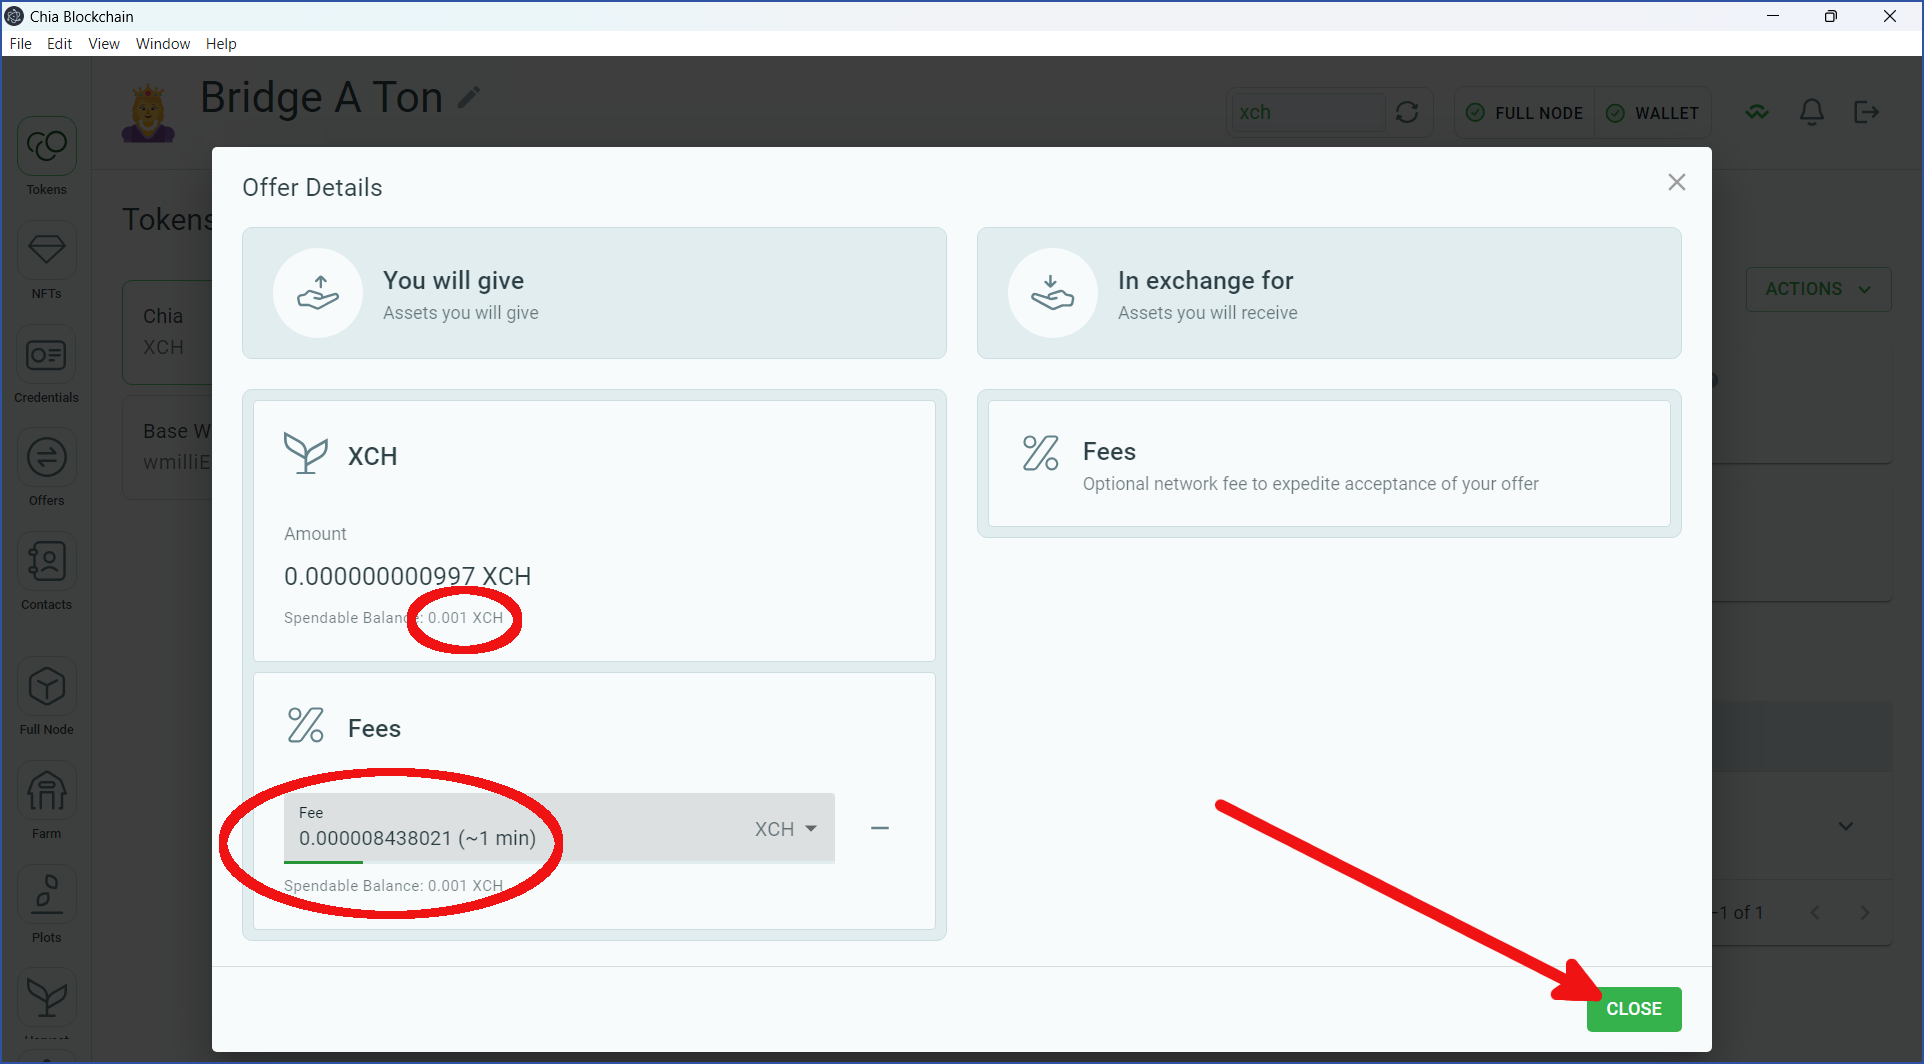
You will be shown the details of the transfer from the bridge to your wallet. By default, no blockchain fee will be used. However, if you have available funds (the small circle in the image below), we recommend that you add a fee in order to expedite the transfer. Either way, leave the `In exchange for` side of the dialog blank. Click `CLOSE` when you are finished reviewing this dialog:

<div align="center"><img src="/files/9Nn8N6iGXkj9bOVgX5Zm" alt="" width="800"></div>

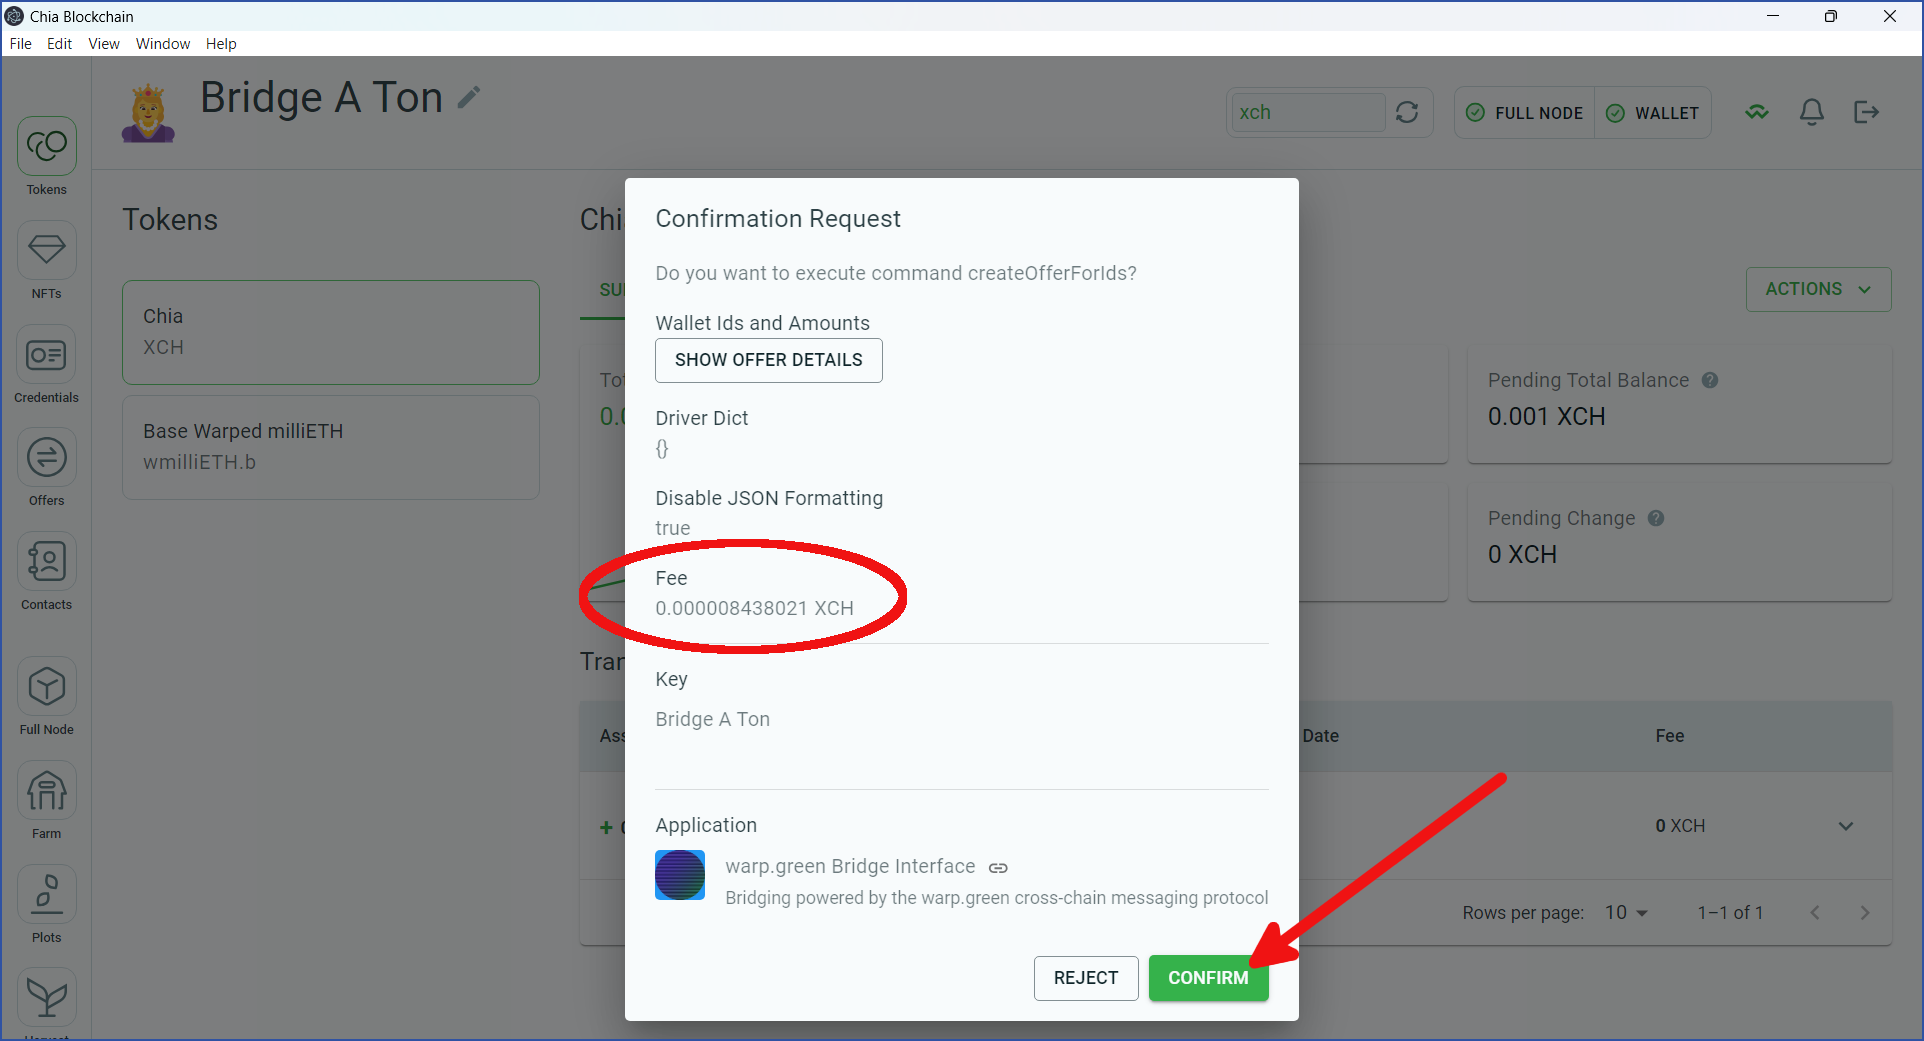
If you added a blockchain fee, it will now appear in the `Confirmation Request` dialog. Click `CONFIRM`:

<div align="center"><img src="/files/XLBLazP3f7GVFnWbb0iU" alt="" width="800"></div>

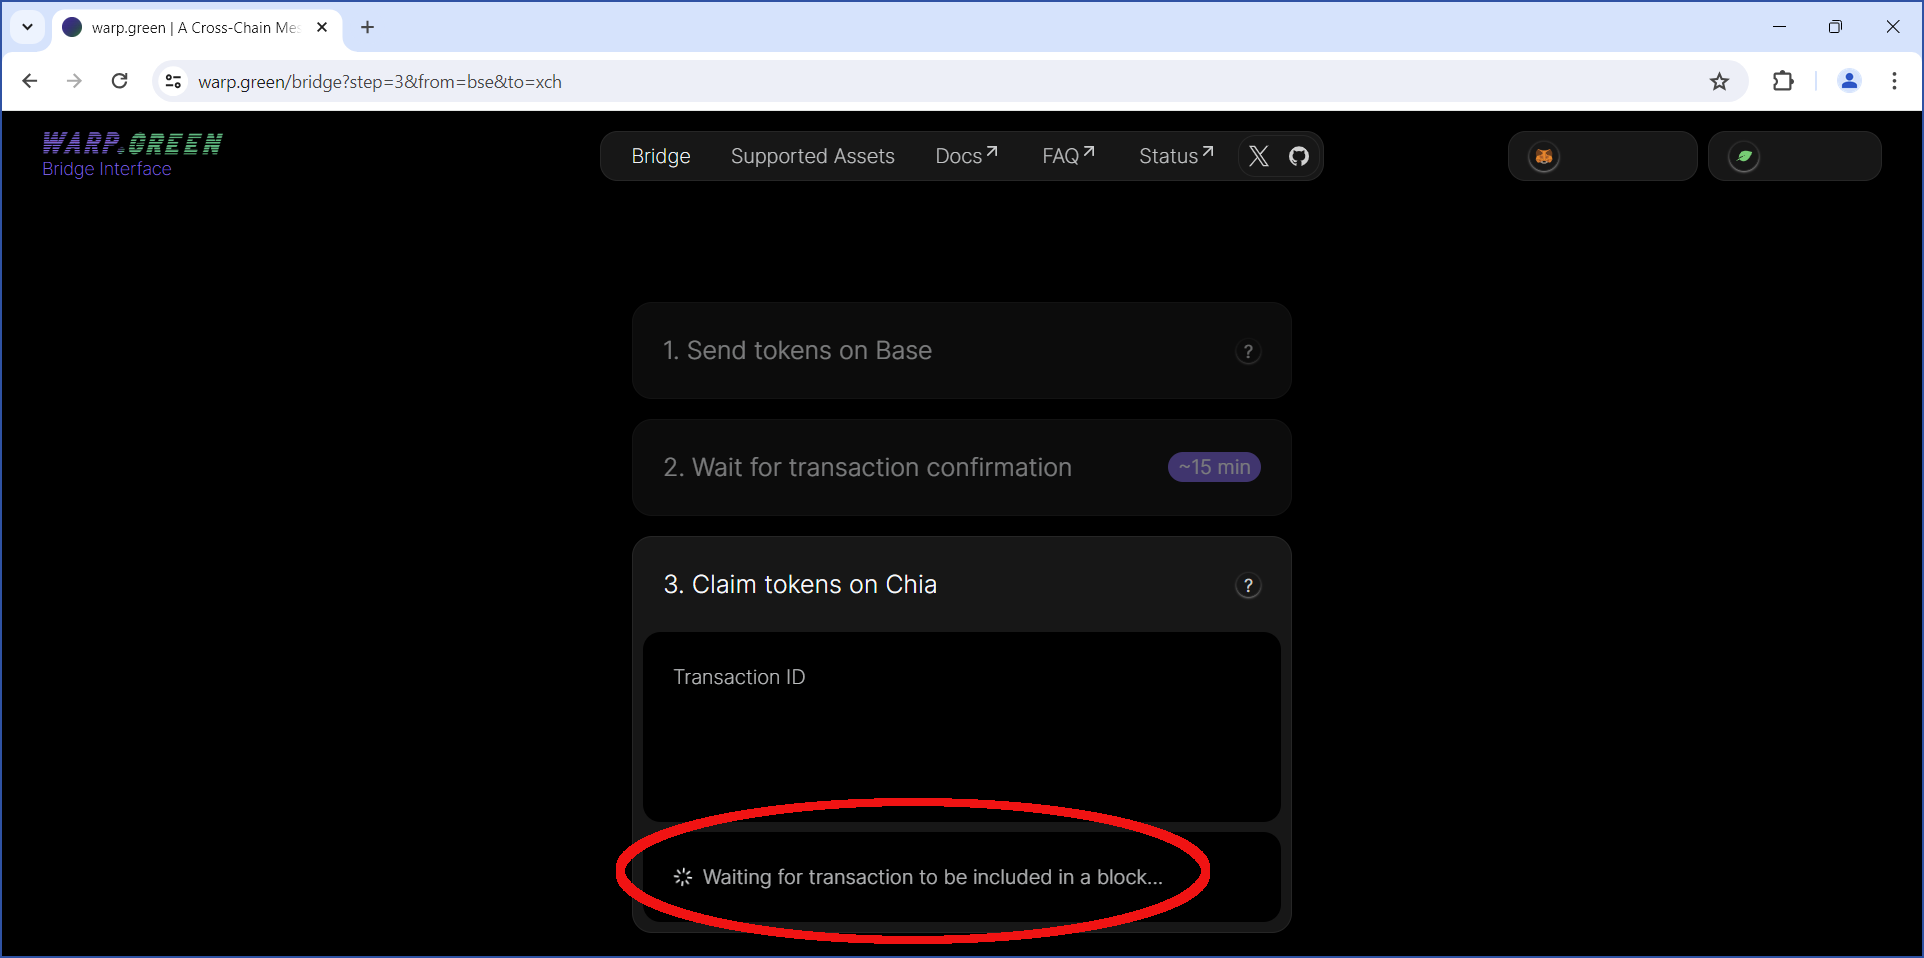
Return to your web browser. The transfer will now be in progress. This should be completed in 1-5 minutes, depending on how busy the Chia network is, along with the size of your fee:

<div align="center"><img src="/files/H0VQbFYbMbYI41B60nK2" alt="" width="800"></div>

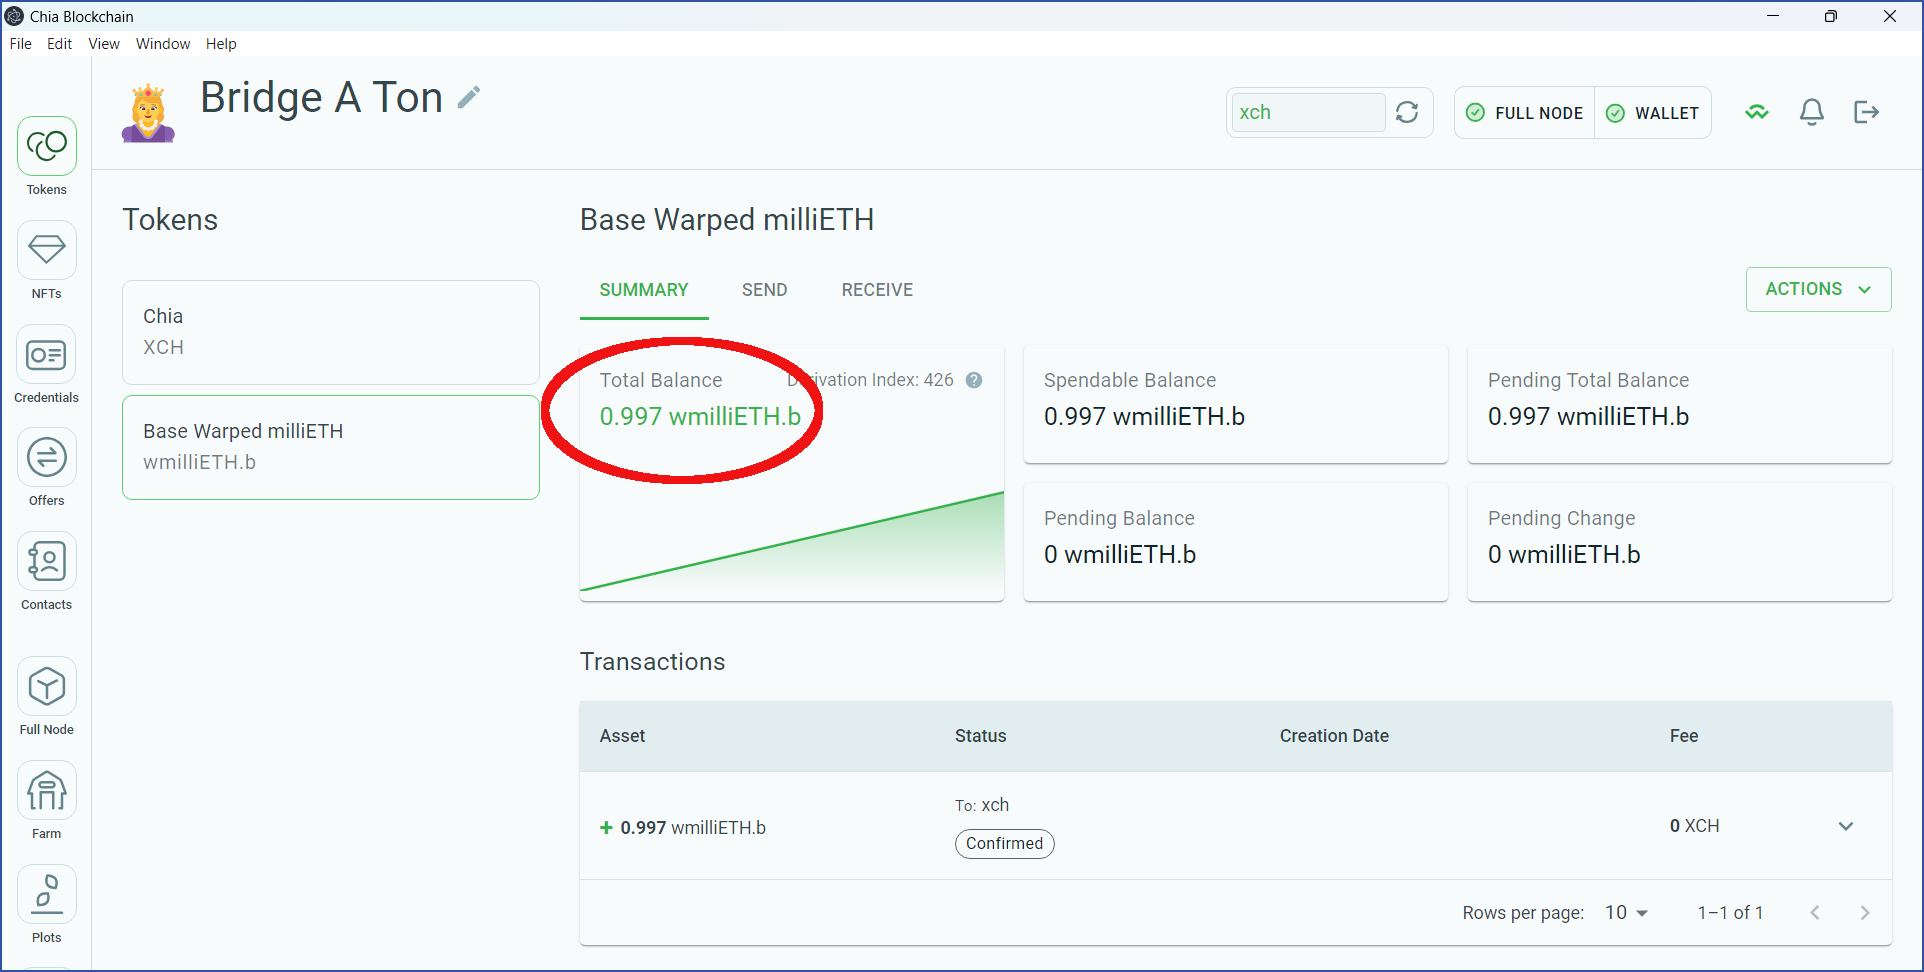
After the transfer has completed, return to the reference wallet. It should now contain the `Base Warped milliETH`. In this example, the bridge charged a 0.3% fee, so 0.997 wmilliETH.b was transferred. Recall that this amount is worth 0.000997 ETH:

<div align="center"><img src="/files/EjpAYjsOfsUZU0J4W7Ik" alt="" width="800"></div>

Congratulations! You have successfully transferred ETH from the Base chain to Chia. If you would like to exchange the wmilliETH.b for another asset, you could head to a decentralized exchange such as [dexie.space](https://dexie.space/), or an AMM such as [tibetswap.io](https://v2.tibetswap.io/).


# Creating a New Wrapped CAT

Make your CAT available on Base

As a result of many requests from the Chia community, the team has decided to create a process for making new memecoins available for bridging. The CAT creator is expected to cover the contract deployment fee on Base. Note that following the steps outlined here does **NOT** guarantee the token will be listed on the official bridge interface - the warp.green team reserves the right to approve/reject pull requests on a case-by-case basis. As such, it's highly recommended to [reach out](/users/contact-us) before starting the process.

**Note**: Before beginning, make sure your token details are consistent and up-to-date on Dexie, SpaceScan, and TibetSwap.

**Note 2**: An example PR can be found [here](https://github.com/warpdotgreen/warp-ui/pull/35).

## Step 1: Deploy WrappedCAT Contract on Base

The first step in the process required you to deploy a special ERC-20 contract for the future warped CAT. This contract uses the bridge portal contract as an 'oracle' to parse messages from Chia and mint equivalent warped CATs. Moreover, the contract allows users to burn their warped CATs in order to send an 'unlock' message to Chia, where they get the same amount (minus a fee) of real CATs.

To do this, please use the following page: <https://warp.green/bridge/deploy>

Note that the CAT symbol needs to match the 'code' on Dexie/SpaceScan (it's not the CAT's full name). On Base, the ERC-20 will have a symbol of 'w\[SYMBOL]' and a name of 'Chia Warped \[SYMBOL]'.

After deploying the contract, store the contract address, as it will be used in future steps.

## Step 2: Add your WrappedCAT Address to the Docs

The [Contract Addresses](/developers/contract-addresses) page maintains an up-to-date list of all currently deployed WrappedCAT contracts. Make a PR to add your new contract address in this file: [https://github.com/warpdotgreen/docs/blob/master/developers/contract-addresses.md](/developers/contract-addresses)

New entries must be added at the end of the table under 'Base Mainnet.' No special description is needed for the PR, as context will be provided in a future PR. Please name your PR request "Add \[SYMBOL]".

## Step 3: Add your WrappedCAT Address to the Watcher

The [watcher](https://github.com/warpdotgreen/watcher) follows sent messages on-chain and tries to parse their contents. Its API is used in the explorer page, which shows pending and finished transfers.

Make a PR to add your token symbol, asset id, and WrappedCAT contract address to this file: <https://github.com/warpdotgreen/watcher/blob/master/config.mainnet.json>

The new entry should be added in the 'tokens' array for the xch-bse CAT bridge, near the end of the JSON file. No special description is needed for the PR, as context will be provided in a future PR. Please name your PR request "Add \[SYMBOL]".

## Step 4: Add your WrappedCAT Address to the UI

It's now time to add your CAT to the [bridge UI](https://github.com/warpdotgreen/warp-ui). More specifically, you will need to modify the following file: <https://github.com/warpdotgreen/warp-ui/blob/master/src/app/bridge/config.tsx>

Use the definition of `BEPE_MEMECOIN_TOKEN_BASE_ONLY` as a template. Make sure the `memecoin` attribute of your token is set to `true` and that there is an `additionalWarning` if the team indicated one is required.

A test transfer is required to add the token to the UI. Before running 'npm run dev', make sure your '.env.local' file contains `NEXT_PUBLIC_TESTNET=false`. With the local UI running, do a test bridge to Base (token amount can be small), and then bridge a small amount back. Keep track of the transaction ids as they'll need to be included in the final PR.

To make the final PR, please follow this template: <https://github.com/warpdotgreen/warp-ui/blob/master/.github/pull_request_template.md> . All the fields of the table should be completed with values from previous steps. Please name your PR request "Add \[SYMBOL]".

After making the final PR, please [contact us](/users/contact-us), making sure to include a link to the final PR. A lot of checks have to be made before a token can be added to the UI - response times may vary.


# Contact Us

If you have any questions or suggestions, our point of contact is yakuhito. The following communication methods are preferred:

* Email: `y@kuhi.to`
* Keybase: [yakuhito\_chia](https://keybase.io/yakuhito_chia)
* Twitter/X: [yakuhito](https://x.com/yakuhito)

Please use the same details to report vulnerabilities or reach out for potential collaborations.

Please also note that we are currently **not** hiring for any roles.


# Introduction

Welcome to the [warp.green](https://warp.green/) developer docs! This is a cross-chain messaging protocol that currently allows sending data between EVM and coinset (Chia) blockchains. A brief presentation can be viewed [here](https://pitch.com/v/warpdotgreen-xwmj7r). Our [GitHub page](https://github.com/warpdotgreen) contains repositories with the code that currently powers the protocol.

This section of the documentation covers everything development-related - from contract addresses and how it all works under the hood to an example application that is currently live. If there are any questions, don't hesitate to [reach out](https://github.com/warpdotgreen)!


# Contract Addresses

### Ethereum Mainnet

<table><thead><tr><th width="245">Contract</th><th width="554">Address</th><th data-hidden></th></tr></thead><tbody><tr><td>Portal.sol</td><td><a href="https://etherscan.io/address/0x2593C582B7a24d94Ba0056B493Fd4048bd99fc3F#code">0x2593C582B7a24d94Ba0056B493Fd4048bd99fc3F</a></td><td></td></tr><tr><td>MilliETH.sol</td><td><a href="https://etherscan.io/address/0xf2D5d8eC69E2faed5eB4De90749c87ee314a4B12#code">0xf2D5d8eC69E2faed5eB4De90749c87ee314a4B12</a></td><td></td></tr><tr><td>ERC20Bridge.sol</td><td><a href="https://etherscan.io/address/0x208b80E85dAC3354DD80f72cC272297909EE81b7">0x208b80E85dAC3354DD80f72cC272297909EE81b7</a></td><td></td></tr><tr><td>WrappedCAT.sol (wXCH)</td><td><a href="https://etherscan.io/address/0x1be362F422A862055dCFF627D33f9bD478e6C7d7">0x1be362F422A862055dCFF627D33f9bD478e6C7d7</a></td><td></td></tr></tbody></table>

### Base Mainnet

<table><thead><tr><th width="248">Contract</th><th>Address</th><th data-hidden></th></tr></thead><tbody><tr><td>Portal.sol</td><td><a href="https://basescan.org/address/0x382bd36d1dE6Fe0a3D9943004D3ca5Ee389627EE">0x382bd36d1dE6Fe0a3D9943004D3ca5Ee389627EE</a></td><td></td></tr><tr><td>MilliETH.sol</td><td><a href="https://basescan.org/address/0xf2D5d8eC69E2faed5eB4De90749c87ee314a4B12">0xf2D5d8eC69E2faed5eB4De90749c87ee314a4B12</a></td><td></td></tr><tr><td>ERC20Bridge.sol</td><td><a href="https://basescan.org/address/0x8412f06e811b858Ea9edcf81a5E5882dbf70aC96">0x8412f06e811b858Ea9edcf81a5E5882dbf70aC96</a></td><td></td></tr><tr><td>WrappedCAT.sol (wXCH)</td><td><a href="https://basescan.org/address/0x36be1d329444aeF5D28df3662Ec5B4F965Cd93E9">0x36be1d329444aeF5D28df3662Ec5B4F965Cd93E9</a></td><td></td></tr><tr><td>WrappedCAT.sol (wDBX)</td><td><a href="https://basescan.org/address/0x2dabfFED5584DAb0CA3f9A56BA849f97A08cAd9A">0x2dabfFED5584DAb0CA3f9A56BA849f97A08cAd9A</a></td><td></td></tr><tr><td>WrappedCAT.sol (wSBX)</td><td><a href="https://basescan.org/address/0x0f374737547cC191f940E02763084CD62BCDe4a6">0x0f374737547cC191f940E02763084CD62BCDe4a6</a></td><td></td></tr><tr><td>WrappedCAT.sol (wHOA)</td><td><a href="https://basescan.org/address/0xee642384091f4bb9ab457b875E4e209b5a0BD147">0xee642384091f4bb9ab457b875E4e209b5a0BD147</a></td><td></td></tr><tr><td>WrappedCAT.sol (wWARP)</td><td><a href="https://basescan.org/address/0x6ca253E17e2334165113Be86C70Bc2655798BDcB">0x6ca253E17e2334165113Be86C70Bc2655798BDcB</a></td><td></td></tr><tr><td>WrappedCAT.sol (wBEPE)</td><td><a href="https://basescan.org/address/0xBB5cBDAE23C5368557CC9A32337863eECf03cF9f">0xBB5cBDAE23C5368557CC9A32337863eECf03cF9f</a></td><td></td></tr><tr><td>WrappedCAT.sol (wDIG)</td><td><a href="https://basescan.org/address/0x4087fF5F00dAAFdd24F93b72a4BFdc3e6b5C1fa8">0x4087fF5F00dAAFdd24F93b72a4BFdc3e6b5C1fa8</a></td><td></td></tr><tr><td>WrappedCAT.sol (wPEPE)</td><td><a href="https://basescan.org/address/0xC71690cd048F30F58Eee0d138fc19647bDaD79C7">0xC71690cd048F30F58Eee0d138fc19647bDaD79C7</a></td><td></td></tr><tr><td>WrappedCAT.sol (wSPROUT)</td><td><a href="https://basescan.org/address/0x68f305Cca4D3462Ac8CAf759492Ed9d33E4DFF40">0x68f305Cca4D3462Ac8CAf759492Ed9d33E4DFF40</a></td><td></td></tr><tr><td>WrappedCAT.sol (wLOVE)</td><td><a href="https://basescan.org/address/0xCf6Ca3929b00Ebc7fF504b165ca40C44087CAE47">0xCf6Ca3929b00Ebc7fF504b165ca40C44087CAE47</a></td><td></td></tr><tr><td>WrappedCAT.sol (w$CHIA)</td><td><a href="https://basescan.org/address/0x05AefaFfF978EA4F9E6ff9FA3Bc2465B90598549">0x05AefaFfF978EA4F9E6ff9FA3Bc2465B90598549</a></td><td></td></tr><tr><td>WrappedCAT.sol (wTWV)</td><td><a href="https://basescan.org/address/0xb23b3F88E1c4564C42177B7b28757f275D2aCBB9">0xb23b3F88E1c4564C42177B7b28757f275D2aCBB9</a></td><td></td></tr><tr><td>WrappedCAT.sol (wYKY)</td><td><a href="https://basescan.org/address/0x78701035aCB24261d532E73B0836478c5c01E0f1">0x78701035aCB24261d532E73B0836478c5c01E0f1</a></td><td></td></tr><tr><td>WrappedCAT.sol (wNIOC)</td><td><a href="https://basescan.org/address/0x8f0Fc5F93832A1A3368e0a25c2798e1B4c4c7437">0x8f0Fc5F93832A1A3368e0a25c2798e1B4c4c7437</a></td><td></td></tr><tr><td>WrappedCAT.sol (wWAR)</td><td><a href="https://basescan.org/address/0xBB5ed692F675108B454202b8789351599f6E829C">0xBB5ed692F675108B454202b8789351599f6E829C</a></td><td></td></tr><tr><td>WrappedCAT.sol (wMWIF)</td><td><a href="https://basescan.org/address/0x014bab9524f4408ef13262401E5609547F7E8718">0x014bab9524f4408ef13262401E5609547F7E8718</a></td><td></td></tr><tr><td>WrappedCAT.sol (wMZ)</td><td><a href="https://basescan.org/address/0xaC0c9DB04234668A1C15F47C7BE9c5D7040b0506">0xaC0c9DB04234668A1C15F47C7BE9c5D7040b0506</a></td><td></td></tr><tr><td>WrappedCAT.sol (wGOAT)</td><td><a href="https://basescan.org/address/0x8DC7294F5d6C5fbF0E926dEcE719e5db648bF45c">0x8DC7294F5d6C5fbF0E926dEcE719e5db648bF45c</a></td><td></td></tr><tr><td>WrappedCAT.sol (wSTR)</td><td><a href="https://basescan.org/address/0x000bA7E6824AA002033Df7BEDf8bAB72Fc6465e9">0x000bA7E6824AA002033Df7BEDf8bAB72Fc6465e9</a></td><td></td></tr><tr><td>WrappedCAT.sol (wSTNK)</td><td><a href="https://basescan.org/address/0xdc77bca5ed07a73D4E3E0D5E5817ebDC69EEc9bf">0xdc77bca5ed07a73D4E3E0D5E5817ebDC69EEc9bf</a></td><td></td></tr><tr><td>WrappedCAT.sol (wJOCK)</td><td><a href="https://basescan.org/address/0x20CC08b1135D7Ae892D6b5C799f0aBb51D822899">0x20CC08b1135D7Ae892D6b5C799f0aBb51D822899</a></td><td></td></tr><tr><td>WrappedCAT.sol (wCHUMP)</td><td><a href="https://basescan.org/address/0xCF38291b2A89Cb884a161E363Bfcc2b2F70E1844">0xCF38291b2A89Cb884a161E363Bfcc2b2F70E1844</a></td><td></td></tr><tr><td>WrappedCAT.sol (wPIZZA)</td><td><a href="https://basescan.org/address/0x3A7B077d815614ae51100fCBd7Fe1EE104Ae4b66">0x3A7B077d815614ae51100fCBd7Fe1EE104Ae4b66</a></td><td></td></tr><tr><td>WrappedCAT.sol (wCAT)</td><td><a href="https://basescan.org/address/0x69adFc7C32e12b17B875087c217209B7e13bFff9">0x69adFc7C32e12b17B875087c217209B7e13bFff9</a></td><td></td></tr><tr><td>WrappedCAT.sol (wDWB)</td><td><a href="https://basescan.org/address/0xc65151ac284f43A51F0A843F6A46930EfF0076c5">0xc65151ac284f43A51F0A843F6A46930EfF0076c5</a></td><td></td></tr><tr><td>WrappedCAT.sol (wPP)</td><td><a href="https://basescan.org/address/0xB5908e2ed3cfb5b6cfB0D5c7D8f4FAdA105861B2">0xB5908e2ed3cfb5b6cfB0D5c7D8f4FAdA105861B2</a></td><td></td></tr><tr><td>WrappedCAT.sol (wSBF)</td><td><a href="https://basescan.org/address/0xCe031c942F63769F7ef5C67b337B126A983EA952">0xCe031c942F63769F7ef5C67b337B126A983EA952</a></td><td></td></tr><tr><td>WrappedCAT.sol (wGRC)</td><td><a href="https://basescan.org/address/0x61B5368b955450250EAd959C703aCE38943f88e5">0x61B5368b955450250EAd959C703aCE38943f88e5</a></td><td></td></tr><tr><td>WrappedCAT.sol (w¢ni)</td><td><a href="https://basescan.org/address/0x28aEb37F911c1A9E9BD22fD5d333C1A7E0335183">0x28aEb37F911c1A9E9BD22fD5d333C1A7E0335183</a></td><td></td></tr><tr><td>WrappedCAT.sol (wCOOKIES)</td><td><a href="https://basescan.org/address/0x90be21da4Ab0f141f224fD8C1cc73220dcFF9189">0x90be21da4Ab0f141f224fD8C1cc73220dcFF9189</a></td><td></td></tr><tr><td>WrappedCAT.sol (wHonK)</td><td><a href="https://basescan.org/address/0xF6C04947A13481daAf4E8756B04f3D6bB7C30efF">0xF6C04947A13481daAf4E8756B04f3D6bB7C30efF</a></td><td></td></tr><tr><td>WrappedCAT.sol (wGOLD)</td><td><a href="https://basescan.org/address/0x0E6049B54cBb09da15Cd0b4578D45AEdd3150b8b">0x0E6049B54cBb09da15Cd0b4578D45AEdd3150b8b</a></td><td></td></tr><tr><td>WrappedCAT.sol (wMOG)</td><td><a href="https://basescan.org/address/0xddadf2DD421819eeC424040a01bC76B7809879B6">0xddadf2DD421819eeC424040a01bC76B7809879B6</a></td><td></td></tr><tr><td>WrappedCAT.sol (w$DUMB)</td><td><a href="https://basescan.org/address/0x9D1A9f442f194282fa47e8e45806375107b0a58e">0x9D1A9f442f194282fa47e8e45806375107b0a58e</a></td><td></td></tr><tr><td>WrappedCAT.sol (wSPACE)</td><td><a href="https://basescan.org/address/0xe5F66250807883DF33aF8973A86e5593F98F9E9E">0xe5F66250807883DF33aF8973A86e5593F98F9E9E</a></td><td></td></tr><tr><td>WrappedCAT.sol (wCOFFEE)</td><td><a href="https://basescan.org/address/0x3c03a9182C2810925D688f4a5420E1B8Ca7fFB58">0x3c03a9182C2810925D688f4a5420E1B8Ca7fFB58</a></td><td></td></tr><tr><td>WrappedCAT.sol (wNeckCoin)</td><td><a href="https://basescan.org/address/0x359D5BFa1bb87598e2198EC139eE44D31Bd06FaC">0x359D5BFa1bb87598e2198EC139eE44D31Bd06FaC</a></td><td></td></tr><tr><td>WrappedCAT.sol (wGYATT)</td><td><a href="https://basescan.org/address/0xA4c74853BE20F750ae5BeAbcAF4BEa93e6eF9bF7">0xA4c74853BE20F750ae5BeAbcAF4BEa93e6eF9bF7</a></td><td></td></tr><tr><td>WrappedCAT.sol (wTIBET-NeckCoin-XCH)</td><td><a href="https://basescan.org/address/0x9c6CAC4E0b34D21C52202d10f72995C5574cDe64">0x9c6CAC4E0b34D21C52202d10f72995C5574cDe64</a></td><td></td></tr><tr><td>WrappedCAT.sol (wNWO)</td><td><a href="https://basescan.org/address/0x0fB9e135419bc82D4Fe250bf2b79fBcbec212639">0x0fB9e135419bc82D4Fe250bf2b79fBcbec212639</a></td><td></td></tr><tr><td>WrappedCAT.sol (wPlank)</td><td><a href="https://basescan.org/address/0x66B55cBbBDd3a96C94220DD4C7A1f47b4213e285">0x66B55cBbBDd3a96C94220DD4C7A1f47b4213e285</a></td><td></td></tr><tr><td>WrappedCAT.sol (wBYC)</td><td><a href="https://basescan.org/address/0x16b13A47B0C535EFaE58675e0657d3C22471cdA8">0x16b13A47B0C535EFaE58675e0657d3C22471cdA8</a></td><td></td></tr><tr><td>WrappedCAT.sol (wMINUTES)</td><td><a href="https://basescan.org/address/0x75fE74892c15b9cfddbCD24C388d07a3c8c7D7c6">0x75fE74892c15b9cfddbCD24C388d07a3c8c7D7c6</a></td><td></td></tr><tr><td>WrappedCAT.sol (wWESO)</td><td><a href="https://basescan.org/address/0xb7Cf6834259fE7331924Bf96Ae88CFD6269bfEB0">0xb7Cf6834259fE7331924Bf96Ae88CFD6269bfEB0</a></td><td></td></tr><tr><td>WrappedCAT.sol (w$HORSE)</td><td><a href="https://basescan.org/address/0x827fc57Bc514578E8280cEE73f5e948D306aF074">0x827fc57Bc514578E8280cEE73f5e948D306aF074</a></td><td></td></tr></tbody></table>

### Chia Mainnet

<table><thead><tr><th width="233">Parameter</th><th>Value</th></tr></thead><tbody><tr><td>Portal Launcher Id</td><td>46e2bdbbcd1e372523ad4cd3c9cf4b372c389733c71bb23450f715ba5aa56d50</td></tr></tbody></table>


# warp.green

<figure><img src="/files/eH520hJd3Zcklv2AaDmT" alt=""><figcaption><p>Messaging Protocol Overview - Validators observe events on one blockchain and generate signatures after the message has enough block confirmations. Users can then fetch the signatures from a public message board (Nostr) and relay the message to the destination chain.</p></figcaption></figure>

warp.green is, at its core, a cross-chain messaging protocol - it allows sending messages from one chain to another. A message consists of:

* **Nonce**: A unique 32-byte value that identifies the message on its source chain. Note that two messages can have the same nonce but different source chains.
* **Source chain**: A 3-byte id of the chain where this message was generated (origin). The value can be used to identify a specific network (see table under 'Chain Ids'), much like an EVM chain ID or a Chia genesis challenge.
* **Source**: This is the chain-specific identifier of the user or contract that created the message. On Chia, this is a puzzlehash. On Ethereum, the source is an address equal to `msg.sender`.
* **Destination chain**: Similar to 'source chain' (3-byte, same possible values) except this parameter specifies the chain where the message is intended to be received.
* **Destination**: The puzzle hash or address that will receive the message (similar to 'source').
* **Contents**: A list of 32-byte values that contain the data that is going to be relayed.

<figure><img src="/files/PubyDP1MaEGGMiXqHQwy" alt=""><figcaption><p>Message Structure Visualization</p></figcaption></figure>

While the structure of a message is the same, the process to send and retrieve on is different based on the type of blockchain (EVM/coinset) the operation is performed on. The pages in this section explain each process.

### Chain Ids

The list below contains ids of networks that are currently supported by the protocol. Note that it may be extended if support for new networks is added.

<table><thead><tr><th width="246">Network</th><th>3-byte ID (Source/Destination)</th></tr></thead><tbody><tr><td>Chia (mainnet)</td><td>"xch" / 0x786368</td></tr><tr><td>Ethereum (mainnet)</td><td>"eth" / 0x657468</td></tr><tr><td>Base (mainnet)</td><td>"bse" / 0x627365</td></tr></tbody></table>

### Message Toll

Besides associated transaction fees, users and contracts that send messages also pay a 'message toll.' This small amount is responsible for preventing protocol abuse. It is not given to validators - instead, the toll is sent to the miner of the block in which the message was sent.


# EVM - Sending And Receiving Messages

On EVM-based chains (Ethereum/Base), messages are sent and received via a [Portal](https://github.com/warpdotgreen/cli/blob/master/contracts/Portal.sol) contract, which usually sits behind an upgradeable proxy.

### Sending Messages

Any contract (or user) that want to send a message can call the `sendMessage` function:

```
function sendMessage(
        bytes3 _destination_chain,
        bytes32 _destination,
        bytes32[] calldata _contents
    ) external payable 
```

A per-message toll of `0.00001 ETH` will need to be sent for each message. Note that the function identifies the sender as `msg.sender`.

<figure><img src="/files/MxTKJ97a0xHKPaU1y4jr" alt=""><figcaption><p>Schematic of sending a message from an EVM chain. A source (usually a contract) calls the portal's <code>sendMessage</code> function with the protocol-set message toll (denoted as $fee$ to highlight that the call also includes some value in ETH). A <code>MessageSent</code> is then generated, which the validators observe. After enough confirmations have passed, the validators generate signatures and post them on Nostr.</p></figcaption></figure>

### Receiving Messages

After the required signatures have been collected, anyone can call the following function:

```
function receiveMessage(
    bytes32 _nonce,
    bytes3 _source_chain,
    bytes32 _source,
    address _destination,
    bytes32[] calldata _contents,
    bytes memory _sigs
) external {
```

The `receiveMessage` function will call the destination contract and provide details about the message that has been relayed. It then proceeds to mark the nonce and source chain combination as 'used', thus preventing a message from being relayed twice.

<figure><img src="/files/3jZDUWdvl2V4FPbGUAId" alt=""><figcaption><p>Messages are relayed by users. Message data is first fetched from the source chain. After that, Nostr is queried (see 'Collecting Signatures') until enough validator signatures are obtained. The <code>receiveMessage</code> function is then called, which will call the destination contract. Note that warp.green is used as an oracle by the destination contract, which trusts the provided values (nonce, source chain id, source, contents) given that the Portal contract calls it.</p></figcaption></figure>


# Chia - Sending Messages

<figure><img src="/files/UtK4pAI1ol4ynSNSkL25" alt=""><figcaption><p>Overview of the process required to send a message. A coin with the sender puzzle hash outputs a special CREATE_COIN condition that contains details about the message. The resulting coin can be spent in the same transaction, and uses the message toll as a transaction fee.</p></figcaption></figure>

For Chia, sending messages is as simple as creating a coin. Specifically, the 'CREATE\_COIN' condition should contain the following arguments:

* `puzzle_hash`: see below
* `amount`: at least the current per-message toll (1000000000 mojos)
* `memos`: a list of values as defined below
  * `destination_chain`: 3-byte identifier of the chain the message will be relayed to
  * `destination`: identifier (i.e., address) of the contract that will receive the message
  * `contents`: all remaining memo values will be padded to 32 bytes and be used as contents

### Resulting Coin

The resulting coin's id will be used as a nonce, as Chia consensus enforces unique coin ids. The puzzle hash of the said coin should be `a09eb1ea8c6e83c0166801dabcf4a70d361cc7f6d89c4a46bcd400ac57719037`, which corresponds to the following puzzle:

```
(mod (
 my_amount 
)
  (include condition_codes.clib)

  (list
    (list ASSERT_MY_AMOUNT my_amount)
    (list RESERVE_FEE my_amount)
  )
)
```

The puzzle above is responsible for sending the message toll to the block farmer - i.e., use the coin's value as a transaction fee.


# Chia - Receiving Messages

<figure><img src="/files/fc1zUqpTGgef4jgXhuDE" alt=""><figcaption><p>Overview of receiving messages on Chia. Message data is assembled by observing the source chain. The user is responsible for collecting validator signatures from Nostr and assembling a spend involving the portal receiver coin, which creates a message coin. The message coin can then be spent along a destination coin.</p></figcaption></figure>

<figure><img src="/files/vt1AGXQRkUMpFHUNUD8N" alt=""><figcaption><p>Puzzle structure and overview for the portal receiver &#x26; message puzzles. The portal receiver can be spent by anyone to relay messages, given enough signatures. It also has a built-in alternative spend path that allows updates in case of a protocol update. Message coins have a fairly simple puzzle, which can be found below.</p></figcaption></figure>

A message should only be received once. Because of this, messages can only be received through a portal singleton, the source code of which can be found [here](https://github.com/warpdotgreen/cli/blob/master/puzzles/portal_receiver.clsp). The singleton takes the message data and associated validator signatures and creates a message coin with [this puzzle](https://github.com/warpdotgreen/cli/blob/master/puzzles/message_coin.clsp):

```
(mod (
    ; first curry (automated)
    PORTAL_RECEIVER_SINGLETON_STRUCT

    ; second curry
    (SOURCE_CHAIN . NONCE)
    SOURCE
    DESTINATION ; destination
    MESSAGE_HASH

    (receiver_parent_info . receiver_amount) ; receiver_proof
    parent_proof ; (parent_parent_info . parent_inner_puzzle_hash)
    my_coin_id
  )

  (include condition_codes.clib)
  (include curry.clib)
  (include sha256tree.clib)

  (defun main (
    PORTAL_RECEIVER_SINGLETON_STRUCT
    (parent_parent_info . parent_inner_puzzle_hash)
    my_coin_id
    receiver_coin_id
  )
    (list
      (list ASSERT_MY_COIN_ID my_coin_id)
      (list ASSERT_MY_PARENT_ID (sha256
        parent_parent_info
        (curry_hashes_inline (f PORTAL_RECEIVER_SINGLETON_STRUCT)
          (sha256tree PORTAL_RECEIVER_SINGLETON_STRUCT)
          parent_inner_puzzle_hash
        )
        1 ; parent amount
      ))
      (list CREATE_COIN_ANNOUNCEMENT receiver_coin_id) ; puzzle contains message info
      (list ASSERT_COIN_ANNOUNCEMENT (sha256 receiver_coin_id my_coin_id))
    ) 
  )

  (defun-inline value_b32_or_x (v)
    (if (= (strlen v) 32) v (x))
  )

  (main
    PORTAL_RECEIVER_SINGLETON_STRUCT
    parent_proof
    my_coin_id
    (sha256
      (value_b32_or_x receiver_parent_info)
      (value_b32_or_x DESTINATION)
      receiver_amount
    ) ; receiver_coin_id
  )
)
```

The message coin has an amount of 0 and locks in to a receiver coin via announcements. The message coin can optionally be spent in the same transaction that it was created so a user both relays a message and uses the intended receiver puzzle in the same transaction.


# Collecting Signatures

<figure><img src="/files/iG8biCt0xizUH3ZSnUY5" alt=""><figcaption><p>Overview of the overall infrastructure. The app is generally responsible for building, initiating, and submitting all transactions. Each validator has an associated Nostr account where they post signatures. At launch, each validator is also responsible for maintaining a private Nostr relay that the browser can connect to.</p></figcaption></figure>

<figure><img src="/files/NDyHtRD1Nj8lUnVi9b02" alt=""><figcaption><p>Validators generally send their text note event to all private relays. If the Nostr server of a validator goes down but the signer is still working, it will still be possible for a user to fetch the validator's signature.</p></figcaption></figure>

A signature is comprised of:

* Routing data: source chain id, destination chain id, and nonce. Binary data is concatenated, and the result is bech32m-encodeded with a prefix of 'r'
* Coin data (optional): singleton coin id for which the signature is valid, bech32m-encoded with a prefix of 'c'. Only used if destination chain is Chia ('xch').
* Signature data: signature, bech32m-encoded with a prefix of 's'

Each validator has an associated Nostr public key ('account') where signatures are posted as kind 1 events (short text note). The signature data is used as the content, while routing and coin data are put in tags with keys 'r' and 'c', respectively. To relay a message, apps should first connect to Nostr relays and fetch the required number of signatures.


# ERC-20 Bridge

Anyone can build on top of the warp.green protocol. At launch, we provided two simple example applications, one of which is called the ERC-20 bridge. As the name suggests, it allows wrapping and unwrapping ERC-20s on Chia by converting them to equivalent CATs. The contracts can be found [here](https://github.com/warpdotgreen/cli/tree/master/contracts).

<figure><img src="/files/yML1enHxMsBDaJdEtLey" alt=""><figcaption><p>The two apps presented in the docs, ERC-20 Bridge and CAT Bridge, are fully immutable apps. They use the warp.green cross-chain messaging protocol as an oracle, meaning that they trust the protocol to relay truthful data.</p></figcaption></figure>

<figure><img src="/files/lbXIhn1z83EMnWVW4WrP" alt=""><figcaption><p>ERC20Bridge.sol overview - While it trusts an oracle to be truthful, the contract itself is immutable once deployed and initialized. No account has any specific privileges - ERC-20 tokens are owned by the contract until unwrapped.</p></figcaption></figure>

### Message Contents

As previously mentioned, each message sent through the warp.green protocol has a contents field which consists of 32-byte values. In the case of `ERC20Bridge`, the contents array contains 3 elements:

* **ERC-20 Contract Address**: The contract address of the token being wrapped, which is essentially used as an identifier
* **Receiver**: The address that will receive either the wrapped ERC-20 CATs (when wrapping) or original ERC-20 tokens (when unwrapping). This value is either a puzzle hash (when wrapping) or an address (when unwrapping).
* **Amount in mojos**: Amount, in mojos, of wrapped CATs to be minted or that have been burned.

Note that all values are automatically padded with leading 0s to be 32-byte.


# Wrapping ERC-20s

Wrapping ERC-20 tokens involves calling a function on the `ERC20Bridge` contract to lock tokens & send a message, relaying the message to Chia, and interacting with a minter puzzle to create wrapped CATs.

<figure><img src="/files/wNocn7cXcppR2eOwoZbg" alt=""><figcaption><p>Description of wrapping steps &#x26; final Chia transaction</p></figcaption></figure>

### Initiate Wrapping

There are 3 functions that allow the user to initiate bridging:

* `bridgeToChia`: Initiates the bridging of an ERC-20 token given its contract address and amount. Requires the `ERC20Bridge` contract to have prior approval to spend tokens as it uses the `transferFrom` method on the target ERC-20 contract.
* `bridgeToChiaWithPermit` - Similar to `bridgeToChia`, except it uses `permit` to include token spend approval and bridging in the same transaction.
* `bridgeEtherToChia` - Wraps any value over the per-message toll to an ERC-20 (either WETH or MilliETH - see 'MilliETH') and initiates bridging.

Note that all of the above functions are also given a receiver puzzle hash as an argument. The specified puzzle hash will receive the wrapped CATs on Chia.

### Offer

At first sight, one might wonder why an offer is needed on the Chia side. The offer serves two purposes:

* Provide a transaction fee: When the mempool is full, transactions with no fees are rejected. Asking the user to create an offer gives them control over the fee that is paid (higher fee leads to lower confirmation time).
* Provide mojos: To mint wrapped CATs, a small amount of mojos needs to be used. Because the bridge layer is immutable and permissionless, the value has to come from the user.

### Eve CAT Coin

Wrapped ERC-20 CATs have a special TAIL that allows them to be minted and melted. Even though the eve CAT coin is technically a CAT, a wallet would need to specifically add support for the ERC-20 Bridge to spend it, as its parent is a non-CAT (meaning that the TAIL would need to be run). To overcome this, the mint spend bundle also spends this CAT coin to create a new coin that any wallet can spend (named 'CAT Payout Coin' in the image).

### Security Coin

Because the user's offer does not request any asset (the receiver puzzle hash is included in the message contents), the spend bundle would be, by default, insecure. The security coin is a standard coin created with a newly-generated and temporary BLS key that:

* Adds a signature requirement to the spend bundle, so the offer cannot be 'extracted' by a malicious farmer to pocket the offered XCH amount and fee without unwrapping the CAT. In the spend above, the portal also has this effect (requires signatures of validators), but, in spends described on other pages, there would normally be no other coin doing this.
* Make necessary assertions so that the spend bundle cannot be 'split' by a malicious farmer. In this case, the security coin could, for example, assert that the CAT Eve Coin was spent to confirm that, if the offer is used, the user will receive their wrapped ERC-20 CATs to the puzzle hash they specified when they initiated the bridging on Ethereum/Base.


# Unwrapping ERC-20s

<figure><img src="/files/kRIIzzgYwIA1VwK8STv8" alt=""><figcaption><p>Overview of steps needed to unwrap ERC-20s &#x26; Chia-side initial transaction model</p></figcaption></figure>

Unwrapping ERC-20s is initiated by burning wrapped ERC-20 CATs on Chia by building and submitting a spend bundle as depicted above. This operation generates a message coming from a trusted 'CAT Burner' puzzle, which can then be relayed to the destination chain. After the user calls the portal's `receiveMessage` function, the message will be relayed to the `ERC20Bridge` contract (message destination), which will send the equivalent amount of ERC-20 tokens (minus the bridging tip) to the destination address that was specified when bridging was initiated on Chia.


# MilliETH

On Ethereum and other EVM chains, applications that do not want to add support for the native currency of the chain (e.g., ether) can still support it by using `WETH`, a simple ERC-20 token that is issued 1:1 when ether is deposited into its contract. It also allows unwrapping - users burn `WETH` and receive ether back at the same ratio, 1:1.

A similar solution can be also used to allow wrapping ether on Chia. However, a limitation in the current CAT standard makes WETH a less than optimal choice. Mainly, CATs are each made up of 1000 mojos, meaning that a CAT's smallest denomination is 0.001. Assuming a $3000 per ether price, that would mean $3, which would make trading difficult. Taking into account the possibility of future price increase, our team decided that this might become a significant problem.

[MilliETH](https://github.com/warpdotgreen/cli/blob/master/contracts/MilliETH.sol) is the solution we've come up with. It functions the same way as WETH, except it mints 1000 milliETH for every 1 ether that is deposited. Similarly, the contract gives back 1 ether for every 1000 milliETH that is burned. The contract is immutable, and can be used by any DeFi application that needs it.

Because some L2s use other native currencies, using milliETH is an 'option' that can be set at bridge deployment. Namely, the `_iweth` and `_wethToEthRatio` arguments can either be set to make the bridge use milliETH or any version of WETH.


# CAT Bridge

Anyone can build on top of the warp.green cross-chain messaging protocol. At launch, we provided two simple example applications, one of which is called the CAT Bridge. This app allows XCH (native currency of the Chia blockchain) and CATs (tokens on the Chia blockchain following the official token standard) to be wrapped into ERC-20 tokens on EVM chains (Ethereum/Base) . The WrappedCAT contract can be found [here](https://github.com/warpdotgreen/cli/blob/master/contracts/WrappedCAT.sol), and puzzles can be found [here](https://github.com/warpdotgreen/cli/tree/master/puzzles/wrapped_cats).

Instead of a contract or singleton owning funds, CATs that have been wrapped are locked in a special puzzle to form a vault coin. The vault coin can only be spent by an unlocker puzzle, which only runs when the equivalent ERC-20 token is burned.


# Wrapping CATs

<figure><img src="/files/2KGR1NGTnf6550bQFCNH" alt=""><figcaption><p>Overview of the Chia-side transaction that initiates CAT wrapping, along with steps.</p></figcaption></figure>

To wrap CATs, they first need to be locked into vault coins. The 'CAT Locker' puzzle asserts the creation of a new vault coin and then creates a message to the WrappedCAT contract. The creation of the coin is done by asserting an announcement from the settlement payments puzzle, which also powers Chia offers.

On the EVM side, the user has to simply relay the message by calling the `receiveMessage` function on the `Portal` contract, which will transmit message contents and other information to the `WrappedCAT` contract. The ERC-20 tokens representing the CAT will then be minted to the address specified when bridging was initiated on Chia.

Note that a WrappedCAT contract needs to be deployed and properly initialized on the destination chain before a CAT can be bridged.


# Unwrapping CATs

<figure><img src="/files/vgxYuCLWwt5CVrL4tW8G" alt=""><figcaption><p>CAT unwrapping transaction model &#x26; process steps</p></figcaption></figure>

To unwrap a CAT, a user first needs to call the `bridgeBack` method on the WrappedCAT ERC-20 contract, specifying a receiver and the desired amount to bridge back. The transaction will generate a message which can be relayed to Chia via the warp.green protocol.

On Chia, the unlocker puzzle is used to return CATs to the users. The coin accepts a list of vault coins, which can then be spent. The last vault in the list will create a CAT with an inner puzzle hash equal to the one specified when unwrapping was initiated on Ethereum, effectively 'sending' the CAT amount to the intended receiver. If the total value of the vault coins being spent is higher than the payout value, a new vault coin is created to contain the change.

Notably, vault coins are locked with a puzzle called `p2_controller_puzzle_hash`, which allows the coin to be controlled by another coin with a different puzzle hash (the unlocker puzzle hash, in this case).


# Wallets

As a validator, all of your hot key signatures will be generated automatically by the validator software. But there are some cases when you need to use your cold keys - attestations, rekeys, withdrawals, upgrades, and so on. This guide will give you a brief overview of the two wallets we'll be working with.

### Ozone

Ozone is the wallet of choice to sign messages using Tangem cards. A usual flow consists of:

* **Generating data to sign** via the validator software CLI. After this step, you should have a QR code encoding a JSON containing your validator index, the message to be signed, your public key, as well as the signing mode (`"bridge": true`)
* **Signing the data** by logging into your Tangem account in Ozone, tapping the 'Settings' icon on the top right corner, selecting 'Sign Message', pressing the top-right QR icon, and scanning the QR code. After pressing 'Sign', you will tap your Tangem cards against the device to generate the actual signature.
* **Sending the data** for a validator (usually 0) to collect all signatures and aggregate them into a spend bundle that is then sent to the network.

### Safe{Wallet}

Formerly known as Gnosis Safe, this is the go-to multisig solution for Ethereum. See [their website](https://safe.global/) for a better presentation. Overall, the interface at [app.safe.global](https://app.safe.global/) is pretty intuitive - but don't be afraid to ask for help! Feel free to find what works for you - for example, Safe also offers a mobile app.

As soon as Safes have been created by validator 0 during deployment, you should be able to see them by connecting your Ethereum hardware wallet to the website - make sure your address is the same as the cold key address you announced.

{% hint style="info" %}
It's recommended that the first thing you do once you log into a Safe for the first time is go to 'Settings' and enable notifications.
{% endhint %}

The main tab that you'll be dealing with is 'Transactions.' The queue shows all pending transactions - actions that have been built by one of the validators but have not yet been executed on-chain. If the number of signatures is below the needed threshold, you can sign it using your cold wallet.

{% hint style="info" %}
Always know what you're signing. The validator generating the transaction will usually send a message explaining what the transaction does - you're encouraged to expand the transaction on Safe and verify that it's indeed correct, which might sometimes involve using the CLI.
{% endhint %}

{% hint style="info" %}
A malicious transaction can theoretically make its way in the queue. Any action signed by at least one validator will show up - it's vital that you check transactions and point out when something looks strange.
{% endhint %}

{% hint style="info" %}
If you're the last signer, you'll have the option to execute the transaction. You can always select 'No' and just send your signature - that way, any other validator (even those that have already signed) will be able to execute the transaction - i.e., send it on-chain by paying the required transaction fees.
{% endhint %}


# Deployment

## Prerequisites

Before beginning this process, you should have:

* Synced Chia full node
* Synced Ethereum full node
* A Coinbase Cloud account and access to your base RPC URL (details in step 1)
* A Nostr relay (empty public key whitelist)
* Access to the machine you intend to run the validator software on
* Two hardware wallets, one for Ethereum (e.g., Trezor) and one for Chia (Tangem)
* The Ozone wallet app installed on your phone

{% hint style="info" %}
Note: For testnet deployment, you don't need the Chia/Ethereum full nodes to get everything set up (see details in step 1). However, you should still sync nodes to test the setup is working as a whole.
{% endhint %}

## Step 0: Generate Keys

First, install the validator software from [here](https://github.com/warpdotgreen/cli) by following the [instructions](https://github.com/warpdotgreen/cli?tab=readme-ov-file#install). You'll then need generate your two (Chia/EVM) hot keys and a Nostr private key by running:

```bash
python3 cli.py keys generate-xch-key
python3 cli.py keys generate-eth-key
python3 cli.py keys generate-nostr-key
```

{% hint style="info" %}
Even if you're deploying on testnet, take the scenario seriously and handle keys properly.
{% endhint %}

{% hint style="info" %}
When running the commands, you'll see `Warning: Failed to load config.json` - ignore the warning for now, as we'll set up the config in later steps.
{% endhint %}

It is up to you if you want to back up mnemonics - a majority of validators can always rekey the portal. In the next step, you're going to use:

* Chia/Ethereum private keys (hex format)
* Nostr mnemonic

Before proceeding, please send a message that follows the template below on the deployment channel:

```
Validator #{validator_index}

Nostr relay: wss://{your-relay-domain}
Nostr public key: {your-newly-generated-nostr-pubkey-hex}

Ethereum hot address: {your-newly-generated-eth-address}
Ethereum cold address: {your-eth-hardware-wallet-address}

Chia hot key: {your-newly-generated-xch-pubkey-hex}
Chia cold key: {your-tangem-pubkey}

Attestation: {validator_index}-{your-signature}
```

{% hint style="info" %}
To get your Tangem public key, you'll need to use Ozone. Connect your Tangem card to the app. Once you're on the main screen (which displays your wallet balance), press on 'Settings' in the top right corner. Select 'Sign Messages' and put any message in the message field. Once you sign it, your card's key will be found in the response JSON ("pubkey").
{% endhint %}

{% hint style="info" %}
Please see '[Attestations](/validators/attestations)' to see how to generate an attestation for your cold XCH key. Note that the config is not yet set, so you'll need to use the optional `--pubkey` switch.
{% endhint %}

{% hint style="info" %}
A validator's index can always be used to get their details from lists. For example, in the `multisig_keys` list we'll set below, `multisig_keys[index]` will contain the multisig (cold) key of the validator for a given index. Note that these are 'code' lists - i.e., numbering starts at 0. Please do NOT make everything confusing by identifying yourself with a negative index.
{% endhint %}

Once you send the message, you may proceed to the next step and save the private keys in the config file.

## Step 1: Set up config.json

In the root of the 'cli' local copy, create a file called 'config.json' and paste the following template:

```json
{
  "xch": {
    "chia_root_or_chia_url": "",
    "agg_sig_data": "",
    "my_hot_private_key": "",
    "portal_threshold": 0,
    "portal_keys": [],
    "multisig_threshold": 0,
    "multisig_keys": [],
    "per_message_toll": 1000000000,
    "portal_launcher_id": "",
    "min_height": 0,
    "sign_min_height": 0
  },
  "eth": {
    "rpc_url": "",
    "my_hot_private_key": "",
    "hot_addresses": [],
    "portal_threshold": 0,
    "deployer_safe_address": "",
    "create_call_address": "0x7cbB62EaA69F79e6873cD1ecB2392971036cFAa4",
    "portal_address": "",
    "erc20_bridge_address": "",
    "wei_per_message_toll": 10000000000000,
    "min_height": 0,
    "sign_min_height": 0
  },
  "bse": {
    "rpc_url": "",
    "my_hot_private_key": "",
    "hot_addresses": [],
    "portal_threshold": 0,
    "l1_block_contract_address": "0x4200000000000000000000000000000000000015",
    "deployer_safe_address": "",
    "create_call_address": "0x9b35Af71d77eaf8d7e40252370304687390A1A52",
    "portal_address": "",
    "erc20_bridge_address": "",
    "wei_per_message_toll": 10000000000000,
    "min_height": 0,
    "sign_min_height": 0
  },
  "nostr": {
    "my_mnemonic": "",
    "relays": []
  }
}
```

From the previous step, you should fill:

* `xch.my_hot_private_key` with your hot XCH key
* `eth.my_hot_private_key` and `bse.my_hot_private_key` with your hot Ethereum key
* `nostr.my_mnemonic` with your Nostr mnemonic

After all validators have submitted their details, validator 0 will send a message containing values for:

* `xch.portal_keys` and `xch.multisig_keys`
* `eth.hot_addresses` = `bse.hot_addresses`
* `nostr.relays`

The message will also contain a list of public keys to add to your Nostr server whitelist. At this point, you may can set:

* `xch.chia_root_or_chia_url`
  * If you're running a node locally, replace this key with `xch.chia_root` and set it to the location of the 'mainnet' folder (e.g., `/home/yakuhito/.chia-testnet11/mainnet`)
  * If you are on testnet and your node is still syncing, replace the key with `xch.chia_url` and set it to `https://testnet.fireacademy.io`. Please make sure to switch it with the option above (`xch.chia_root`) once you're synced!
* `xch.agg_sig_data`: This is a constant that is specific to the network you're running.
  * Testnet: `37a90eb5185a9c4439a91ddc98bbadce7b4feba060d50116a067de66bf236615` ([source](https://github.com/Chia-Network/chia-blockchain/blob/main/chia/util/initial-config.yaml#L90))
  * Mainnet: `ccd5bb71183532bff220ba46c268991a3ff07eb358e8255a65c30a2dce0e5fbb` ([source](https://github.com/Chia-Network/chia-blockchain/blob/main/chia/util/initial-config.yaml#L18))
* `xch.portal_threshold` , `xch.multisig_threshold`, `eth.portal_threshold` , `bse.portal_threshold`: Set to 3 for testnet, 7 for mainnet
* `xch.sign_min_height`: The minimum number of confirmations a message needs to have on Chia for it to be signed. Used to prevent attacks exploiting re-orgs - set this value to 5 for testnet and 32 for mainnet ([source](https://docs.chia.net/consensus-analysis/)).
* `eth.rpc_url`: Point this to your Ethereum RPC URL.
  * If you're on testnet and waiting for your node to sync, you can set the value to an Alchemy/Infura/etc. RPC URL. However, please make sure to make it point to your node later, as you should test your whole infrastructure.
* `eth.sign_min_height` and `bse.sign_min_height`: The minimum number of confirmations a message needs to have on L1 for it to be signed. Please see [this post](https://jumpcrypto.com/writing/bridging-and-finality-op-and-arb/) about finality. For mainnet, set this value to 64 (2 epochs). For testnet, set the value to 10 (\~2 minutes) for Base and 64 for Ethereum (Sepolia).
* `bse.rpc_url`: You can create a Coinbase Cloud account [here](https://portal.cloud.coinbase.com/). You'll be allowed to create a node for free (i.e., get an API key).
  * For mainnet, the value should look like this: `https://api.developer.coinbase.com/rpc/v1/base/[api-key]`
  * For testnet, please ensure that you select 'Base Sepolia' (i.e., testnet) before copying the URL. It's somewhere on the page, and the default is mainnet even if you 'created' a testnet node. The value should look like this: `https://api.developer.coinbase.com/rpc/v1/base-sepolia/[api-key]`

{% hint style="info" %}
Don't forget to update your Nostr server's pubkey whitelist - Validator 0 will share the list after all validators have submitted their attestations.
{% endhint %}

## Step 2: Deploy contracts

Validator 0 will deploy the portal singleton on XCH and a multisig on each EVM network (Ethereum and Base). Once addresses are shared, fill in the following config values:

* `xch.portal_launcher_id` - Launcher id of portal singleton (will be sent in a message)
* `xch.min_height` - First block when messages can be sent. Will also be included in the message.
* `eth.deployer_safe_address` and `bse.deployer_safe_address`: This is the cold key multisig. Get the addresses from the message and access them using the Safe{Wallet} app. Check that the threshold and addresses are set appropriately (same values as config).

In the Safe app, a deployment transaction will also be created shortly after. After updating the config, you can verify the transactions using:

```
python3 cli.py deployment get-evm-deployment-data --weth-address meth --tip 30 --chain [chain-id]
```

{% hint style="info" %}
Slightly different versions of the solidity compiler might generate different addresses. Check the addresses from the output against what you got from Validator 0 - on mainnet, a specific docker image will be used, which you will be able to use yourself to get the same address.
{% endhint %}

Where `[chain-id]` is either 'eth' or 'bse.' For each EVM network, you can go on to fill the following config values:

* `portal_address`: The address of the portal. In the deploy command output, you can find it under `Tx 2: deploy TransparentUpgradeableProxy` as `Predicted address`.
* `erc20_bridge_address`: The address of the `ERC20Bridge` contract. It's the `Predicted address` under `Tx 3: deploy ERC20Bridge`.

{% hint style="info" %}
To allow the Portal contract to be updated, it'll be deployed behind a standard proxy called "TransparentUpgradeableProxy." The address of the 'Portal' contract is the 'logic address' (it implements the current logic of the portal, which means the address can change). However, when specifying the portal address, always refer to the address of the proxy contract, as that is the contract that runs the logic (e.g., sends and receives messages).
{% endhint %}

Once the transaction has enough confirmations, it will be executed by validator 0. You'll then be able to fill in the last two config values, `eth.min_height` and `bse.min_height`. Their value should be the block that the contract deployment transaction was confirmed at.

## Step 3: Run validator

You're now ready to run the validator software! Start it using:

```
python3 cli.py listen
```


# Attestations

Attestations are a way to prove that you still have access to your cold XCH key. Each week (and during deployment), validator 0 will generate a random challenge via:

```
python3 cli.py rekey create-challenge
```

{% hint style="info" %}
The attestations are part of the 'rekey' module - you'll follow a similar process to [rekey](/validators/rekeying) or update the portal.
{% endhint %}

Example challenge:

```
e5c6ef33e66149c6e0d694ebe3f2325ea5ac2a84e66635ce0a4355ce912443ca
```

The challenge will be sent to you via a message. Once you have it, run:

```
python3 cli.py rekey sign-challenge --challenge [challenge] --validator-index [index]
```

{% hint style="info" %}
You can run all the attestation commands on a machine that does NOT have your hot keys in the config. Simply clone the 'cli' repository on your computer and copy config.json (with hot keys removed).
{% endhint %}

{% hint style="info" %}
By default, your public cold key is taken from the config. If you're just setting things up, specify your public key using the optional `--pubkey [tangem-public-key]` switch.
{% endhint %}

Remember to replace `[challenge]` with the given challenge and `[index]` with your assigned validator index. The command will generate a QR code and save it to 'qr.png.'

Example command output:

```
$ python3 cli.py rekey sign-challenge --challenge e5c6ef33e66149c6e0d694ebe3f2325ea5ac2a84e66635ce0a4355ce912443ca --validator-index 2
Message: b'Validator #2 attests having access to their cold private XCH key by signing this message with the following challenge: e5c6ef33e66149c6e0d694ebe3f2325ea5ac2a84e66635ce0a4355ce912443ca'
Message hash: e9a9144b1d4455448cf317b4d5da231c0e0893355c323e438ac1e3234f7fc7e9
Message to sign: e9a9144b1d4455448cf317b4d5da231c0e0893355c323e438ac1e3234f7fc7e9
Your validator index: 2
Validator public key: 8a5c3c9d08d667775d0045335b8c90941763cd00a8cd6ed867c03db243da9b4c227a7012859b9355376df297bd5d8811
Validator puzzle hash: 0830d088496e4d541012794d1ee6efcec4fdbe15fc7a4e2315a3ff4a9f939d0f
Validator address: xch1pqcdpzzfdex4gyqj09x3aeh0emz0m0s4l3ayugc450l548unn58s98cm7f
QR code data: {"validator_index": 2, "address": "xch1pqcdpzzfdex4gyqj09x3aeh0emz0m0s4l3ayugc450l548unn58s98cm7f", "message": "0xe9a9144b1d4455448cf317b4d5da231c0e0893355c323e438ac1e3234f7fc7e9", "bridge": true}
QR code saved to qr.png
```

To sign the challenge, open the Ozone Wallet app on your phone and sign in to the account associated with your validator Tangem card. Press the settings icon in the top right of the screen, and select 'Sign Messages.'

On the new screen, you'll have a QR icon in the top right corner - press on it, and scan the contents of the previously-generated QR code. The message field should be auto-filled with the `Message hash` outputted by the previous `cli.py` command.

{% hint style="info" %}
If you can't view 'qr.png', simply copy the JSON string after 'QR code data' and put it into any QR code generator (such as [this one](https://www.qr-code-generator.com/)). Scan the resulting QR code with Ozone. **DO NOT** simply copy the hash/JSON - the `"bridge": true` part of the JSON tells Ozone to use a special signing method.
{% endhint %}

After following the on-screen instructions (tap Tangem card, enter PIN, etc.), you'll see a box saying 'Signature' that contains JSON. Your attestation is a string in the following format: `{validator_index}-{signature}`. Take both values from the JSON and send them for verification.

Example attestation:

```
2-8bec3988424a2939facc24d83baf571e4dd4a91f7267ed4f61e3d85de9970e02c075e21f43ed98bb529b17f86d43e42f01d6767fa8439576a9708
45de508a41374a3774f8f357d5f90b539a3cf98334d89f9b11dd546244f6f15e1725128ba7e
```

Anyone can verify the given attestation using:

```
python3 cli.py rekey verify-challenge --challenge [challenge] --sig [attestation]
```

{% hint style="info" %}
If your config has not been set up yet, this command also supports the `--pubkey [tangem-public-key]` switch.
{% endhint %}

Example command output:

```
python3 cli.py rekey verify-challenge --challenge e5c6ef33e66149c6e0d694ebe3f2325ea5ac2a84e66635ce0a4355ce912443ca --sig 2-8bec3988424a2939facc24d83baf571e4dd4a91f7267ed4f61e3d85de9970e02c075e21f43ed98bb529b17f86d43e42f01d6767fa8439576a9708
45de508a41374a3774f8f357d5f90b539a3cf98334d89f9b11dd546244f6f15e1725128ba7e
Message: b'Validator #2 attests having access to their cold private XCH key by signing this message with the following challenge: e5c6ef33e66149c6e0d694ebe3f2325ea5ac2a84e66635ce0a4355ce912443ca'
Message hash: e9a9144b1d4455448cf317b4d5da231c0e0893355c323e438ac1e3234f7fc7e9
Signature is valid!
```

Once validator 0 verifies an attestation, he will reach with a 'check' emoji to the message containing it. Any validator is welcome to verify any attestations and react the same way.


# Rekeying

Rekeying is the process of changing hot or cold keys, as well as signature thresholds. It is expected to be used when one of the validators loses access to their key(s) or suspects that they were compromised.

For EVM chains, Safe{Wallet} makes any possible re-key operation simple through their interface. Validator 0 will generate a normal multisig transaction, which the other validators will verify and sign.

For Chia, the portal singleton comes with a built-in update mechanism. After validators have been notified that a rekey is needed, they will each run the following command:

```
python3 cli.py rekey sign-tx --new-message-keys [new-message-keys] --new-message-threshold [new-message-threshold] --new-update-keys [new-update-keys] --new-update-threshold [new-update-threshold] --validator-index [validator-index]
```

{% hint style="info" %}
Message keys refer to hot keys, while update keys refer to cold keys. It's recommended that you take these from your current `config.json` file and then modify where needed. Current message and update keys are taken from the config - so make sure to keep it up to date and only update the information **after** someone (usually validator 0) has submitted and confirmed the rekey transaction.
{% endhint %}

{% hint style="info" %}
Message and update keys should be given as a single string separated by commas (no spaces). Example: `val1,val2,val3`
{% endhint %}

A list of the options and their respective descriptions can be viewed via:

```
python3 cli.py rekey sign-tx --help
```

The process to generate the signature is identical to the one used during [attestations](/validators/attestations) (generate QR code, scan with Ozone wallet, get signature). The `{validator-index}-{signature}` string should be sent to validator 0.

{% hint style="info" %}
Your signature authorizes the transition from the keys/threshold in the current config to the newly-specified values. It can be used to update *any* portal coin with the settings in your config to the new settings. This means that messages can be relayed while the signatures are gathered, leading to minimal service disruption.
{% endhint %}

Once enough signatures have been gathered, validator 0 will assemble a spend bundle that upgrades the portal via:

```
python3 cli.py rekey broadcast-spend --help
```

After the transaction is confirmed, validators should update the affected `config.json` files. The frontend code configuration will also need to be updated.

### Verifying

Use the `verify-tx-sig` command of the `rekey` module to verify anyone's rekey signature.

```
python3 cli.py rekey verify-tx-sig --help
```


